How do you find fish on a fish finder?
Learn how to use a fish finder to locate fish effectively. Master settings, read sonar signals, and boost your catch with our expert guide.
Fish finders have revolutionized angling, transforming how anglers locate fish in both freshwater and saltwater environments. These devices use sonar technology to provide detailed underwater images, revealing fish, structures, and bottom contours. Modern fish finders offer advanced features like 3D imaging, side-scanning, and real-time views, enabling anglers to pinpoint fish with precision. However, mastering a fish finder requires understanding its operation, settings, and interpretation. This guide provides a detailed roadmap to using a fish finder effectively, helping you catch more fish.
Understanding Fish Finder Basics
A fish finder, or sonar, sends sound waves into the water, which reflect off objects like fish, structures, or the bottom and return to the transducer. The device processes these echoes to display underwater information on a screen. Basic components include:
- Transducer: Emits and receives sonar waves.
- Display Unit: Shows sonar data, often as arches, dots, or detailed images.
- Power Supply: Ensures consistent performance.
- Mounting System: Secures the unit on your boat or kayak.
Fish finders vary in complexity, from entry-level models like the Garmin Striker 4 to advanced multifunction displays (MFDs) like the Lowrance HDS Live series. Understanding your unit’s capabilities is the first step to success.
Step-by-Step Guide to Using a Fish Finder
To maximize your fish finder’s potential, follow these five key steps:
- Power Up the Unit
- Learn the User Interface
- Optimize Settings
- Interpret Sonar Returns
- Target and Catch Fish
1. Power Up the Unit
Powering on a fish finder is straightforward—press the “on” button. For boats with MFDs integrating fish finders, chartplotters, or radar, select the fish finder function from the menu. Ensure a reliable power supply to avoid performance issues:
- Use heavy-gauge tinned copper wire to minimize voltage drop.
- Fuse the unit close to the battery.
- Check the battery’s reserve capacity to support continuous operation.
Poor power supply can cause screen lag or unit lockup, degrading sonar performance. Online amperage drop calculators can help determine the correct wire gauge based on the unit’s power draw and wire length.
2. Learn the User Interface
Each fish finder has a unique user interface, typically resembling a smartphone’s touchscreen or tactile buttons. Modern units, like the Humminbird Helix series, often feature intuitive touchscreens, while others, like the Lowrance Elite FS, combine touch and buttons for reliability in rough conditions.
- Touchscreen Units: Easy to navigate but can be challenging on small, moving boats due to instability or wet, slimy fingers from bait handling.
- Button-Based Units: More reliable in rough waters or when hands are dirty, ideal for small boats or kayaks.
To master the interface:
- Start with the manual or online tutorials for basic functions like zooming, adjusting range, or changing screen brightness.
- Spend time on the water experimenting. Simple units may take minutes to learn, while complex MFDs might require a season to fully master.
- Practice tasks like switching between sonar modes or marking waypoints to build confidence.
3. Optimize Settings
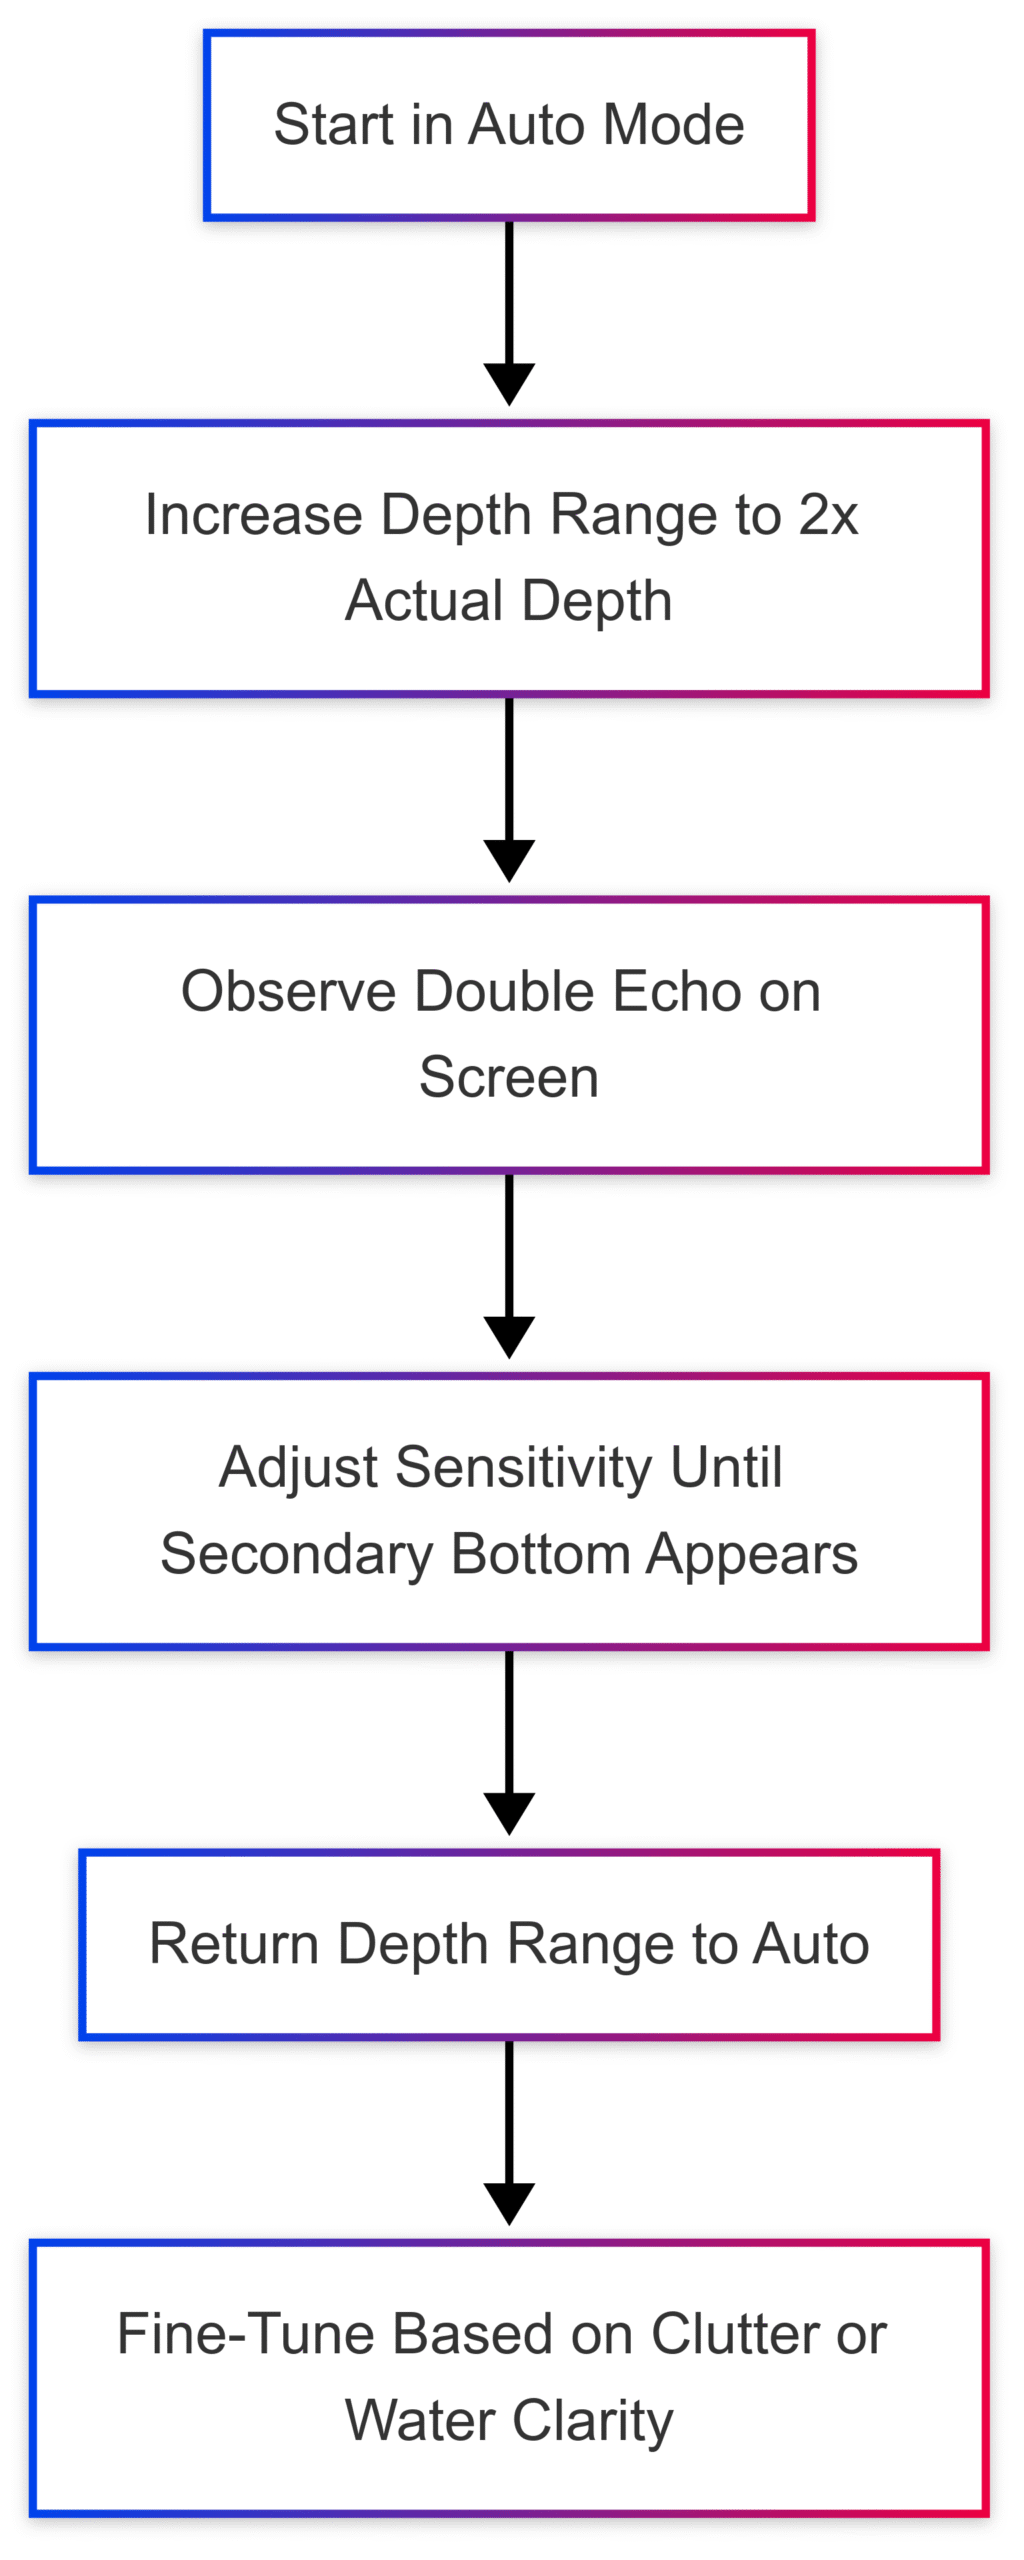
Start with the fish finder in auto mode, which provides a reliable baseline for beginners. As you gain experience, adjust settings to suit specific conditions:
- Sensitivity: Controls the strength of sonar returns. Higher sensitivity reveals more fish but increases clutter (false signals). Lower it in murky water to reduce noise.
- Range: Auto-range works well for down-looking sonar, but manually adjust to focus on the water column or deep structures. For side imaging, balance range and detail—50 feet offers clarity, while 100 feet covers more area but reduces resolution.
- Zoom: Magnifies specific depths or bottom areas, making fish appear larger on-screen. Useful for isolating targets.
- Color Palette: Adjust for visibility in different lighting. Bright palettes (e.g., red for strong returns) suit daylight; dimmer ones prevent glare at night.
- Sonar Frequency:
- Low Frequency (50/83 kHz): Wider cone, ideal for deep water or locating fish schools.
- High Frequency (200 kHz): Narrower cone, better for shallow water and detailed imaging.
- CHIRP Sonar: Uses multiple frequencies (e.g., 50-200 kHz) for enhanced detail and target separation.
- Sonar Mode: Choose between traditional 2D sonar, down imaging, side imaging, or live sonar based on depth and speed:
- 2D Sonar: Best for high-speed scouting (0-30 mph), covering large areas.
- Down Imaging: Detailed views at slow speeds (1-4 mph), ideal for identifying structures.
- Side Imaging: Scans up to 600 feet side-to-side, perfect for locating fish or structures.
- Live Sonar: Real-time imaging (under 7 mph) shows fish reacting to lures.
- 360 Imaging: Comprehensive views at slow speeds (under 1 mph), great for pinpointing structures.
Example Sensitivity Adjustment:
4. Interpret Sonar Returns
Reading the fish finder screen is critical for identifying fish, structures, and bottom conditions. Avoid fish ID modes, as they can mislabel non-fish objects. Instead, focus on raw sonar data:
- Fish Signatures:
- Arches: Indicate fish moving through the sonar cone. Full arches suggest fish passing directly under the boat; half arches indicate partial passage.
- Dots: Common in down imaging, representing fish or bait schools.
- Tails: Thin marks at arch ends, indicating large fish detected on the cone’s edge.
- Color: Strong returns (e.g., red) indicate large fish or solid objects; weaker returns (e.g., blue) suggest smaller fish or clutter.
- Shape:
- Arches: Individual fish.
- Round marks: Bait balls.
- Vertical lines: Structures like trees or wrecks.
- Size: Larger returns indicate bigger fish, but zoom and range settings affect apparent size.
- Location: Use fish behavior knowledge to interpret returns. For example, crappie often school near deep structures in summer, while bluefish may appear higher in the water column.
Bottom Structure:
- Hard Bottom: Thick, bright lines (e.g., yellow or red) indicate rock or gravel.
- Soft Bottom: Thin, faint lines (e.g., blue) suggest mud or clay.
- Structures: Drop-offs, weeds, or sunken logs appear as irregular shapes or shadows.
Depth and Temperature: Displayed in the top corner, these help identify fish species based on their preferred habitats.
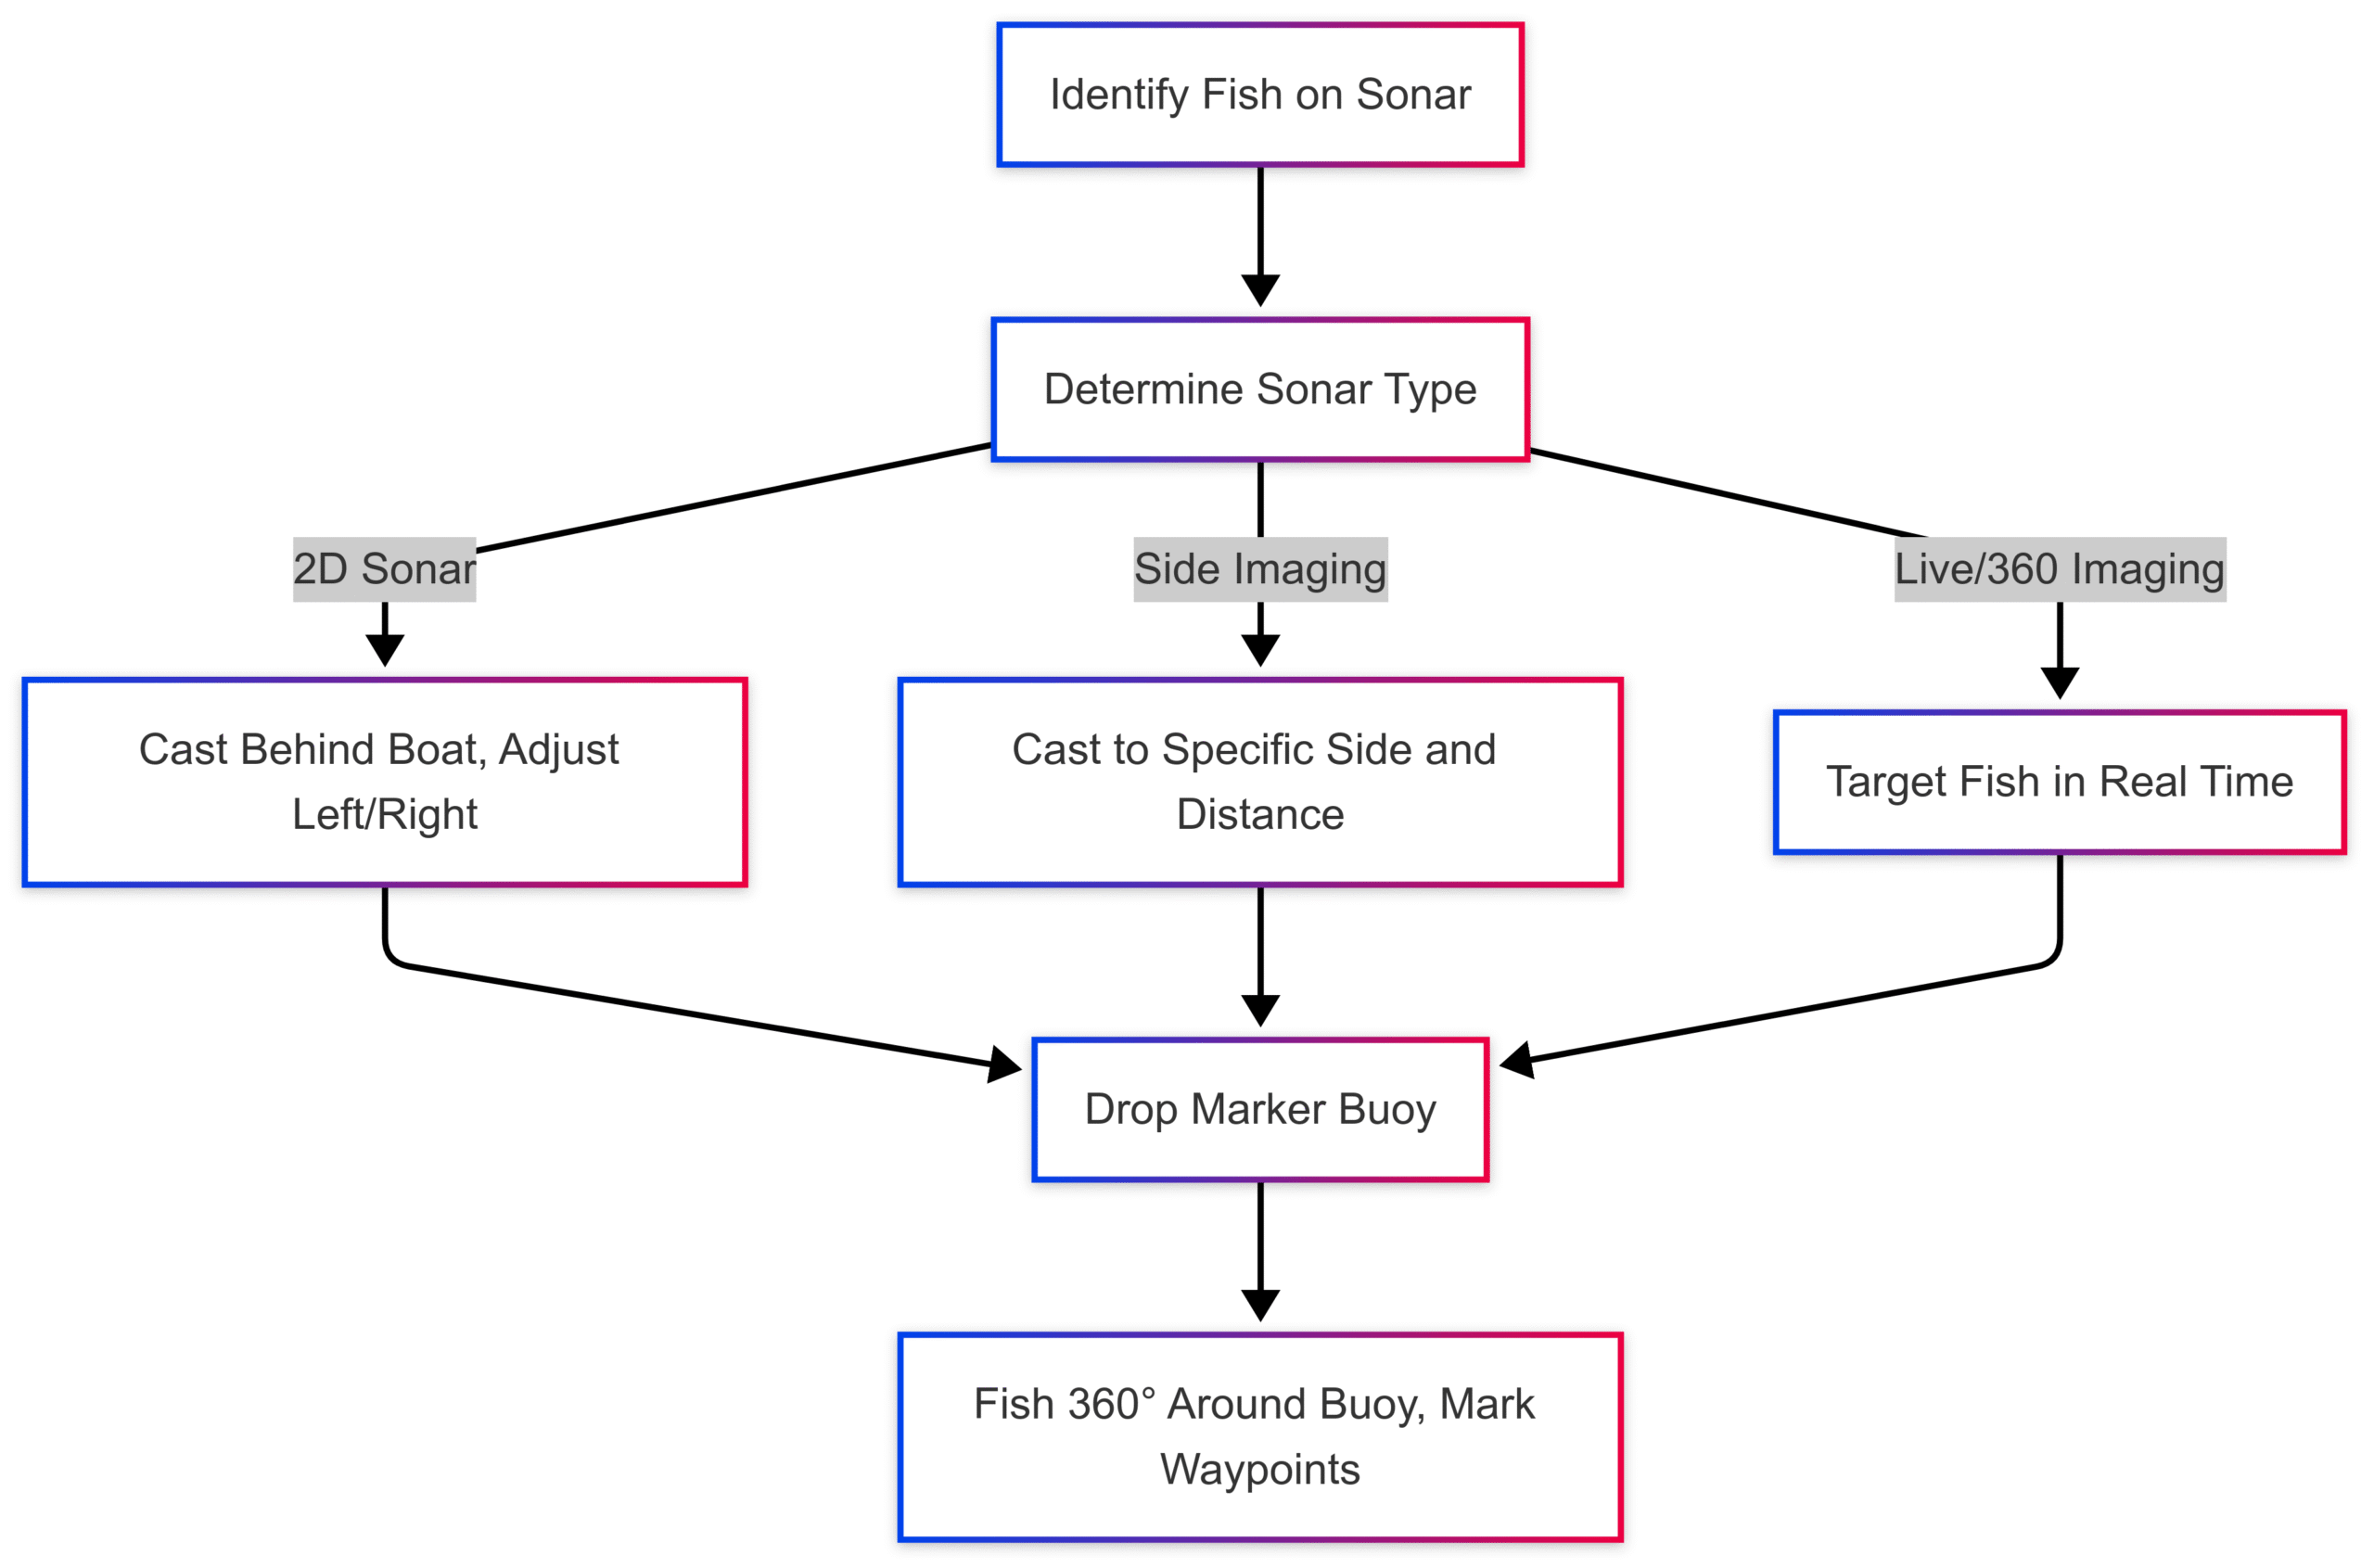
5. Target and Catch Fish
Once you identify fish or structures, use the fish finder to guide your casts:
- Traditional 2D Sonar: Fish are within the sonar cone, typically behind the boat. Cast slightly left or right of the transom to start, then adjust based on bites.
- Side Imaging: Shows fish location (left or right) and distance from the boat. Cast toward the marked side, using range settings to estimate distance.
- Live Sonar/360 Imaging: Provides real-time fish movement, allowing precise lure placement. For example, Garmin Panoptix shows fish approaching your bait.
- Marker Buoys: Drop buoys to mark fish or structure locations, then fish 360° around them to locate the exact spot.
- Waypoints: Use GPS-enabled units to mark productive spots. Assign symbols (e.g., fish for catches, rocks for structures) for easy reference.
Example Casting Strategy:
Advanced Fish Finder Technologies
Modern fish finders offer advanced features to enhance fish detection:
- CHIRP Sonar: Combines multiple frequencies for clearer images and better target separation. Example: Lowrance HDS Live (50-200 kHz).
- Down Imaging: Provides high-detail images of structures and fish directly below the boat. Example: Humminbird Helix 7 DI.
- Side Imaging: Scans wide areas to locate fish and structures. Example: Lowrance StructureScan (up to 600 feet per side).
- Live Sonar: Real-time imaging, ideal for watching fish react to lures. Example: Garmin LiveScope.
- 360 Imaging: Full-circle views for precise targeting. Example: Humminbird 360 Imaging.
- 3D Sonar: Builds detailed 3D models of the underwater environment. Example: Raymarine RealVision 3D.
Comparison of Sonar Technologies:
| Sonar Type | Speed Range | Range | Best For | Example Models |
|---|---|---|---|---|
| 2D Sonar | 0-30 mph | Entire water column | High-speed scouting | Garmin Striker 4, Lowrance Hook Reveal |
| Down Imaging | 1-4 mph | Below boat | Detailed structure identification | Humminbird Helix 7 DI |
| Side Imaging | 1-4 mph | Up to 600 ft/side | Wide-area structure and fish location | Lowrance StructureScan, Humminbird SI |
| Live Sonar | <7 mph | Real-time view | Watching fish react to lures | Garmin LiveScope |
| 360 Imaging | <1 mph | 360° around boat | Pinpoint casting to structures | Humminbird 360 Imaging |
| 3D Sonar | 1-4 mph | 120° port/starboard | Detailed 3D terrain and fish mapping | Raymarine RealVision 3D, Furuno DFF3D |
Recommended Fish Finder Models and Prices
Here are popular fish finders with specifications and approximate retail prices (USD):
| Model | Screen Size | Sonar Features | Price (USD) | Best For |
|---|---|---|---|---|
| Garmin Striker 4 | 3.5″ | 2D Sonar, CHIRP, GPS | $139.99 | Budget-conscious anglers |
| Humminbird Helix 5 DI G2 | 5″ | 2D Sonar, Down Imaging, GPS | $299.99 | Versatile freshwater fishing |
| Lowrance Hook Reveal 7 | 7″ | 2D Sonar, CHIRP, Side Imaging, GPS | $499.99 | Wide-area scanning |
| Humminbird Helix 7 CHIRP SI | 7″ | CHIRP, Side Imaging, Down Imaging, GPS | $699.99 | Advanced structure identification |
| Garmin LiveScope (w/ Panoptix) | 9″ (requires MFD) | Live Sonar, CHIRP, GPS | $1,999.99 | Real-time fishing |
| Raymarine RealVision 3D | 9-12″ (MFD) | 3D Sonar, CHIRP, Side/Down Imaging | $2,499.99+ | Professional anglers |
Prices are approximate and may vary by retailer.
Targeting Specific Species
To catch species like crappie or striped bass:
- Crappie: Look for schools near deep structures (e.g., sunken trees, brush piles) in summer. Use side imaging to locate these spots, then drop waypoints. Cast jigs or minnows around marked structures.
- Striped Bass: Often found chasing baitfish in open water. Use 2D sonar to locate bait balls, then switch to live sonar to watch stripers approach your lure. Cast toward bait concentrations.
Tips for Kayak Anglers:
- Use compact units like the Garmin Striker 4 for portability.
- Record depth contours with GPS to map productive areas.
- Paddle slowly (1-4 mph) when using side or down imaging for clear returns.
- Drop marker buoys to maintain position over fish or structures.
Common Challenges and Solutions
- Uncertain Fish Location: With 2D sonar, fish are within the cone (width equals depth at low frequency). Use side imaging or live sonar for precise direction and distance.
- Cluttered Screen: Reduce sensitivity to minimize false returns. Adjust color palettes for better contrast.
- Learning Curve: Spend time on the water and use resources like Ryan Moody’s online courses or manufacturer tutorials (e.g., Lowrance’s YouTube channel).
- Misinterpreting Returns: Cross-reference sonar with underwater cameras or bathyscopes to verify fish vs. structures.
Conclusion
Mastering a fish finder transforms your fishing experience, enabling you to locate fish, identify structures, and optimize your casts. By powering the unit correctly, learning the interface, optimizing settings, interpreting sonar returns, and targeting fish strategically, you’ll significantly increase your catch rate. Advanced technologies like CHIRP, side imaging, and live sonar provide unmatched precision, but even basic units like the Garmin Striker 4 can be highly effective with practice. Invest time on the water, experiment with settings, and use waypoints to build a map of productive spots. Whether you’re chasing crappie in a kayak or stripers in open water, a fish finder is your key to unlocking the underwater world.
Happy Boating!
Share How do you find fish on a fish finder? with your friends and leave a comment below with your thoughts.
Read How to Choose the Right Boat Fuel Tank until we meet in the next article.