Ways of starting and testing emergency generator
An emergency generator is the last line of electrical defence when a ship’s main power fails. When a blackout occurs — whether from a main engine failure, switchboard fault, or casualty — the emergency generator must start automatically within 45 seconds and supply power to critical systems: steering, navigation lights, fire detection, bilge pumps, emergency lighting, and communications. If it fails to start, the ship and crew are in immediate danger.
International regulations under SOLAS require that at least two independent starting methods be available on every emergency generator. This is not a recommendation — it is a flag state requirement, and Port State Control (PSC) officers actively verify compliance. A ship found with only one functional starting method can be detained or issued a deficiency order until the second starting method is restored.
This guide covers all starting methods in full procedural detail, the required testing schedule, load testing methodology, and the inspection checks that keep an emergency generator ready when it matters most.
Regulatory Requirements
Before examining starting methods, the compliance framework is worth understanding:
| Requirement | Standard | Detail |
|---|---|---|
| Minimum starting methods | SOLAS / Class rules | At least two independent starting systems required |
| Automatic start time | SOLAS II-1 Reg. 43 | Generator must reach full voltage within 45 seconds |
| Weekly test | ISM / Class | Unloaded run to verify battery start |
| Monthly test | ISM / Class | Automatic start simulation and load test |
| Hydraulic start verification | Monthly | Confirm accumulator pressure and operation |
| PSC compliance | Port State Control | Second starting method failure = potential detention |
The two mandated starting methods are typically battery electric start (primary) and hydraulic or pneumatic start (secondary). These must be independent — a fault in one cannot disable the other.
Starting Methods: Overview
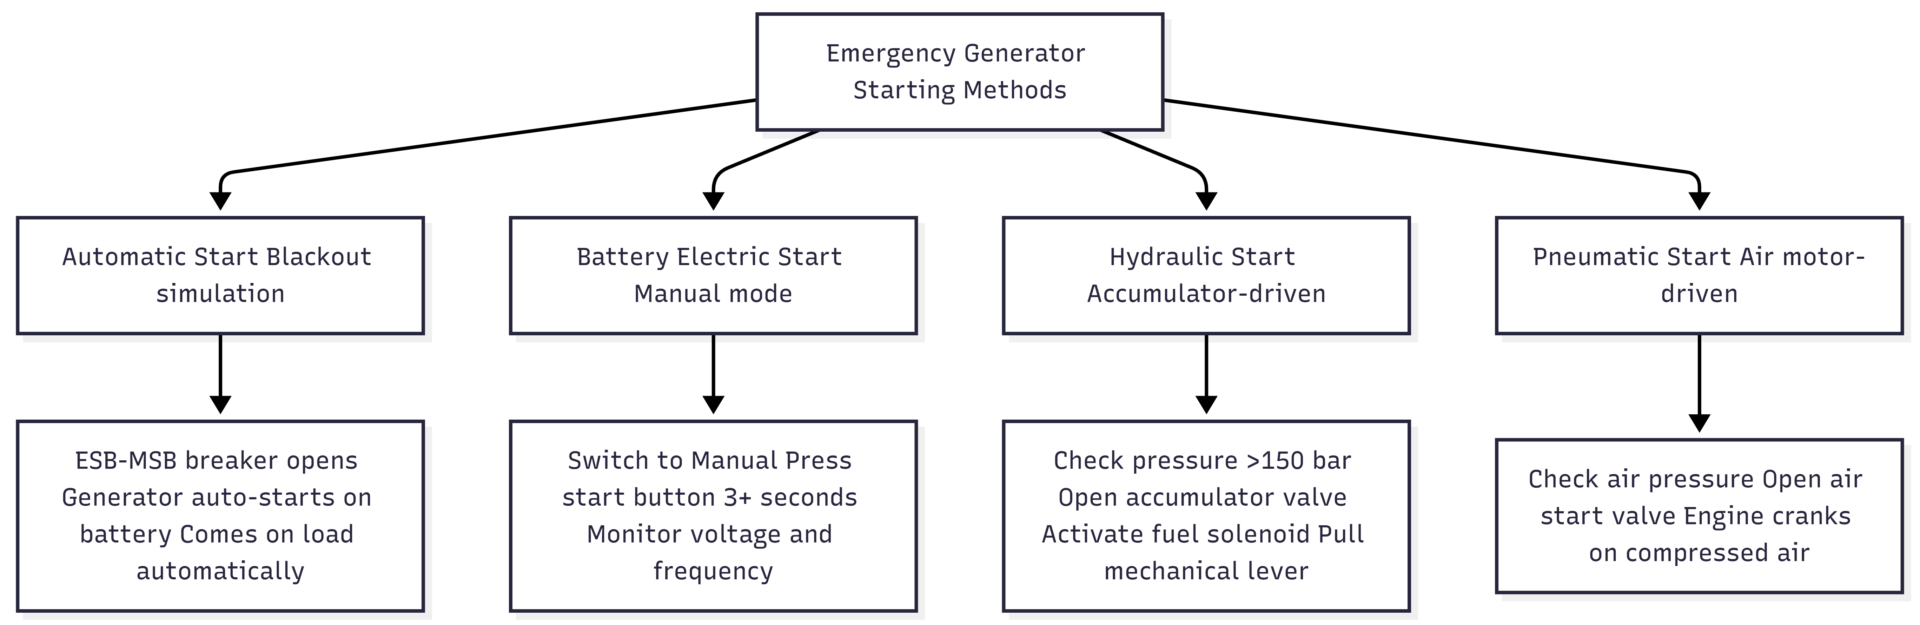
Method 1: Automatic Start
The automatic start is the emergency generator’s primary operational mode — the state in which it must always be left after testing. When main power is lost, the Automatic Transfer Switch (ATS) detects the loss of voltage on the main switchboard, breaks the tie between the Emergency Switchboard (ESB) and the Main Switchboard (MSB), and initiates the generator start sequence using the onboard batteries.
The interlock between the MSB and ESB prevents the emergency generator and main power from being supplied simultaneously, which would cause a phase conflict.
Testing procedure for automatic start:
- Notify the officer of the watch and engine control room before beginning the test
- Go to the MSB or ESB panel — the tie breaker connecting them is accessible from either location
- Simulate a blackout by opening the tie breaker manually. This disconnects ESB from MSB and triggers the automatic start sequence
- The emergency generator should start automatically on battery power and come on load within 45 seconds, supplying power to all essential services connected to the ESB
- Verify voltage (380–440V or 220V depending on vessel) and frequency (50Hz or 60Hz depending on flag state)
- Monitor for 10–15 minutes, recording exhaust temperature, lube oil pressure, and any abnormal sounds or exhaust colour
- To stop: close the tie breaker again — the interlock takes the generator off load automatically
- Switch the generator control to manual mode and press stop
- Return the control switch to Auto — the generator must always be left in auto mode
Method 2: Manual Battery Start
The battery start is the most commonly used starting method during weekly tests. It operates the electric starter motor using the dedicated emergency generator battery bank, which is charged by a separate trickle charger and must never be used for any other purpose.
Pre-start checks:
- Verify battery voltage is within the specified range (typically 24V DC systems; check manufacturer’s specifications)
- Check fuel level in the day tank
- Check engine sump oil level
- Check coolant level in the header tank or radiator
- Confirm all isolation valves are open
Starting procedure:
- Go to the emergency generator room and locate the control panel
- Switch the control mode from Auto to Manual (or Test mode, depending on the panel design — this allows the generator to start without automatically coming on load)
- Press and hold the start button for a minimum of 3 seconds until the engine fires and catches
- Once running, check the panel meters:
- Voltage: 380–440V (3-phase) or 220V (single phase), per vessel specification
- Frequency: 50Hz or 60Hz per flag state
- Check lube oil pressure on the local gauge — it should rise within seconds of start
- Run the generator unloaded for 10–15 minutes
- During the run, monitor exhaust colour (should be clear to light grey), listen for abnormal mechanical sounds, and record exhaust temperature
- Check the sump level again while running
- To stop: press the manual stop button on the panel
- Return the control switch to Auto
Method 3: Hydraulic Start
The hydraulic start system uses a pre-charged hydraulic accumulator to crank the engine when battery start is unavailable or has failed. The accumulator must be maintained at the specified pressure between tests — typically above 150 bar (approximately 2,175 psi). If the pressure has dropped below the minimum, the system must be recharged before the test can proceed.
Pre-start checks:
- Check the hydraulic accumulator pressure gauge — minimum 150 bar / 2,175 psi
- If pressure is low, use the hand pump or electric pump to recharge before proceeding
- Verify the hydraulic fluid level in the reservoir
Starting procedure:
- Switch the control panel to Manual mode
- Open the hydraulic valve from the accumulator to the hydraulic start motor on the engine
- Activate the fuel solenoid valve to allow fuel to flow to the injection system
- Pull or push the mechanical start lever (or press the hydraulic start button, depending on the system design) — this releases hydraulic pressure through the start motor to crank the engine
- The engine should fire and start running
- Check voltage and frequency on the panel meters
- Run for 10–15 minutes, monitoring all parameters as in the battery start procedure
- To stop: press the manual stop button
- Return to Auto mode
- Recharge the hydraulic accumulator to the required pressure before closing the valve — this is critical; an uncharged accumulator is a non-functional starting system
- Close the valve between the accumulator and the engine
Hydraulic system pressure reference:
| Parameter | Typical Specification |
|---|---|
| Minimum operating pressure | 150 bar (2,175 psi) |
| Nominal charge pressure | 175–200 bar (2,538–2,901 psi) |
| Recharge method | Hand pump or electric pump |
| Fluid type | Per manufacturer specification |
| Check frequency | Before every start attempt |
Method 4: Pneumatic Start
Some emergency generators use compressed air rather than hydraulic pressure to crank the engine. The pneumatic start system operates from a dedicated air receiver that must be kept charged to the required pressure.
Starting procedure:
- Verify air receiver pressure is within the required range (typically 25–30 bar for pneumatic start systems; confirm against manufacturer’s specifications)
- Switch control panel to Manual mode
- Open the air start valve to the engine’s air start motor
- The engine cranks on compressed air and should start within a few revolutions
- Close the air start valve once the engine is running
- Monitor parameters and run for 10–15 minutes as with other methods
- Recharge the air receiver after the test
Testing Schedule
Emergency generator testing follows a structured schedule that verifies different aspects of readiness at different intervals.

| Test Frequency | Test Type | Duration | What Is Verified |
|---|---|---|---|
| Weekly | Battery start, unloaded | 10–15 min | Start reliability, voltage, frequency, oil pressure |
| Monthly | Automatic start simulation | 15–30 min | Blackout response, auto transfer, on-load operation |
| Monthly | Hydraulic start | 10–15 min | Accumulator pressure, mechanical start function |
| Annually | Full load bank test | 30–60 min | Capacity at 30%, 80%, and 100% rated load |
For ships, the weekly and monthly tests are the core schedule. Ashore, NFPA 110 governs similar requirements for land-based emergency generators in commercial and healthcare facilities, with comparable weekly inspection and monthly load test requirements.
Load Testing Procedure
A load test verifies that the generator can actually supply its rated power — not just run unloaded. An unloaded generator can appear perfectly healthy while being incapable of sustaining electrical load due to fuel system degradation, engine wear, or cooling issues that only manifest under load.
Planning the load test:
- Determine the generator’s rated output (kW and kVA)
- Identify what loads will be connected — emergency lighting, air compressors, fire pump, bilge pump
- Confirm the test duration: minimum 15 minutes on load for monthly tests; 30–60 minutes for annual load bank tests
Executing the load test:
- Start the generator using the battery or automatic method and allow it to warm up for 3–5 minutes unloaded
- From the emergency switchboard (ESB) panel, close the Automatic Circuit Breaker (ACB) to connect the generator to the ESB bus
- Switch on loads progressively — do not apply full load instantaneously
- Monitor and record at regular intervals (every 5 minutes):
- Output voltage (all three phases if 3-phase)
- Frequency
- Load current (amperage)
- Lube oil pressure
- Coolant temperature
- Exhaust temperature
- Fuel consumption (where measurable)
- Run at load for the required duration
- Remove loads progressively before stopping
Data recording table (example format):
| Parameter | 5 min | 10 min | 15 min | 20 min | Specification |
|---|---|---|---|---|---|
| Voltage (V) | 380–440V | ||||
| Frequency (Hz) | 50 or 60 Hz | ||||
| Current (A) | ≤ rated | ||||
| Oil pressure (bar) | Per manufacturer | ||||
| Coolant temp (°C) | Per manufacturer | ||||
| Exhaust temp (°C) | Per manufacturer |
Evaluating results:
- Compare all readings against the manufacturer’s rated specifications
- Any parameter consistently outside specification indicates a fault requiring investigation
- Document all findings — whether normal or abnormal — in the engine room logbook
- Address any deficiencies before the next scheduled test
Pre-Test Inspection Checklist
Before any start or test, the following checks must be completed:
| Item | Check | Acceptable Condition |
|---|---|---|
| Fuel day tank | Level | Minimum 75% full |
| Engine sump oil | Dipstick level | Between min and max marks |
| Coolant / radiator | Level | At the full mark |
| Battery voltage | Panel meter or test meter | Per manufacturer’s spec (typically 24–27V DC) |
| Battery terminals | Visual | Clean, tight, no corrosion |
| Hydraulic accumulator | Pressure gauge | Above minimum (150 bar typical) |
| Air receiver | Pressure gauge | Within specified range |
| Fuel supply valves | Position | Open |
| Exhaust system | Visual | Clear, no obstruction |
| Engine room ventilation | Open / operating | Adequate airflow |
After Testing: Critical Final Step
Every test — regardless of starting method — must end with the generator control switch returned to Auto mode. This is the single most important post-test action.
A generator left in Manual mode after testing will not start automatically when a real blackout occurs. This defeats the entire purpose of the emergency generator and creates a safety-critical gap in the ship’s damage control capability. Before leaving the emergency generator room, verify the control switch position and confirm it on the logbook entry.
Common Faults and Troubleshooting
| Symptom | Likely Cause | Action |
|---|---|---|
| Fails to start on battery | Low battery voltage, faulty solenoid, engine mechanical fault | Check battery voltage, test solenoid, try hydraulic start |
| Starts but won’t come on load | ACB fault, voltage or frequency out of range | Check ACB operation, verify governor and AVR settings |
| Low oil pressure at start | Low sump level, oil pump fault, pressure gauge fault | Stop immediately, check oil level |
| High exhaust temperature | Overload, cooling fault, fuel quality issue | Reduce load, check cooling system |
| Hydraulic system won’t start | Low accumulator pressure, valve not open, fuel solenoid fault | Recharge accumulator, check valve and solenoid |
| Generator hunts (frequency unstable) | Governor fault, fuel supply issue | Check fuel filters and governor, adjust if qualified |
Keeping a well-maintained emergency generator — with both starting systems fully functional, tested on schedule, and always left in Auto mode — is one of the most consequential responsibilities in shipboard engineering. It costs relatively little to maintain; the cost of failure in a genuine emergency is incalculable.
Happy Boating!
Share Ways of starting and testing emergency generator with your friends and leave a comment below with your thoughts.
Read 7 Technologies To Reduce Fuel Consumption Of Ships until we meet in the next article.