
3 Creative Boat Prop Cover Ideas for Winter
Winter brings harsh conditions that can wreak havoc on a boat’s propeller, especially in regions like southern Ontario, where snow can accumulate to several feet. Freezing temperatures, snow, ice, and wind can cause corrosion, scratches, or even structural damage to the propeller and lower unit. A well-designed boat prop cover is essential to shield this critical component during the off-season. While commercial covers are available, they can be costly and may not suit every boater’s needs or budget. This article explores three creative, cost-effective, and practical DIY boat prop cover ideas to protect your propeller during winter, with detailed instructions, material lists, pros and cons, and additional tips for winterizing your outboard motor. These solutions are designed to be accessible, customizable, and environmentally conscious, catering to boaters who want to save money while ensuring their equipment remains in top condition.
Why Protect Your Boat’s Propeller in Winter?
Before diving into the cover ideas, it’s worth understanding why protecting your propeller is crucial. The propeller and lower unit of an outboard motor are exposed to the elements when stored outdoors, making them vulnerable to:
- Snow and Ice Damage: Accumulated snow can melt and refreeze, potentially causing ice dams that exert pressure on the propeller or lower unit, leading to cracks or seal damage.
- Corrosion: Exposure to moisture, especially in saltwater environments, can accelerate corrosion on metal components.
- Physical Damage: Falling debris, wind-blown objects, or even critters nesting in the lower unit can cause scratches, dents, or mechanical issues.
- Theft: Expensive propellers are a target for thieves, especially in marinas or unsecured storage areas.
A prop cover mitigates these risks by providing a protective barrier, reducing maintenance costs, and extending the lifespan of your propeller. The following three DIY ideas offer practical solutions for boaters, with estimated costs ranging from $5 to $50, making them accessible for all budgets.
1. DIY Tarp and Rope Cover
The DIY tarp and rope cover is a straightforward, budget-friendly option that uses readily available materials to create a secure, weather-resistant shield for your propeller. This method is ideal for boaters who want a quick and customizable solution without investing in specialized tools or skills.
Materials Needed
| Material | Estimated Cost | Purpose |
|---|---|---|
| Tarp (waterproof, UV-resistant) | $5–$15 | Covers the propeller and lower unit, protecting against snow, rain, and UV damage |
| Rope (1/4-inch, 10–20 feet) | $5–$10 | Secures the tarp in place |
| Bungee cords (4–6, medium-duty) | $5–$10 | Provides adjustable tension to hold the tarp tightly |
| Scissors or utility knife | $0–$5 (if not owned) | Cuts the tarp to size |
Total Estimated Cost: $10–$30
How to Make a DIY Tarp and Rope Cover
- Measure and Cut the Tarp: Select a tarp large enough to cover the propeller and lower unit with at least 6 inches of overlap on all sides. Measure your propeller’s diameter and add 12 inches to ensure full coverage. Cut the tarp to size using scissors or a utility knife.
- Position the Tarp: Drape the tarp over the propeller, ensuring it covers the blades and extends over the lower unit. Center the tarp to avoid uneven coverage.
- Secure with Bungee Cords: Wrap bungee cords around the tarp at the base of the lower unit, just above the propeller, to hold it snugly in place. Use multiple cords for a tight fit, ensuring no gaps where snow or water could enter.
- Tie with Rope: Wrap the rope around the bungee cords and tie it securely to prevent the tarp from slipping or blowing away in high winds. Create a double knot or use a bowline for easy removal in spring.
- Check for Drainage: Ensure the tarp has a slight downward slope or a small opening at the bottom to allow water to drain, preventing pooling and freezing.
Pros
- Cost-Effective: At $10–$30, this is significantly cheaper than commercial covers, which can cost $40–$100.
- Customizable: Easily adjust the tarp size to fit any propeller, from small 7.8-inch models to larger 17-inch dual propellers.
- Easy to Make: Requires no advanced skills or tools, making it accessible for all boaters.
- Reusable: With proper storage, the tarp and ropes can be reused for multiple seasons.
Cons
- Limited Protection: Offers basic protection against snow and rain but may not shield against heavy impacts or extreme freezing conditions.
- Durability Concerns: Tarps may tear or degrade under prolonged UV exposure or heavy snow loads, requiring replacement every 1–2 seasons.
- Aesthetics: The cover may not look as sleek or professional as a pre-made option.
Tips for Success
- Choose a heavy-duty, UV-resistant tarp to maximize durability.
- Check the cover after heavy snowfalls to remove excess weight and prevent tearing.
- Store the boat with the outboard tilted down to minimize snow accumulation and protect bellows, as recommended by forum user Searay205.
2. Repurposed Material Cover
For environmentally conscious boaters, a prop cover made from repurposed materials is an eco-friendly and cost-effective alternative. This approach reduces waste by reusing items like old canvases, tarps, or fabrics, turning them into functional propeller protection.
Materials Needed
| Material | Estimated Cost | Purpose |
|---|---|---|
| Repurposed material (old canvas, tarp, or heavy fabric) | $0–$20 (if purchased second-hand) | Forms the main body of the cover |
| Bungee cords or ropes | $5–$10 | Secures the cover in place |
| Cutting tools (scissors, utility knife) | $0–$5 (if not owned) | Shapes the material to fit the propeller |
| Grommets (optional, 4–6) | $5–$10 | Reinforces attachment points for ropes |
Total Estimated Cost: $5–$50
How to Make a Repurposed Material Cover
- Select a Material: Choose a sturdy, water-resistant material, such as an old boat cover, canvas drop cloth, or heavy-duty tarp. Ensure it’s large enough to cover the propeller with extra room for securing.
- Measure and Cut: Measure the propeller’s diameter and add 8–12 inches for overlap. Cut the material to size, ensuring clean edges to prevent fraying.
- Add Grommets (Optional): If using ropes, install grommets along the edges of the material using a grommet kit. This reinforces the attachment points and prevents tearing.
- Secure the Cover: Drape the material over the propeller and lower unit, then use bungee cords or ropes to fasten it tightly. If using grommets, thread the rope through them for a secure fit.
- Ensure Ventilation: Leave a small opening at the bottom or use breathable fabric to allow moisture to escape, preventing mold or ice buildup.
Pros
- Eco-Friendly: Reduces waste by repurposing materials that might otherwise end up in landfills.
- Cost-Effective: Often free or very low-cost if using materials you already own.
- Customizable: Can be tailored to fit any propeller size or shape.
- Creative Outlet: Allows boaters to experiment with unique materials and designs.
Cons
- Variable Protection: The level of protection depends on the material’s quality; less durable fabrics may not withstand heavy snow or freezing conditions.
- Time-Intensive: Cutting and securing the material may require more effort than other methods.
- Aesthetics: May look patchwork or less polished compared to commercial covers.
Tips for Success
- Use marine-grade or water-resistant materials, such as old canvas boat covers, for better durability.
- Apply a waterproofing spray to non-waterproof fabrics to enhance weather resistance.
- Avoid trapping moisture by ensuring proper ventilation, as warned by forum user LI Sound Grunt, who noted that trapped water can freeze and cause damage.
3. Foam Pipe Insulation Cover
The foam pipe insulation cover is the simplest and most affordable option, ideal for boaters seeking a quick, no-fuss solution to protect their propeller from scratches and minor damage. This method uses lightweight foam insulation commonly found in hardware stores.
Materials Needed
| Material | Estimated Cost | Purpose |
|---|---|---|
| Foam pipe insulation (1–2 pieces, 6 feet long) | $5–$15 | Covers propeller blades to prevent scratches and minor damage |
| Cutting tools (scissors, utility knife) | $0–$5 (if not owned) | Cuts the foam to size |
| Duct tape or zip ties (optional) | $0–$5 | Secures the foam in place |
Total Estimated Cost: $5–$20
How to Make a Foam Pipe Insulation Cover
- Measure the Propeller: Determine the length of each propeller blade from hub to tip. Most blades range from 7.8 to 17 inches, so purchase foam insulation long enough to cover all blades.
- Cut the Foam: Use scissors or a utility knife to cut the foam pipe insulation into pieces that match the length of each blade. If the insulation has a pre-cut slit, use it to slide over the blades; otherwise, cut a slit along one side.
- Attach the Foam: Slide each piece of foam over a propeller blade, ensuring full coverage from hub to tip. If the foam is loose, secure it with duct tape or zip ties at the base and tip.
- Inspect the Fit: Ensure the foam fits snugly and doesn’t obstruct the lower unit’s drainage holes or weep holes, as highlighted by forum user Scott06.
- Optional Tarp Layer: For added protection in heavy snow, drape a small tarp over the foam-covered propeller and secure it with bungee cords.
Pros
- Ultra-Affordable: At $5–$20, this is the cheapest option, accessible to all boaters.
- Quick and Easy: Can be made in under 10 minutes with minimal tools.
- Customizable: Foam can be cut to fit any blade size or shape.
- Lightweight: Adds minimal weight to the outboard, reducing strain on the trailer or storage system.
Cons
- Limited Protection: Primarily protects against scratches and minor impacts, not heavy snow or ice.
- Low Durability: Foam may degrade or tear after one season, requiring replacement.
- Basic Appearance: Looks utilitarian and may not appeal to those seeking a polished look.
Tips for Success
- Use high-density foam insulation for better durability and impact resistance.
- Combine with a tarp or skirt for enhanced protection in deep snow, as suggested by forum user aubv.
- Remove the propeller and store it indoors to prevent theft or seizing, as recommended by forum user aubv, and use the foam to cover the shaft instead.
Comparison of Boat Prop Cover Ideas
| Cover Type | Estimated Cost | Protection Level | Durability | Ease of Making | Eco-Friendliness |
|---|---|---|---|---|---|
| DIY Tarp and Rope | $10–$30 | Moderate | 1–2 seasons | Easy | Moderate |
| Repurposed Material | $5–$50 | Moderate | 1–3 seasons | Moderate | High |
| Foam Pipe Insulation | $5–$20 | Low | 1 season | Very Easy | Low |
Chart: Protection vs. Cost
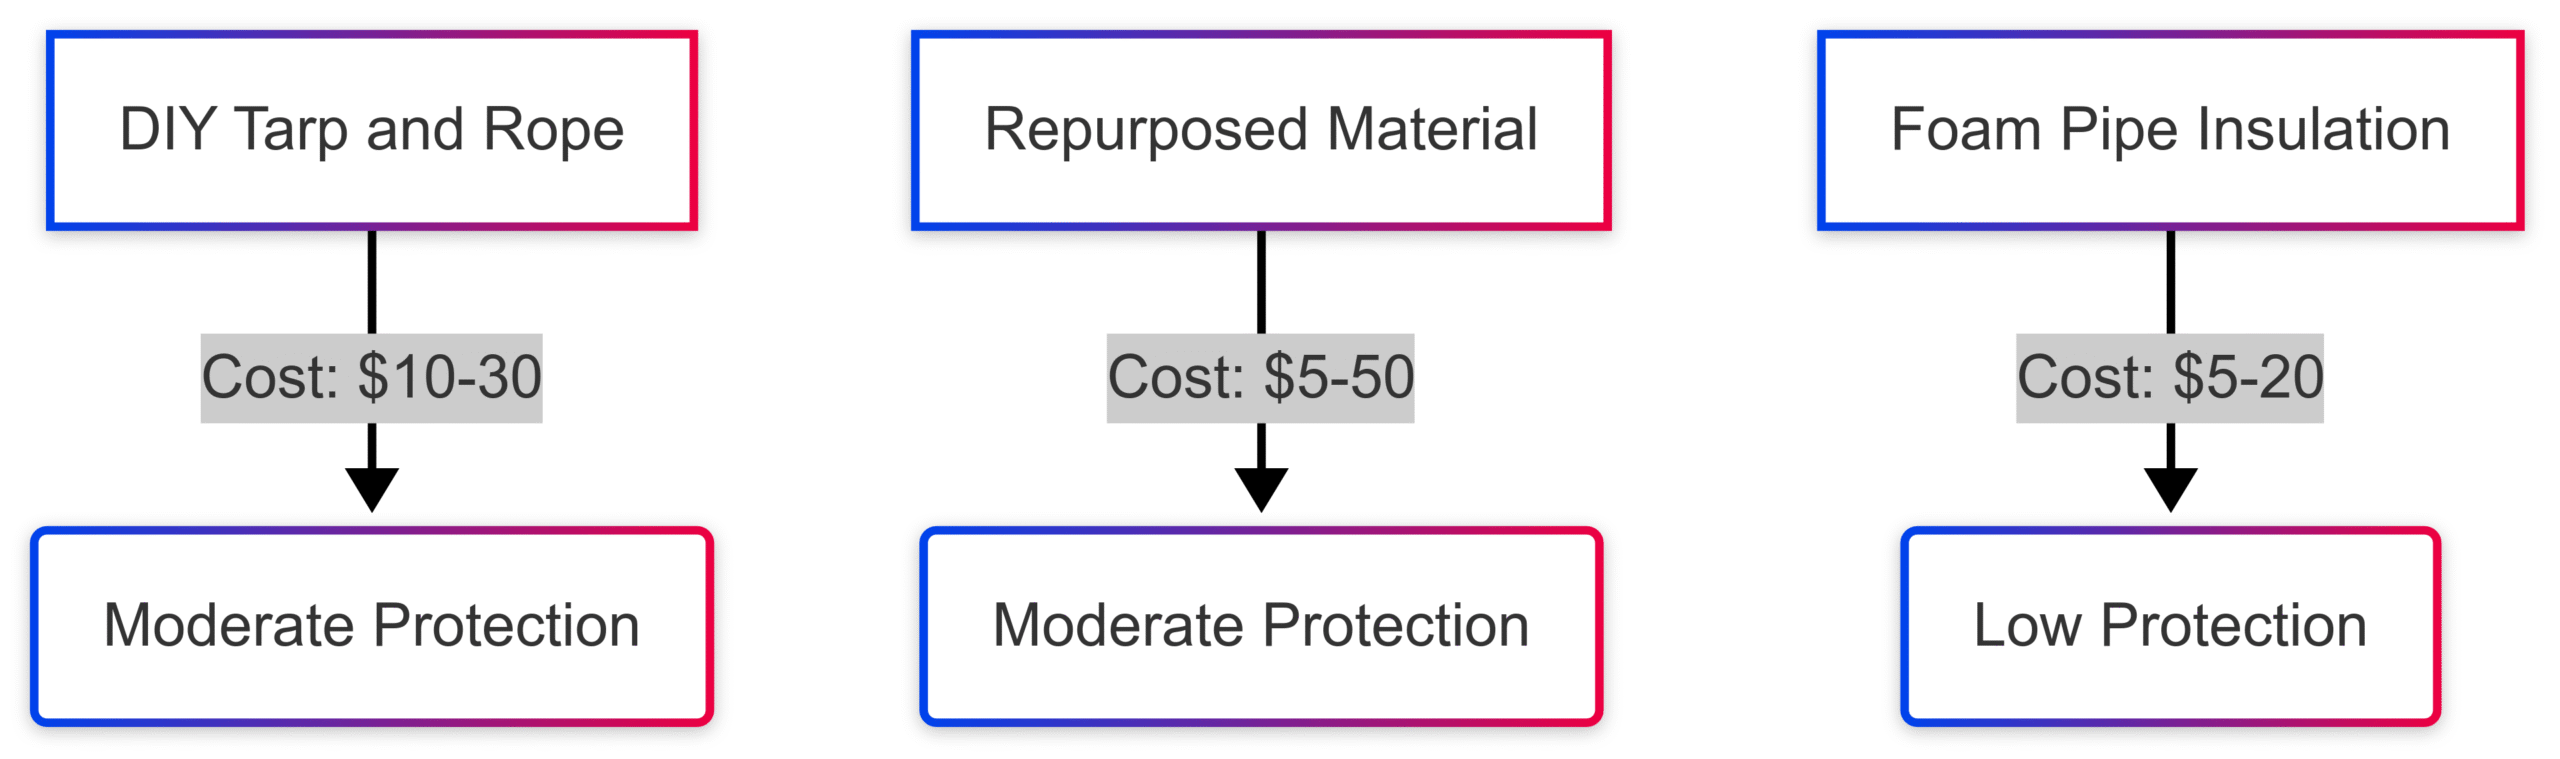
This chart illustrates that while foam insulation is the cheapest, it offers the least protection, whereas tarp and repurposed material covers provide better shielding at a slightly higher cost.
Additional Materials for Enhanced Prop Covers
Beyond the core materials, other items can enhance the functionality and durability of your DIY prop cover:
| Material | Estimated Cost | Purpose |
|---|---|---|
| Ratchet straps | $20–$30 | Provides stronger, adjustable securing compared to bungee cords |
| PVC pipes | $10–$20 | Creates a frame to support the cover, preventing snow buildup |
| PVC connectors | $5–$10 | Joins PVC pipes to form a stable frame |
| Canvas fabric | $50–$100 | Offers durable, water-resistant coverage for long-term use |
| Cotton fabric | $20–$50 | Breathable option for warmer climates, less durable than canvas |
| Grommets | $5–$10 | Reinforces fabric for secure rope attachment |
Using PVC Pipes for Support
PVC pipes can be cut to size and connected with fittings to create a frame that supports the cover, preventing snow accumulation. For example, forum user NeilM used 2-inch CPVC pipes with 30-degree elbows to build a sturdy frame for a boat cover. This approach is particularly useful in heavy snow areas, as it directs snow off the cover.
Choosing the Right Fabric
Canvas is ideal for harsh winter conditions due to its water, mildew, and UV resistance. Cotton, while breathable, is better suited for milder climates but may degrade faster. Apply a waterproofing treatment to either fabric for added protection.
Securing with Grommets and Straps
Grommets reinforce attachment points, ensuring the cover withstands wind and snow. Ratchet straps offer superior tension compared to bungee cords, keeping the cover taut even in stormy conditions.
Addressing Common Concerns: Is Covering the Prop Necessary?
Forum user Sam from southern Ontario raised a valid concern about covering the lower unit with a bag and duct tape, fearing water could enter and freeze in deep snow. Community responses highlighted several key points:
- Avoid Trapping Moisture: Forum users LI Sound Grunt and aubv warned that a tightly sealed bag could trap water, leading to ice dams that damage the lower unit. Instead, ensure any cover allows drainage through weep holes or an open bottom.
- Tilt the Motor Down: Multiple users, including Dacman and jobowker, recommended storing the outboard fully tilted down to minimize snow accumulation and protect bellows, reducing the risk of water pooling.
- Remove the Propeller: Users like aubv and Drcoffee suggested removing the propeller to prevent theft, seizing, or damage, storing it indoors and covering the shaft with PVC pipe or a rag.
- Simplify Protection: Dacman and phillyg argued that a cover may not be necessary if the motor is tilted down, as the lower unit is designed to handle water exposure, and snow can act as an insulator.
Based on this feedback, a prop cover is beneficial but should prioritize ventilation and drainage. Combining a cover with propeller removal and proper motor positioning offers the best protection.
Commercial Alternative: Oceansouth Propeller Bags
For boaters preferring a pre-made solution, Oceansouth Propeller Bags are a reliable option. These covers are designed for durability and ease of use, with the following specifications:
| Propeller Diameter | Price (excl. VAT) |
|---|---|
| 200mm (7.8″) | €18.78 |
| 260mm (10″) | €20.50 |
| 320mm (12.5″) | €22.30 |
| 360mm (14.3″) | €24.10 |
| 410mm (16″) | €26.00 |
| 435mm (17″) Dual/Twin | €30.00 |
Features:
- Material: Heavy-duty UV polyester with 1/4-inch closed-cell foam padding.
- Closure: Press studs for a secure, drawstring-free fit.
- Handle: Polyester webbing for easy transport.
- Color: High-visibility red for safety during trailering.
- Non-Skid Interior: Prevents slippage during transit.
Pros: Durable, professionally designed, easy to install, and reusable for multiple seasons.
Cons: Higher cost (€18.78–€30.00) compared to DIY options, and may not fit unique propeller shapes.
Forum user JonathanG praised similar covers for withstanding tough New York winters, suggesting they’re a worthwhile investment for those prioritizing longevity.
Additional Winterizing Tips
To complement your prop cover, consider these winterizing practices to protect your entire outboard:
- Change Lower Unit Oil: Forum user Dacman emphasized checking for water in the oil before storage to prevent internal damage.
- Use a Skirt or Tent: Forum user PolishFly_Maine recommended a “tent” to prevent snow buildup around the lower unit, reducing the risk of freeze-thaw cycles cracking the housing.
- Prevent Critter Damage: Forum user Bryan A. noted that covers can deter animals from nesting in the lower unit and chewing seals.
- Support the Boat Cover: For overall boat protection, forum user RickDV suggested an A-frame support made from 2x4s to shed snow, while JDK proposed plywood sheets for heavy snow loads.
Chart: Winterizing Workflow
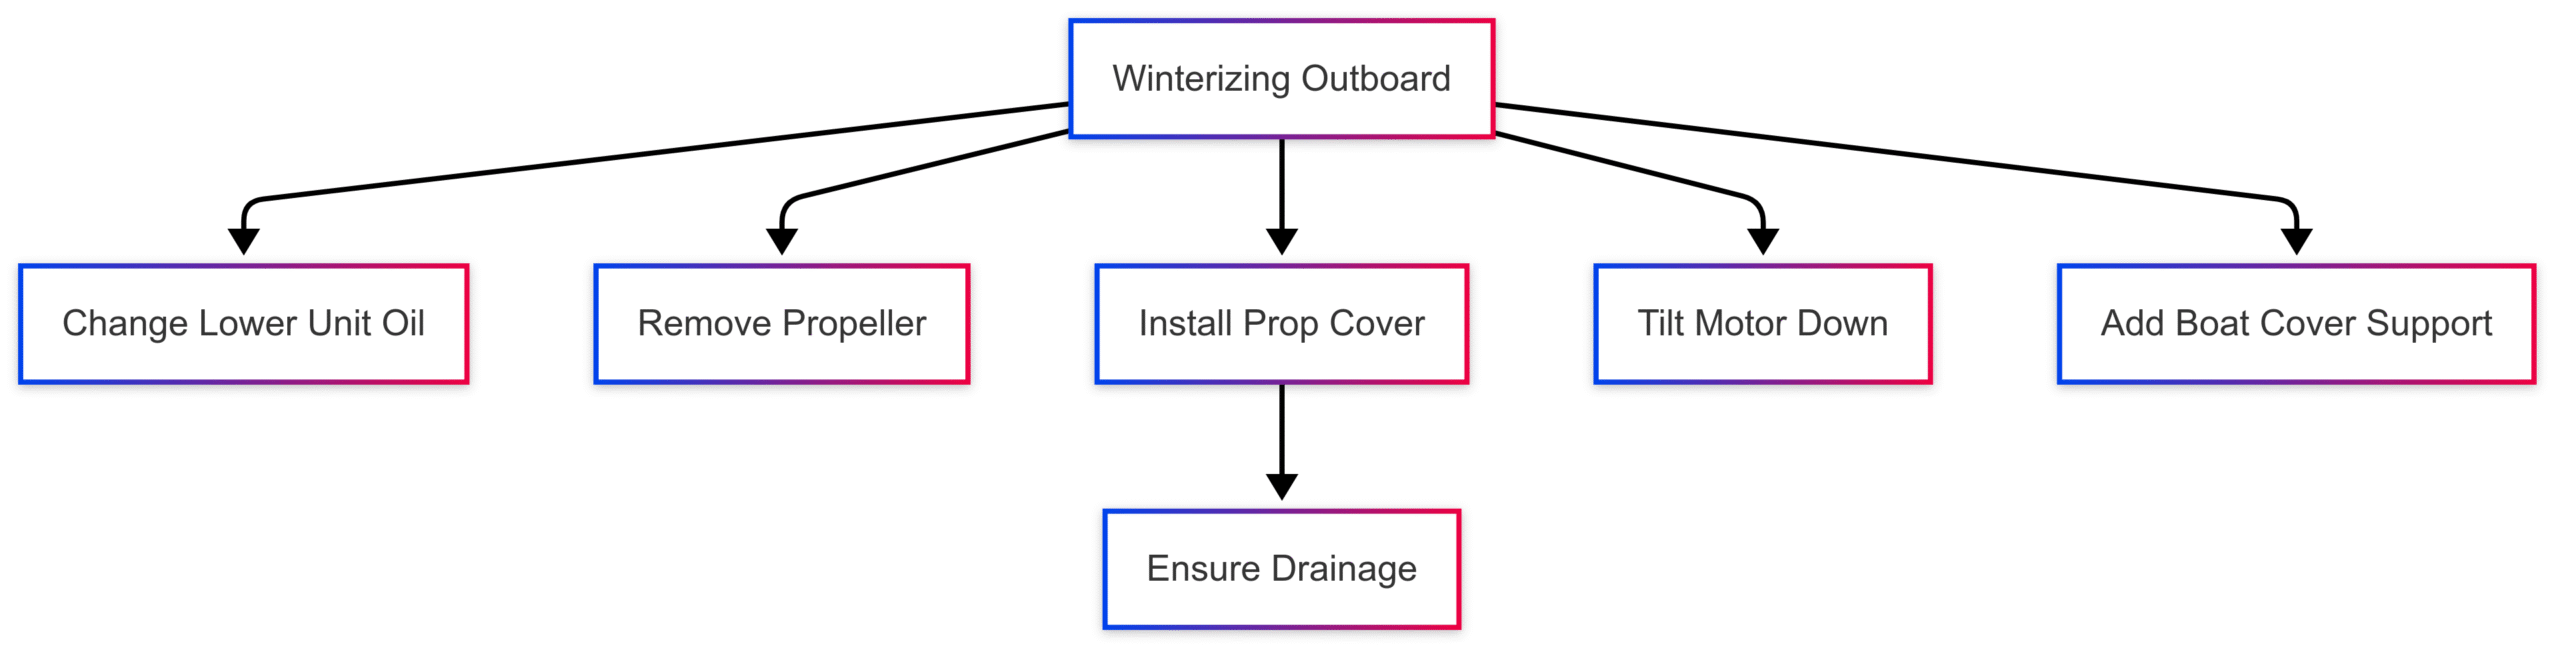
This workflow ensures comprehensive protection for your outboard and boat during winter storage.
Conclusion
Protecting your boat’s propeller during winter is a critical step in maintaining its performance and longevity. The three DIY prop cover ideas—tarp and rope, repurposed material, and foam pipe insulation—offer affordable, customizable solutions for boaters of all skill levels. Each method balances cost, protection, and ease of creation, with estimated costs ranging from $5 to $50. By combining these covers with proper winterizing techniques, such as removing the propeller, tilting the motor down, and ensuring drainage, you can safeguard your outboard against snow, ice, and other winter hazards. For those preferring a commercial option, Oceansouth Propeller Bags provide a durable alternative, though at a higher cost. Whether you’re in southern Ontario facing deep snow or a milder climate, these creative ideas will keep your propeller safe, saving you money and ensuring your boat is ready for the next boating season.
Happy Boating!
Share 3 Creative Boat Prop Cover Ideas for Winter with your friends and leave a comment below with your thoughts.
Read 3 Cheap Ways to Make a DIY Frame for Your Boat Winter Cover until we meet in the next article.


Thanks for sharing. I read many of your blog posts, cool, your blog is very good.