A Do-It-Yourself Winter Cover Frame
Protecting your boat during the harsh winter months is crucial to maintaining its condition and extending its lifespan. A do-it-yourself (DIY) winter boat cover frame offers a cost-effective and customizable solution compared to expensive factory-made covers or professional shrink-wrapping services. This guide provides a detailed, step-by-step process for creating a sturdy and affordable winter boat cover frame, including material selection, frame construction, cover fabrication, and maintenance tips. Whether you own a powerboat or a sailboat, this article will equip you with the knowledge to safeguard your vessel from snow, ice, UV rays, and other environmental hazards.
Why Choose a DIY Winter Boat Cover Frame?
A DIY winter boat cover frame has several advantages:
- Cost Savings: Factory-made covers can cost hundreds of dollars, and professional shrink-wrapping services may run $15–$20 per foot or more. A DIY solution can be built for as little as $50–$150, depending on materials and boat size.
- Customization: Tailor the frame and cover to fit your boat’s unique dimensions and features, such as antennas, masts, or swim platforms.
- Eco-Friendly: Unlike single-use shrink wrap, a reusable tarp and frame reduce plastic waste, making it a more sustainable choice.
- Durability: A well-constructed frame and cover can last multiple seasons with proper maintenance, protecting your investment.
Step 1: Choosing the Right Materials
Selecting appropriate materials is the foundation of a successful DIY boat cover. The cover material and frame components must withstand harsh winter conditions, including heavy snow, high winds, and UV exposure.
Cover Material Options
The cover material should be durable, waterproof, UV-resistant, and breathable to prevent mold and mildew. Below is a comparison of common fabrics used for winter boat covers:
| Fabric Type | Description | Pros | Cons |
|---|---|---|---|
| Polyester | Lightweight, durable, water-resistant | Easy to clean, affordable, good for smaller boats | Less protective against heavy snow or extreme weather |
| Canvas | Heavy-duty, excellent protection | Water-resistant, breathable, good UV protection | More expensive, heavier, harder to sew |
| Vinyl-Coated Fabric | Highly water-resistant, UV-resistant | Easy to clean, durable, ideal for harsh conditions | Less breathable, heavy, may crack in extreme cold |
| Sunbrella | Premium marine-grade fabric | Durable, water-resistant, UV-resistant, fade-resistant, variety of colors | Higher cost, requires careful sewing for best results |
Factors to Consider:
- Water Resistance: Ensure the fabric prevents water seepage to avoid damage to the boat’s interior.
- UV Protection: UV-resistant fabrics prevent fading and material degradation.
- Breathability: Breathable fabrics reduce moisture buildup, preventing mold and mildew.
- Weight: Heavier fabrics provide better protection for larger boats but may be harder to handle.
- Color: Dark colors (e.g., navy, black) absorb heat, keeping the boat warmer in cold climates, while lighter colors reflect sunlight, keeping it cooler.
Recommendation: Sunbrella or vinyl-coated fabrics are ideal for most boats due to their durability and weather resistance. Polyester is suitable for smaller boats or milder climates.
Frame Material Options
The frame provides structural support for the cover, ensuring it sheds snow and resists wind. Common materials include:
| Material | Description | Pros | Cons |
|---|---|---|---|
| PVC Pipe | Lightweight, easy to cut and assemble | Affordable, no welding required, easy to store | Becomes brittle in cold, UV degradation over time |
| EMT Conduit | Thin-walled steel electrical conduit | Strong, durable, withstands harsh weather, reusable | Requires welding or clamps, heavier than PVC |
| Wood | Common dimensional lumber (e.g., 2x4s, 1x6s) | Easy to work with, widely available, no special tools needed | Less durable, may loosen or rot over time |
Recommendation: EMT conduit is the best choice for durability and strength, especially in areas with heavy snow or high winds. PVC is a good alternative for milder climates or temporary setups, while wood is suitable for quick, budget-friendly frames.
Tools and Additional Materials
- Tools:
- Hacksaw or pipe cutter (for EMT or PVC)
- Screwdriver (for wood or clamps)
- Sewing machine (for cover fabrication)
- Scissors or rotary cutter (for cutting fabric)
- Tape measure
- Welding equipment (for EMT, optional)
- Drill (for wood or mounting hardware)
- Additional Materials:
- Grommets: Metal rings for tie-down points ($5–$10 for a pack of 10)
- Bungee cords: For securing the cover ($10–$20 for a pack)
- Rope or ratchet straps: For additional tie-downs ($5–$15)
- Seam tape: Waterproof tape to reinforce seams ($10–$15)
- Carpet scraps or padding: To prevent tarp abrasion (free or $5–$10)
- Kover Klamps or conduit connectors: For EMT frames ($20–$50)
- Foam pipe insulation: For sailboat masts or sharp edges ($5–$10)
Cost Estimate
| Item | Approximate Cost |
|---|---|
| Sunbrella Fabric (20×30 ft) | $100–$150 |
| EMT Conduit (35 ft) | $25–$35 |
| Grommets (10-pack) | $5–$10 |
| Bungee Cords (10-pack) | $10–$20 |
| Rope (50 ft) | $5–$10 |
| Seam Tape (10 ft) | $10–$15 |
| Kover Klamps (10) | $20–$30 |
| Total | $175–$270 |
Note: Costs vary based on boat size, material quality, and local prices. PVC or wood frames may reduce costs to $50–$150.
Step 2: Measuring Your Boat
Accurate measurements ensure the cover fits snugly, providing optimal protection. Follow these steps:
- Measure Dimensions:
- Length: From bow to stern, including outboard motors or swim platforms.
- Width: At the widest point, typically the beam.
- Height: From the highest point (e.g., radar, antenna) to the ground or waterline.
- Account for Protrusions:
- Include accessories like antennas, masts, or trolling motors.
- Measure the height of the tallest protrusion to ensure the frame clears it.
- Add Extra Allowance:
- Add 6–12 inches to length and width to account for curves, angles, and ease of installation.
- Add 12–18 inches to height for snow shedding and access inside the boat.
- Double-Check:
- Verify measurements to avoid errors.
- Test-fit a mock-up with string or tape to confirm coverage.
- Sailboat Considerations:
- Measure the mast separately if it remains stepped.
- Plan for additional covering (e.g., tarp or foam insulation) to protect the mast.
Example Measurements for a 19-ft Bowrider:
- Length: 19 ft + 1 ft (outboard) + 1 ft (allowance) = 21 ft
- Width: 8 ft + 1 ft (allowance) = 9 ft
- Height: 5 ft (console) + 1.5 ft (allowance) = 6.5 ft
Step 3: Building the Boat Cover Frame
The frame must be sturdy, tall enough to shed snow, and easy to assemble. Below is a detailed process for constructing an EMT conduit frame, with alternatives for PVC or wood.
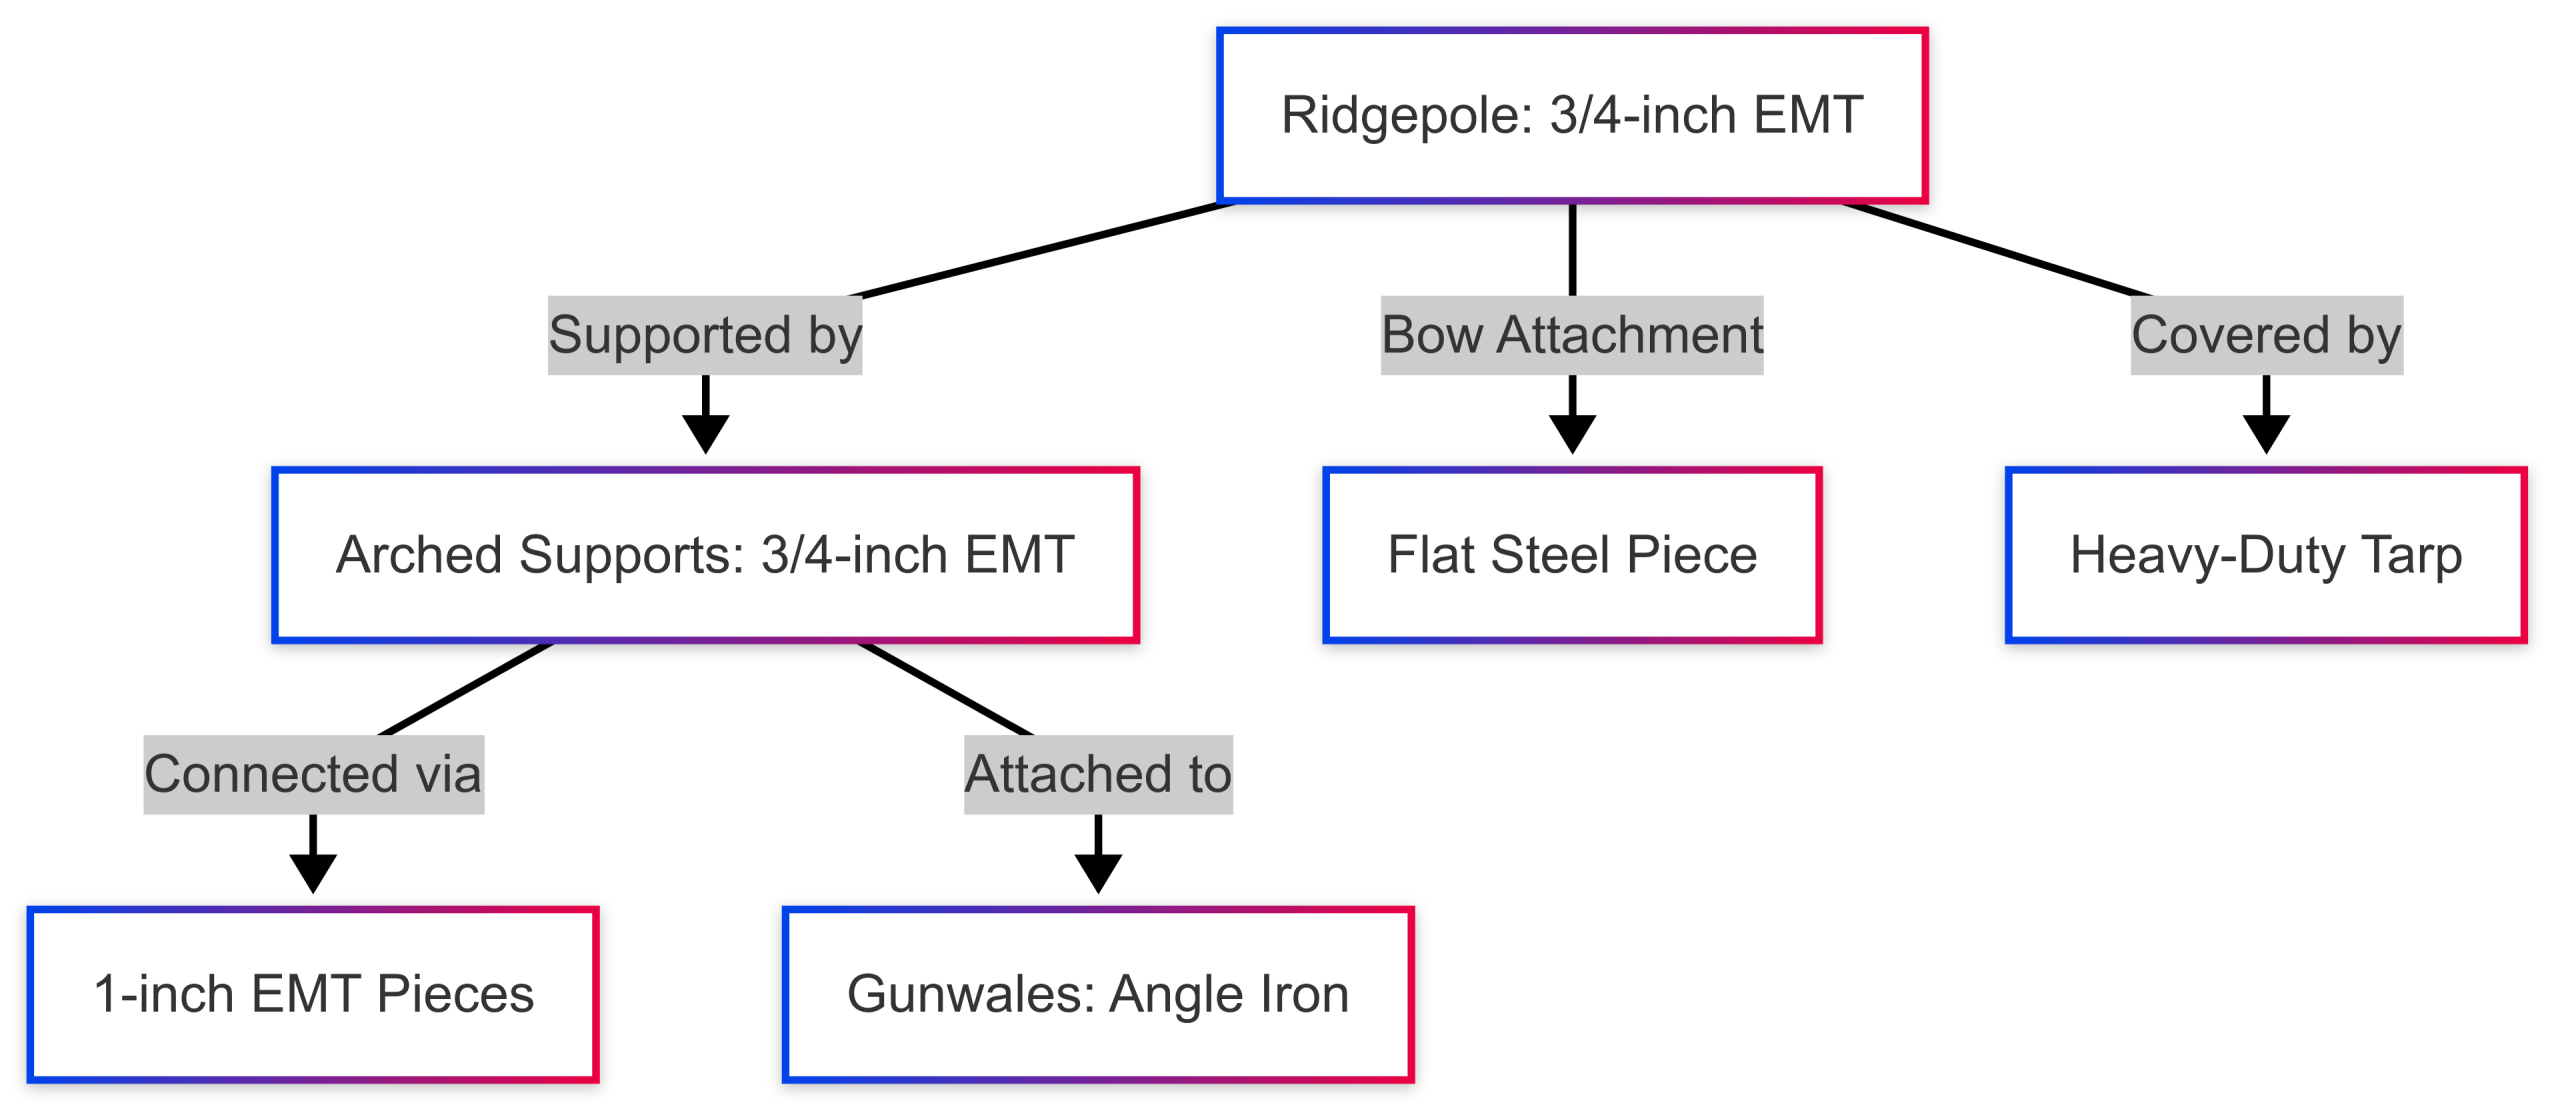
EMT Conduit Frame Construction
Materials:
- 3/4-inch EMT conduit (35 ft for a 19-ft boat)
- 1-inch EMT conduit (3-inch pieces for supports)
- Kover Klamps or conduit connectors
- 1/8-inch x 1-inch flat steel (8 inches for bow attachment)
- 1-inch steel angle iron (1 ft for gunwale attachments)
- Heavy-duty tarp (20×30 ft)
Steps:
- Determine Frame Design:
- Create a central ridgepole running from bow to stern.
- Add arched supports every 4–6 ft to prevent sagging.
- Ensure the ridgepole is 18–24 inches above the highest point for snow shedding.
- Cut and Assemble Ridgepole:
- Cut two 3/4-inch EMT conduits to form a 15-ft ridgepole (adjust for boat length).
- Weld or connect with Kover Klamps.
- Bend the bow end at a 45-degree angle or attach a 45-degree elbow.
- Create Ridgepole Supports:
- Cut three 3-inch pieces of 1-inch EMT for each support.
- Cut 3/4-inch EMT for support legs (e.g., 30–36 inches, depending on position).
- Grind the ends of the 3/4-inch EMT to fit snugly around the 1-inch pieces.
- Weld or clamp the legs to the 1-inch pieces, forming an arch.
- Attach to Gunwales:
- Cut 2-inch pieces of angle iron for gunwale attachments.
- Weld or bolt the angle iron to the support legs.
- Secure the supports to the boat’s gunwales with clamps or screws.
- Mount Ridgepole:
- Temporarily mount the ridgepole using boxes or duct tape to determine bow attachment.
- Weld or bolt a flat steel piece to the ridgepole for bow attachment.
- Slide supports onto the ridgepole and adjust for fit.
- Test Stability:
- Push gently from different angles to ensure the frame is secure.
- Add additional supports if needed for larger boats or heavy snow loads.
Diagram:
PVC Frame Alternative
- Materials: 1.5-inch PVC pipes, T-connectors, 45-degree elbows, tarp.
- Steps:
- Cut PVC pipes to match boat dimensions.
- Assemble a central ridgepole using T-connectors.
- Create arched supports with 45-degree elbows.
- Secure to rod holders or gunwales with clamps.
- Dry-fit for easy disassembly and storage.
Note: PVC is less durable in cold climates and may require replacement after 1–2 seasons.
Wood Frame Alternative
- Materials: 2x4s, 1×6 pressure-treated lumber, carriage bolts, tarp.
- Steps:
- Build a central ridgepole with two 1×6 boards bolted together.
- Add three vertical 1×6 supports bolted to the ridgepole.
- Attach 2x4s to gunwales for additional support.
- Use rope or strapping to create ribs for tarp support.
- Pad sharp edges with carpet or neoprene.
Note: Wood frames are easy to build but may rot or loosen over time.
Step 4: Fabricating the Boat Cover
Once the frame is built, fabricate the cover to fit snugly over the frame and boat.
Cutting and Sewing
- Cut the Fabric:
- Use the boat measurements to cut the fabric, adding 6–12 inches for seams and overlap.
- Use sharp scissors or a rotary cutter for clean edges.
- Sew the Panels:
- Sew panels together using a heavy-duty sewing machine or by hand.
- Use UV-resistant, heavy-duty thread and a zigzag stitch for durability.
- Reinforce Seams:
- Add a second row of stitches or apply seam tape to prevent water seepage.
- Sew patches on high-wear areas (e.g., corners, protrusions).
- Add Grommets:
- Install metal grommets every 2–3 ft along the edges for tie-down points.
- Use a grommet tool for secure installation.
Sailboat-Specific Considerations
- Mast Protection: Cover the mast separately with a tarp or foam pipe insulation to prevent snow or ice damage.
- Streamlined Shape: Sailboats have flatter decks and taller masts, requiring a more tailored cover shape.
- Fewer Materials: Smaller sailboats require less fabric and fewer grommets.
Step 5: Securing the Boat Cover
Properly securing the cover ensures it stays in place during high winds and heavy snow.
- Lay the Cover:
- Center the cover over the frame, ensuring it covers the entire boat.
- Attach to Frame:
- Use bungee cords to attach the cover to the frame at each corner.
- Add additional bungee cords or ropes to secure loose areas.
- Tie Down to Boat:
- Loop ropes through grommets and under the hull, lacing them like a boot.
- Use ratchet straps for extra tension in snowy climates.
- Protect Protrusions:
- Secure the cover around antennas or masts with padding to prevent tearing.
- Test Security:
- Gently pull the cover from different angles to ensure it’s snug but not overly stressed.
Step 6: Maintaining Your Boat Cover
Regular maintenance extends the life of your cover and frame.
- Cleaning: Wash the cover with mild soap and water to remove dirt and prevent mold.
- Repairs: Patch tears or worn areas with duct tape or fabric patches immediately.
- Storage: Store the cover in a dry, cool place when not in use, folded properly to avoid creases.
- Support System: Use a cover support system (e.g., PVC poles or ropes) to prevent water pooling.
- Inspections: Check the cover and frame regularly for damage, especially after storms.
Step 7: Alternative Tarp Method for Sailboats
If time or resources are limited, a tarp can be used instead of a custom-sewn cover.
- Measure and Cut:
- Measure the sailboat and cut a heavy-duty tarp to size.
- Use a silver or canvas tarp for durability (avoid blue tarps).
- Secure the Tarp:
- Drape the tarp over the frame and secure with bungee cords or ropes.
- Ensure a steep pitch to shed snow and rain.
- Add Support:
- Place PVC pipes or poles under the tarp to prevent pooling.
- Cover the mast separately with foam insulation or a smaller tarp.
- Check Regularly:
- Inspect the tarp for tears or loose ties, especially after heavy snow or wind.
Benefits of a Boat Cover Support System
A well-designed boat cover support system offers:
- Protection: Shields the boat from rain, snow, UV rays, and critters.
- Cost-Effectiveness: Extends the life of factory covers, reducing replacement costs.
- Versatility: Works for boats of all sizes and types, including sailboats and fishing boats.
- Ease of Use: Quick to assemble and disassemble with proper planning.
Real-World Example: 14-Foot Fishing Boat Frame
For a 14-ft fishing boat, a typical EMT frame might include:
- Ridgepole: 15 ft long, 18 inches above gunwales.
- Supports: Three arched supports (30–36 inches long).
- Tarp: 20×30 ft heavy-duty tarp ($25–$40).
- Cost: ~$50 for materials, with a tarp replacement cost of $25 annually.
This setup has been reported to extend the life of a $200 factory cover by at least twofold, saving significant costs over time.
Tips for Success
- Prevent Critter Entry: Use mothballs or moisture-absorbing bags inside the boat to deter mice and reduce dampness.
- Ventilation: Add vents (e.g., plastic tubing or gutter drains) to promote airflow and prevent mildew.
- Snow Load: Ensure the frame has a steep pitch (at least 30 degrees) to shed snow effectively.
- Welding Tips for EMT:
- Use a MIG or flux-core welder with the lowest heat setting.
- Weld in short bursts to avoid burning through thin metal.
- Practice on scrap pieces to perfect your technique.
Conclusion
Building a DIY winter boat cover frame is a rewarding project that saves money, protects your boat, and reduces environmental waste. By carefully selecting materials, measuring accurately, and constructing a sturdy frame, you can create a custom cover that withstands harsh winter conditions. Whether you choose EMT conduit for durability, PVC for ease, or wood for simplicity, this guide provides the tools and knowledge to succeed. Regular maintenance and inspections will ensure your cover and frame last for years, keeping your boat in top condition for the next boating season.
For additional resources, consider exploring hobby welding projects or consulting local boating forums for tips tailored to your region. Happy building, and enjoy the peace of mind that comes with a well-protected boat!
Happy Boating!
Share 3 Cheap Ways to Make a DIY Frame for Your Boat Winter Cover with your friends and leave a comment below with your thoughts.
Read 3 Affordable Ways to Heat a Boat in Winter until we meet in the next article.