Transducers: Where Do You Mount One on a Pontoon Boat
Learn where to mount a transducer on a pontoon boat for optimal fish finder performance. Expert tips, installation steps, and best practices included.
Pontoon boats are a popular choice for anglers due to their spacious decks, stability, and versatility on the water. Whether you’re fishing on a calm lake or navigating a river, a fish finder can significantly enhance your experience by locating fish and underwater hazards. The key component of any fish finder is the transducer, which uses sonar to detect objects beneath the surface. However, to maximize its effectiveness, the transducer must be mounted in the right location on your pontoon boat. This guide explores the optimal placement for transducers on pontoon boats, installation best practices, and tips to ensure peak performance, all tailored to help anglers make informed decisions.
What Is a Transducer?
A transducer is the heart of a fish finder system. It converts electrical energy into sound waves, which are emitted into the water. These waves bounce off objects—such as fish, plants, or debris—and return to the transducer, which then translates the signals into visual data displayed on the fish finder’s screen. This allows anglers to identify fish locations, water depth, and potential hazards like rocks or submerged logs.
Transducers are essential for accurate fish finding, and their performance depends heavily on proper placement. Incorrect mounting can lead to distorted signals, reduced sensitivity, or complete failure of the system. For pontoon boats, which have unique hull designs with cylindrical pontoons (or “toons”), transducer placement requires careful consideration to avoid interference and ensure clear sonar readings.
Types of Transducers
Transducers come in various types, each suited to specific boat designs and fishing needs. Understanding these options helps you choose the right transducer for your pontoon boat:
- Thru-Hull Transducers: These are mounted by drilling holes into the boat’s hull. They work best on flat surfaces and are common on inboard engine boats. On pontoon boats, thru-hull transducers are less common due to the curved pontoon tubes, but they can be adapted with custom mounting rigs.
- Shoot-Thru-Hull Transducers: Designed for fiberglass hulls, these transducers are mounted inside the hull and send signals through the hull material. They’re protected from external damage and perform well at high speeds, but their accuracy is slightly lower than other types.
- Portable Mount Transducers: These use suction cups to attach to the hull, making them easy to install and remove. They’re ideal for anglers who switch between boats or prefer minimal modifications.
- Transom Mount Transducers: Mounted on the transom (the rear of the boat), these are popular for their depth range and sensitivity. They adapt well to various hull designs but may create drag at high speeds.
For pontoon boats, transom mount and portable mount transducers are the most practical due to the boat’s design and ease of installation. Below is a comparison table of transducer types:
| Transducer Type | Mounting Method | Best For | Pros | Cons |
|---|---|---|---|---|
| Thru-Hull | Drilled into hull | Inboard engine boats | High accuracy, durable | Requires hull modification |
| Shoot-Thru-Hull | Inside hull | Fiberglass hulls, high speeds | Protected, no drag | Less accurate, fiberglass only |
| Portable Mount | Suction cup on hull | Temporary use, multiple boats | Easy to install/remove, no drilling | Less secure, may detach |
| Transom Mount | Bolted to transom | Most hull designs | High sensitivity, versatile | Creates drag at high speeds |
Why Proper Transducer Placement Matters
The placement of a transducer directly affects its ability to send and receive sonar signals. On a pontoon boat, improper placement can result in:
- Signal Interference: Turbulence from the boat’s movement or propeller can disrupt sonar waves, leading to inaccurate readings.
- Physical Damage: Mounting in a vulnerable area risks the transducer being struck by debris or grounding.
- Reduced Performance: If the transducer is not submerged or is misaligned, it may fail to detect underwater objects.
Pontoon boats, with their dual or triple pontoon tubes, present unique challenges. The cylindrical shape of the pontoons creates turbulence and bubbles in the water, which can interfere with sonar signals. Additionally, pontoon boats often have accessories like ladders or aerator pumps that may limit mounting options. Choosing the right location ensures clear sonar readings and protects the transducer from damage.
Optimal Transducer Placement on a Pontoon Boat
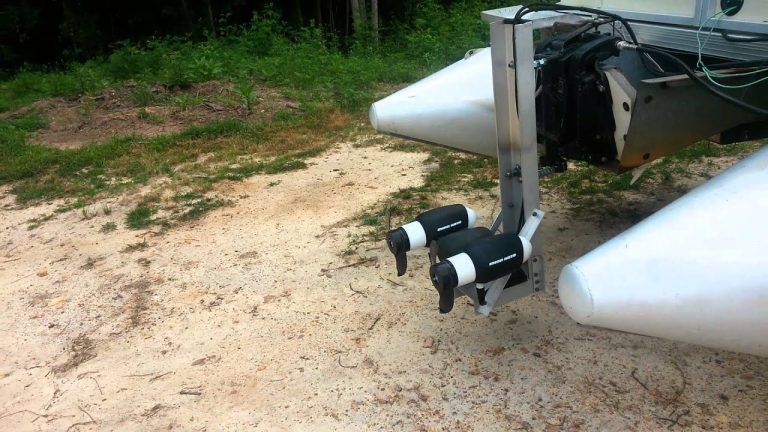
The consensus among pontoon boat owners and marine experts is to mount the transducer on a bracket at the rear of one of the pontoon tubes, typically on the starboard (right) side, close to the fish finder’s display console. This location offers several advantages:
- Proximity to the Console: Most pontoon boats have their helm or console on the starboard side. Mounting the transducer nearby minimizes cable length, reducing the risk of electrical interference or signal loss.
- Clean Water Flow: The rear of the pontoon tube provides access to relatively undisturbed water, free from the turbulence caused by the boat’s movement or propeller.
- Protection from Debris: Unlike mounting near the motor or transom, a pontoon bracket keeps the transducer away from debris that collects in high-traffic areas.
Step-by-Step Guide to Choosing the Mounting Location
- Identify the Console Location: Determine where your fish finder’s display is mounted, as the transducer should be on the same side (usually starboard) to keep cables short.
- Locate the Pontoon Bracket: Most pontoon boats have a U-shaped aluminum bracket welded to the rear of the pontoon tube, near the bottom. This is the ideal mounting spot.
- Check Water Submersion: Ensure the transducer will remain submerged even when the boat is at full throttle (wide open throttle, or WOT). The transducer must stay in contact with the water to function.
- Avoid Turbulence: Position the transducer away from areas with heavy water disturbance, such as near the propeller or aerator pumps.
- Consider Accessibility: Choose a spot that allows easy access for maintenance and adjustments without compromising the boat’s structural integrity.
Why Avoid the Transom or Motor Area?
Mounting the transducer near the transom or motor is generally discouraged. As noted by experienced pontoon owners, this area is prone to:
- Debris Accumulation: Debris like weeds or branches can get caught in the motor area, risking damage to the transducer.
- Turbulence: The propeller creates significant water disturbance, which can interfere with sonar signals.
- Drag: A transom-mounted transducer may create drag, affecting the boat’s performance at high speeds.
Instead, the pontoon bracket provides a stable, low-drag mounting point that keeps the transducer in clean water.
Installing a Transducer on a Pontoon Boat
Installing a transducer on a pontoon boat requires careful planning to ensure a secure and functional setup. Below is a detailed installation process:
Tools and Materials Needed
- Stainless steel screws, bolts, and nuts
- Drill and appropriate drill bits
- Flex loom or conduit for wire protection
- Marine-grade sealant
- Screwdriver or wrench
- Shims (if needed for leveling)
- Fish finder and transducer kit
Installation Steps
- Select the Mounting Bracket: Locate the U-shaped bracket on the rear of the starboard pontoon tube. If no bracket exists, consult a professional welder to add one, ensuring it doesn’t extend below the pontoon to minimize drag.
- Position the Transducer: Place the transducer so it extends slightly below the pontoon tube (about 1/8 inch) to ensure it remains submerged. Use shims to level the transducer side-to-side for accurate sonar readings.
- Drill Mounting Holes: Carefully drill holes in the bracket for the transducer’s mounting hardware. Take care not to damage the pontoon tube.
- Secure the Transducer: Attach the transducer using stainless steel hardware to prevent rust. Tighten the screws enough to hold the transducer securely but allow it to pivot upward if it strikes an object.
- Run the Cables: Route the transducer cable through the boat’s siding or deck, using flex loom to protect it from water and wear. Secure the cable to prevent movement.
- Connect to the Console: Run the cable to the fish finder’s display, typically mounted on the console. Drill holes in the console if necessary, but use marine-grade sealant to prevent water ingress.
- Power the Fish Finder: Connect the fish finder to a power source, such as the boat’s battery or a dedicated second battery for accessories. Ensure proper wiring to avoid power drainage.
- Test the System: Launch the boat and test the fish finder to confirm clear sonar readings. Adjust the transducer’s position if needed.
Wiring Diagram
Below is a simple diagram illustrating the wiring setup for a fish finder on a pontoon boat:
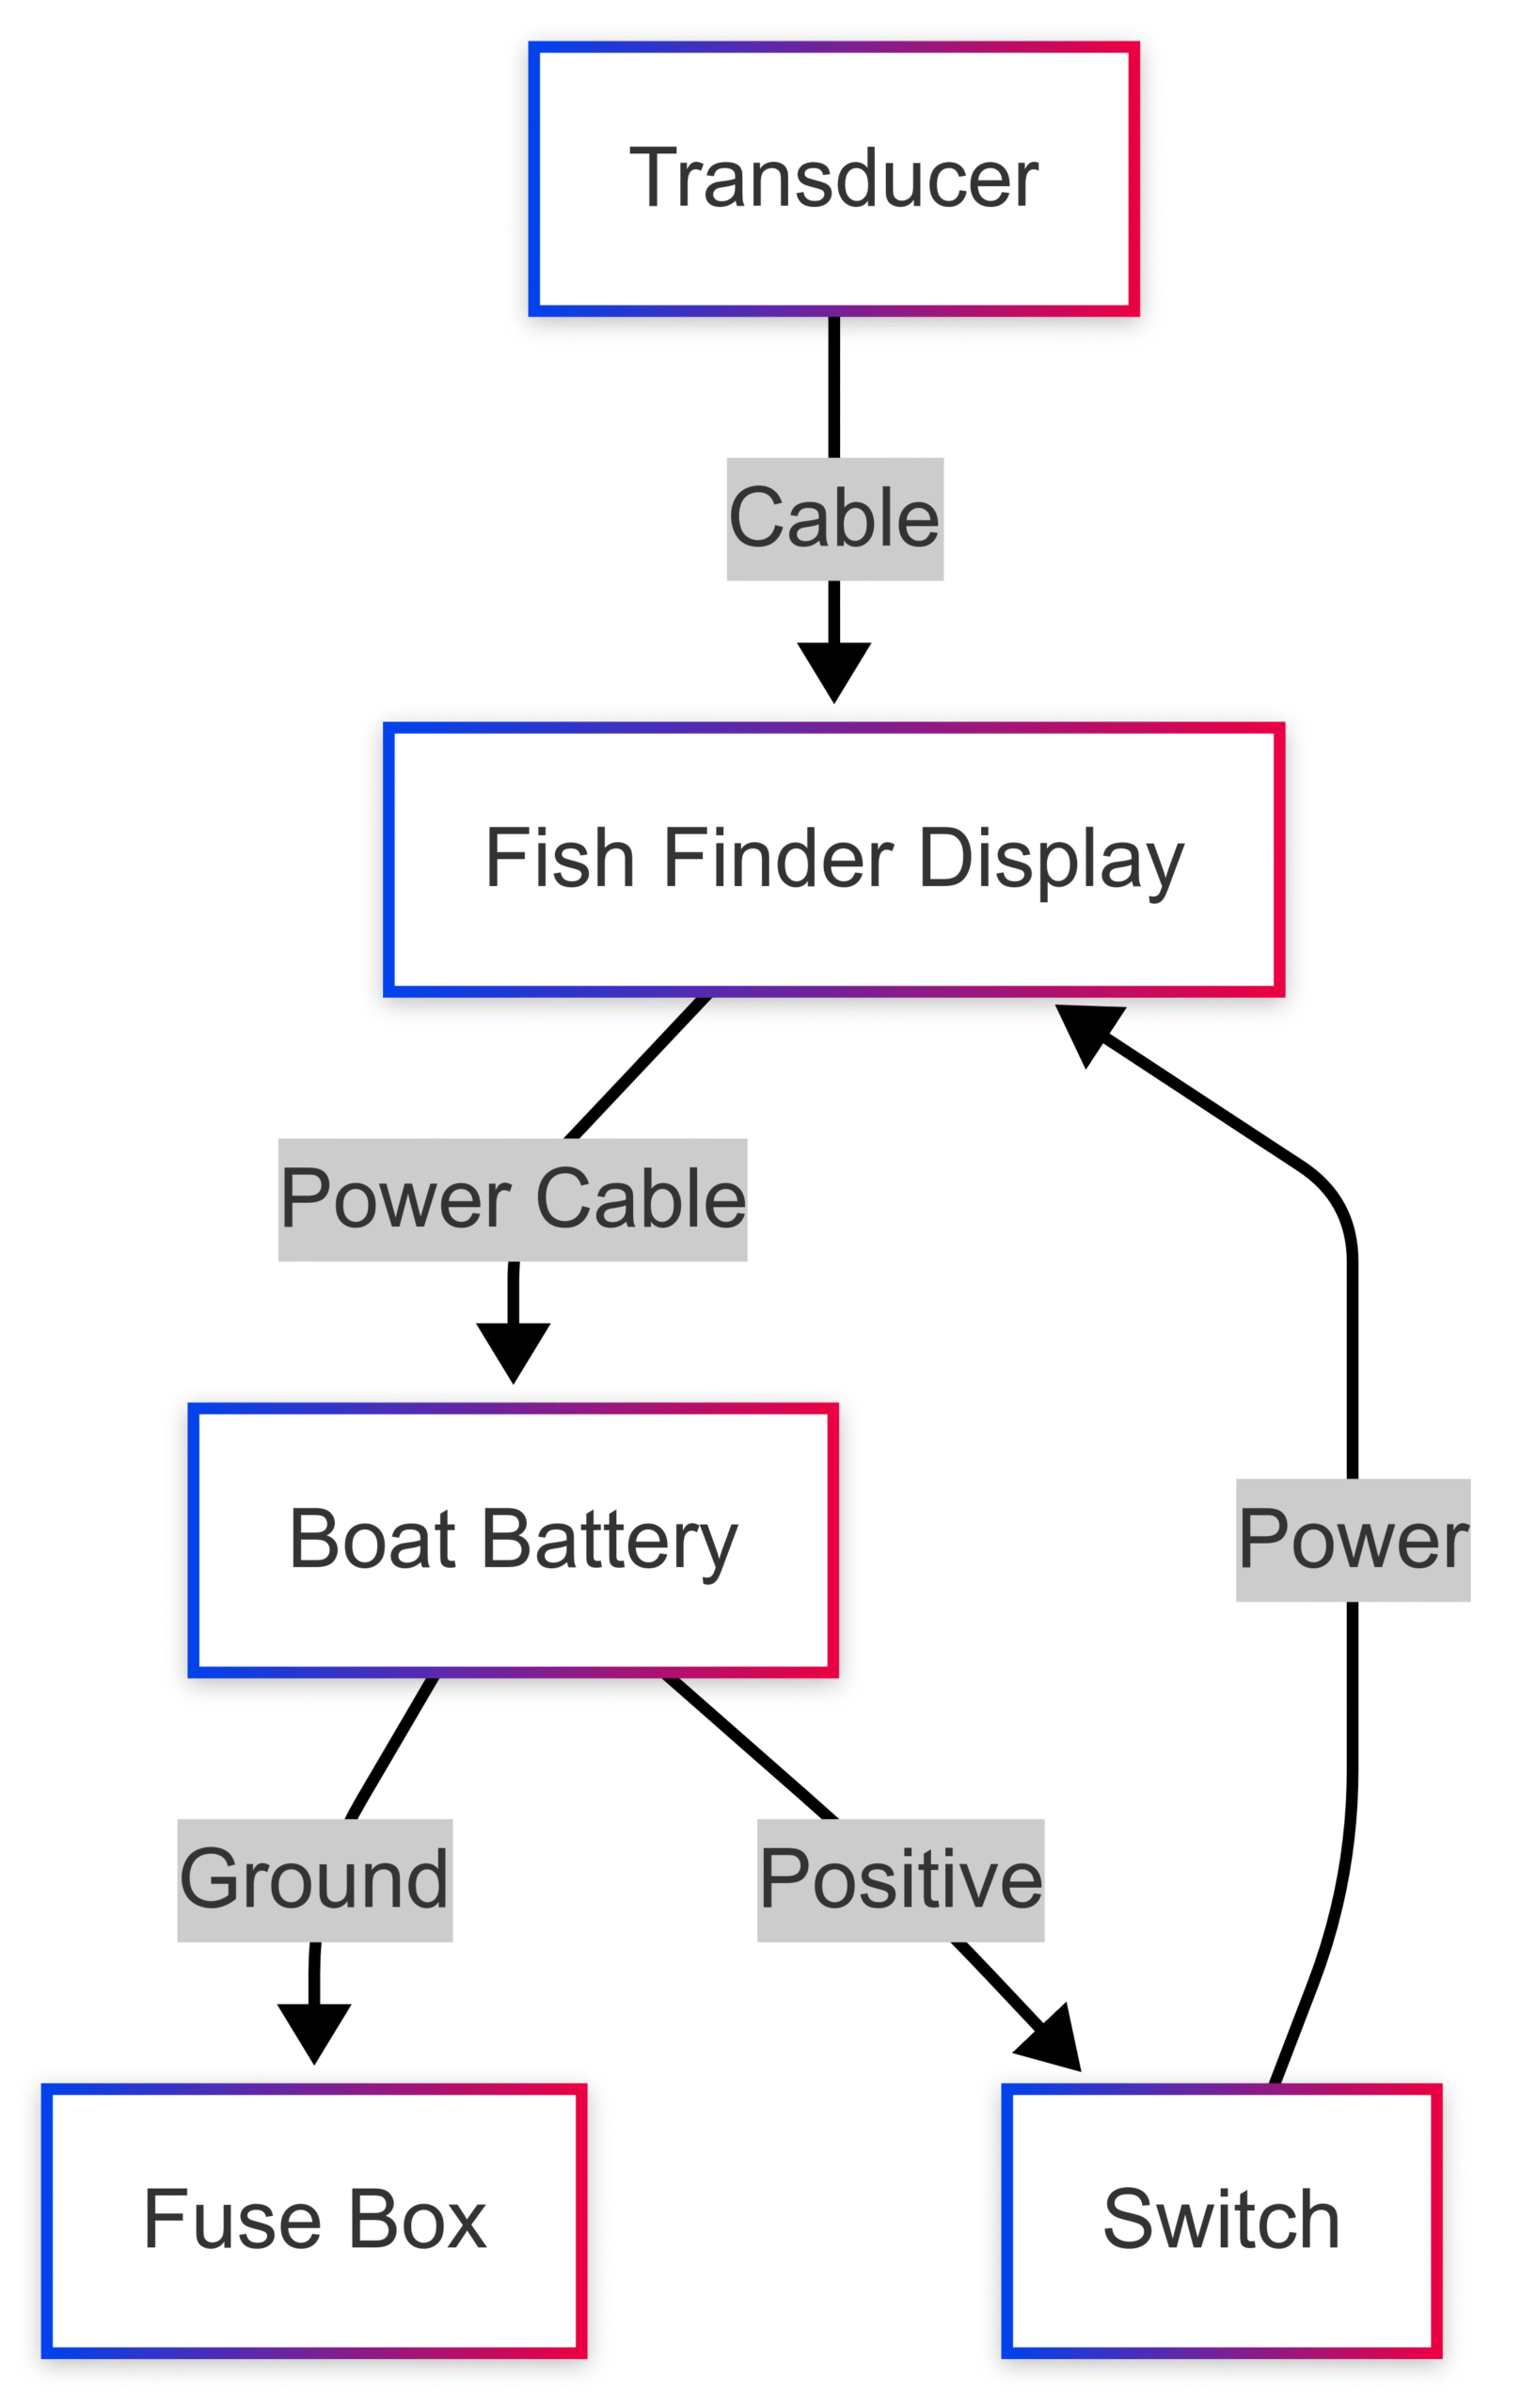
This diagram shows the transducer connected to the display, which is powered by the boat’s battery through a switch and fuse box for safety.
Tips for Optimal Transducer Performance
To ensure your transducer performs reliably, follow these best practices:
- Protect Cables: Use flex loom or conduit to shield cables from water and physical damage. This extends the lifespan of your fish finder system.
- Use Stainless Steel Hardware: Rust-resistant screws and bolts prevent corrosion and ensure a secure mount.
- Install a Second Battery: If your pontoon boat has multiple electronic accessories, consider adding a second battery to power them, reserving the primary battery for engine operation. A typical setup might include:
- Primary Battery: Powers the engine.
- Secondary Battery: Powers accessories like the fish finder, radio, or lights.
- Example Battery: Interstate DCM0035 AGM Deep Cycle (lightweight, ~35 lbs, suitable for trolling motors and fish finders).
- Regular Maintenance: Check the transducer and mounting hardware periodically for looseness or damage, especially after hitting debris.
- Avoid Over-Tightening: Allow the transducer to pivot slightly to prevent damage from impacts.
- Consider a Kick-Up Bracket: Some transducers come with kick-up brackets that automatically tilt upward if they strike an object, reducing the risk of damage.
Common Transducer Models and Specifications
Here are some popular fish finder models with transducers suitable for pontoon boats, including their specifications and approximate prices:
| Model | Transducer Type | Key Features | Frequency | Max Depth | Price (USD) |
|---|---|---|---|---|---|
| Garmin Striker 4 | Transom Mount | CHIRP sonar, GPS, 3.5” display | 77/200 kHz | 1,600 ft | ~$120 |
| Lowrance Elite-4 DSI | Transom Mount | DownScan Imaging, 4” display | 455/800 kHz | 300 ft | ~$200 |
| Humminbird Helix 5 CHIRP DI | Transom Mount | CHIRP, Down Imaging, 5” display | 200/455 kHz | 600 ft | ~$300 |
| Eagle FishMark 320 | Transom Mount | 320×320 resolution, grayscale display | 200 kHz | 800 ft | ~$150 (used) |
*Prices are approximate and may vary based on retailer and availability.
Addressing Common Installation Challenges
Pontoon boat owners often encounter specific issues when mounting transducers. Here are solutions to common problems:
- No Mounting Bracket: If your pontoon lacks a U-shaped bracket, a marine welder can add one for $50–$100. Alternatively, consider a portable mount transducer for temporary use.
- Interference from Accessories: Ladders or aerator pumps may obstruct the bracket. Relocate the pump or use a custom bracket to position the transducer correctly.
- Turbulence Issues: If sonar readings are unclear, ensure the transducer is in clean water, away from bubbles or propeller wash. Adjust its position slightly if needed.
- Cable Management: Use cable ties and flex loom to secure cables and prevent them from dangling or getting caught.
Real-World Insights from Pontoon Owners
Online forums and social media discussions provide valuable insights from pontoon boat owners who have installed transducers. For example:
- User sc_shane (from a boating forum) upgraded to an Eagle FishMark 320 and mounted the transducer on a U-shaped bracket at the rear of the pontoon tube after confirming it stayed submerged. This placement avoided turbulence and debris near the motor.
- User bradcox100 mounted a Lowrance Elite-4 DSI transducer on the aerator bracket of a Sun Tracker pontoon, as no right-side bracket was available. This solution worked well after careful installation.
- User steveiam installed transducers on both pontoon tubes of a Tracker boat, using flip-up brackets to accommodate a rear ladder, demonstrating flexibility in mounting options.
These real-world examples highlight the importance of checking your boat’s specific design and consulting with experienced anglers or professionals.
Trolling Motors and Transducers: A Brief Note
Many pontoon owners also install trolling motors for precise boat control while fishing. While this article focuses on transducers, trolling motor placement can affect transducer performance. For example, mounting a trolling motor (like the Minn Kota Ulterra or Garmin Force Kraken) off-center may cause slight boat yaw, but it doesn’t significantly impact transducer function if the transducer is mounted on the pontoon bracket. Ensure the trolling motor’s propeller doesn’t create turbulence near the transducer.
For trolling motor installation, consider:
- Mounting Location: Front deck or side mounts (e.g., Toon Troll or Shuttleslide) are common.
- Shaft Length: 30–60 inches, depending on the boat’s size and deck height.
- Battery: A lightweight AGM or lithium battery (e.g., Dakota Lithium 36V 60AH, ~$1,200) for extended use.
Conclusion
Mounting a transducer on a pontoon boat is a straightforward process when you choose the right location and follow best practices. The U-shaped bracket at the rear of the starboard pontoon tube is the optimal spot, offering clean water flow, proximity to the console, and protection from debris. By using stainless steel hardware, protecting cables, and considering a second battery, you can ensure reliable performance from your fish finder. Whether you’re upgrading to a modern unit like the Garmin Striker 4 or installing a budget-friendly Eagle FishMark 320, proper transducer placement will enhance your fishing experience, helping you locate fish and navigate safely.
For anglers new to pontoon boats or fish finders, consulting with a marine professional or referencing online forums can provide additional guidance. With the right setup, your pontoon boat will be ready for countless successful fishing trips.
Happy Boating!
Share Transducers: Where Do You Mount One on a Pontoon Boat with your friends and leave a comment below with your thoughts.
Read All About Pontoon Boat Trailer Ladders: Climbing Aboard until we meet in the next article.