What happens when a tank vent gets clogged
Learn what happens when a tank vent gets clogged, its symptoms, causes, and fixes. Discover how to diagnose and prevent fuel tank vent issues effectively.
A clogged fuel tank vent might seem like a minor issue, but it can lead to significant problems for vehicles, from cars and trucks to motorcycles. The fuel tank vent is a critical component of a vehicle’s evaporative emission control (EVAP) system, designed to allow air to enter or exit the tank to equalize pressure as fuel is added or consumed. When this vent becomes obstructed, it disrupts the fuel system’s balance, leading to performance issues, safety concerns, and potential damage to the vehicle. This article explores the causes, symptoms, diagnosis, and solutions for a clogged tank vent, drawing from real-world experiences and technical insights to provide a comprehensive guide for vehicle owners.
Understanding the Fuel Tank Vent System
The fuel tank vent is part of the EVAP system, which prevents fuel vapors from escaping into the atmosphere. The vent allows air to flow in and out of the fuel tank, compensating for changes in pressure caused by fuel consumption, temperature changes, or refueling. In modern vehicles, the vent is typically integrated into the fuel cap or connected via a hose to a charcoal canister, which captures and stores fuel vapors. In older vehicles or motorcycles, the vent may be a simple hose or valve attached to the tank or cap.
When the vent becomes clogged—due to debris, corrosion, or a pinched hose—it disrupts this pressure balance, leading to a range of symptoms. These issues can affect both gasoline and diesel vehicles, as well as motorcycles, with varying degrees of severity depending on the vehicle’s design and usage.
How the Fuel Tank Vent Works
The fuel tank vent system serves three primary functions:
- Pressure Equalization: Allows air to enter the tank as fuel is consumed, preventing a vacuum from forming.
- Vapor Management: Directs fuel vapors to the EVAP system’s charcoal canister for storage and later combustion, reducing emissions.
- Refueling Support: Permits air to escape the tank during refueling, ensuring smooth fuel flow without backpressure.
A clogged vent disrupts these functions, causing pressure buildup or vacuum formation, which can manifest in various ways, from difficulty refueling to engine performance issues.
Symptoms of a Clogged Tank Vent
A clogged fuel tank vent can produce several noticeable symptoms, ranging from minor inconveniences to severe mechanical issues. Below are the most common signs, illustrated with real-world examples from vehicle owners.
1. Difficulty Filling the Fuel Tank
One of the most frequent symptoms is trouble refueling. When the vent is clogged, air cannot escape the tank as fuel enters, causing backpressure that triggers the fuel pump nozzle to shut off prematurely. This results in a slow, frustrating refueling process, with the nozzle clicking off repeatedly as if the tank were full.
Example: A truck owner reported that their ’97 Dodge 3500 experienced significant air pressure in the fuel tank during refueling, with the tank visibly deforming inward by nearly an inch. After removing the fuel cap, the tank returned to its normal shape as air rushed in, confirming a clogged vent.
2. Fuel Odor
A blocked vent can trap fuel vapors inside the tank, which may escape through the filler neck or other openings, causing a noticeable gasoline or diesel smell inside or around the vehicle. This is particularly concerning, as it indicates a failure in the EVAP system’s ability to manage vapors, potentially leading to environmental and safety issues.
3. Check Engine Light
The vehicle’s onboard diagnostics system monitors the EVAP system for faults. A clogged vent can trigger diagnostic trouble codes (DTCs) such as P0440 (General EVAP System Failure) or P0442 (EVAP System Leak Detected), illuminating the check engine light. According to RepairPal, this is a common issue in vehicles with obstructed vents.
4. Pressure Buildup or Vacuum Formation
A clogged vent can cause either excessive pressure or a vacuum inside the fuel tank. A pressure buildup may result in a “hiss” sound when opening the fuel cap, while a vacuum can make the cap difficult to remove. In extreme cases, the vacuum can deform or collapse the fuel tank, as seen in the case of a 1983 Mercedes-Benz 300D W123, where the tank was crushed inward during a long highway trip, reducing its capacity to just 6 gallons.
Example: The Mercedes owner described driving 3,200 miles with no power loss, despite the tank collapsing due to a clogged vent. The issue only became apparent when the fuel gauge stopped functioning and fill-up volumes decreased significantly.
5. Engine Performance Issues
In some cases, a clogged vent can affect engine performance by disrupting fuel delivery. A vacuum in the tank can restrict fuel flow to the pump, leading to symptoms such as:
- Hard starting or extended cranks: The engine may struggle to start due to insufficient fuel pressure.
- Rough idling or misfires: Inconsistent fuel delivery can cause the engine to run unevenly.
- Power loss or bogging: Particularly in motorcycles, a clogged vent can cause the engine to sputter or lose power, especially at higher RPMs.
Example: A 2008 Suzuki DL650 V-Strom owner reported losing acceleration after 20 minutes of riding, with the engine sputtering and failing to exceed 7,000 RPM. The issue was traced to a clogged fuel vent, which caused a vacuum that restricted fuel flow.
6. Fuel Tank Damage
In severe cases, a clogged vent can cause physical damage to the fuel tank. The vacuum created by a blocked vent can collapse a steel or plastic tank, reducing its capacity and potentially causing leaks or structural failure. This is particularly dangerous in older vehicles with metal tanks, which may not return to their original shape after deformation.
Example: The Mercedes W123 owner’s tank was so severely collapsed that it pulled the filler cap inward, nearly damaging the vehicle’s bodywork. After clearing the vent, the tank regained its full capacity, though a crease remained.
Causes of a Clogged Tank Vent
Several factors can lead to a clogged fuel tank vent, including:
- Debris Accumulation: Dirt, dust, or insects can block the vent hose or valve, especially in vehicles exposed to harsh environments.
- Corrosion: In older vehicles, rust or corrosion in the vent line or fuel cap can obstruct airflow. A 1999 Dodge 2500 owner reported a corroded fuel cap vent as the cause of their issue.
- Pinched or Kinked Hoses: Improper installation or tank movement can pinch the vent hose, restricting airflow. A 2013 Triumph Street Triple R owner discovered a pinched breather hose causing lean running conditions.
- Faulty Fuel Cap: A non-vented or malfunctioning fuel cap can prevent proper ventilation. A Harley-Davidson owner resolved their bike’s stalling issue by replacing a non-vented cap with a vented one.
- EVAP System Issues: In modern vehicles, a clogged charcoal canister or malfunctioning purge valve can mimic the symptoms of a clogged vent.
Diagnosing a Clogged Tank Vent
Diagnosing a clogged fuel tank vent requires a systematic approach. Below is a step-by-step guide based on real-world experiences and expert recommendations.
Step 1: Listen for Pressure or Vacuum Sounds
Open the fuel cap after driving or during refueling. A hissing sound indicates pressure buildup, while a sucking sound suggests a vacuum. For example, the Dodge 3500 owner heard air rushing into the tank, confirming a vacuum caused by a clogged vent.
Step 2: Inspect the Fuel Cap and Vent Hose
Check the fuel cap for a vent valve (common in motorcycles and older vehicles) and ensure it’s not clogged with debris or corrosion. Inspect the vent hose for kinks, pinches, or blockages. The Suzuki V-Strom owner was advised to check both the cap and the drain hose for obstructions.
Step 3: Test with a Loose Fuel Cap
Drive with the fuel cap slightly loose to allow air to enter the tank. If symptoms like power loss or hard starting disappear, the vent is likely clogged. This method was suggested for both the Dodge 3500 and Suzuki V-Strom.
Caution: Riding or driving with a loose cap can be hazardous, as it may allow fuel to spill in an accident. Use this method briefly and in a controlled environment.
Step 4: Check Fuel Tank Condition
Visually inspect the tank for signs of deformation, such as dents or creases. The Mercedes W123 owner discovered their tank had collapsed inward, a clear sign of a vacuum caused by a clogged vent.
Step 5: Monitor Engine Performance
Use a scan tool to check for EVAP-related trouble codes (e.g., P0440, P0442). If the check engine light is on, these codes can point to a vent issue. Additionally, monitor fuel pressure with a gauge to ensure the pump is delivering adequate fuel, as low pressure may indicate a vacuum-related restriction.
Step 6: Perform a Fuel Flow Test
For motorcycles or vehicles with suspected fuel delivery issues, perform a fuel flow test to measure the pump’s output. The Suzuki V-Strom owner was advised to warm up the bike and test fuel flow to rule out a clogged fuel filter or pump.
Solutions for a Clogged Tank Vent
Once a clogged vent is confirmed, several methods can be used to clear it, depending on the severity and location of the blockage.
1. Cleaning the Vent Hose
- Tools Needed: Compressed air, brake cleaner, thin wire (e.g., guitar string).
- Procedure: Remove the vent hose from the tank or cap, blow compressed air through it, and use brake cleaner to dissolve debris. A thin wire can dislodge stubborn blockages. The Dodge 3500 owner successfully cleared their vent using brake cleaner, forced air, and a guitar string.
2. Replacing the Fuel Cap
If the fuel cap’s vent valve is clogged or faulty, replace it with a vented cap compatible with your vehicle. A 1999 Dodge 2500 owner resolved their issue by replacing a corroded cap. Typical costs for a replacement cap range from $10 to $30, depending on the vehicle make and model.
3. Inspecting and Repositioning Hoses
Ensure the vent hose is not kinked or pinched. Reroute the hose if necessary, as the Triumph Street Triple owner did after discovering a pinched breather hose. Secure the hose with zip ties to prevent future issues.
4. Replacing EVAP Components
In modern vehicles, a clogged charcoal canister or faulty purge valve may require replacement. These components typically cost $50–$150, with labor costs ranging from $100–$200, according to RepairPal.
5. Professional Diagnosis and Repair
For complex issues or if you’re uncomfortable performing repairs, consult a mechanic. The Suzuki V-Strom owner opted for professional diagnosis due to warranty coverage, which covered the cost of repairs. Labor rates vary but typically range from $80–$120 per hour.
Preventing Clogged Tank Vents
Preventive maintenance can reduce the risk of a clogged vent:
- Regular Inspections: Check the fuel cap and vent hose for debris or corrosion during routine maintenance.
- Use Quality Fuel: Poor-quality fuel can leave residues that clog the EVAP system.
- Proper Tank Installation: Ensure vent hoses are not pinched during tank installation or repairs.
- Replace Aging Components: Replace old fuel caps or hoses in vehicles over 10 years old to prevent corrosion-related blockages.
Case Studies: Real-World Examples
Below are summarized case studies from vehicle owners who experienced clogged tank vents, highlighting the diversity of symptoms and solutions.
Case Study 1: 1997 Dodge 3500 Truck
- Symptoms: Hard starting, extended cranks, tank deformation, and pressure buildup during refueling.
- Diagnosis: Vacuum in the tank caused by a clogged vent, confirmed by tank deformation and air rush when opening the cap.
- Solution: Cleared the vent using brake cleaner, compressed air, and a guitar string. Secured the hose to prevent future blockages.
- Outcome: Resolved hard starting and tank deformation, with normal refueling restored.
Case Study 2: 1983 Mercedes-Benz 300D W123
- Symptoms: Tank collapsed, reduced fuel capacity (6 gallons), and fuel gauge failure during a 3,200-mile trip.
- Diagnosis: Clogged vent caused a vacuum, collapsing the tank. No power loss occurred due to the robust OM617 lift pump.
- Solution: Used 120 psi compressed air to clear the vent and restore tank shape.
- Outcome: Full tank capacity restored, with no further issues on the return trip.
Case Study 3: 2008 Suzuki DL650 V-Strom
- Symptoms: Loss of acceleration after 20 minutes, sputtering, and inability to exceed 7,000 RPM.
- Diagnosis: Suspected clogged fuel vent causing a vacuum, confirmed by testing with a loose cap.
- Solution: Sent to a dealership for diagnosis under warranty, likely requiring vent cleaning or fuel pump maintenance.
- Outcome: Awaiting professional repair, expected to resolve performance issues.
Case Study 4: 2013 Triumph Street Triple R
- Symptoms: Lean running, jerky throttle, and poor fuel economy as fuel level dropped.
- Diagnosis: Clogged breather hose caused pressure buildup, restricting fuel flow to the pump.
- Solution: Blew compressed air through the breather tube, clearing debris and restoring airflow.
- Outcome: Normal performance and fuel economy restored.
Technical Specifications and Costs
| Component | Typical Cost | Function | Common Issues |
|---|---|---|---|
| Fuel Cap (Vented) | $10–$30 | Allows air to enter/exit tank | Corrosion, clogged valve |
| Vent Hose | $5–$20 | Connects tank to EVAP system or cap | Kinks, pinches, debris accumulation |
| Charcoal Canister | $50–$150 | Stores fuel vapors | Clogging, saturation |
| Purge Valve | $30–$100 | Controls vapor flow to engine | Sticking, failure |
| Labor (Mechanic) | $80–$120/hour | Diagnosis and repair | Varies by complexity |
Note: Costs are approximate and based on average U.S. prices for parts and labor.
Visualizing the Fuel Tank Vent System
To better understand the fuel tank vent system, the following diagram illustrates the components and airflow in a typical vehicle:
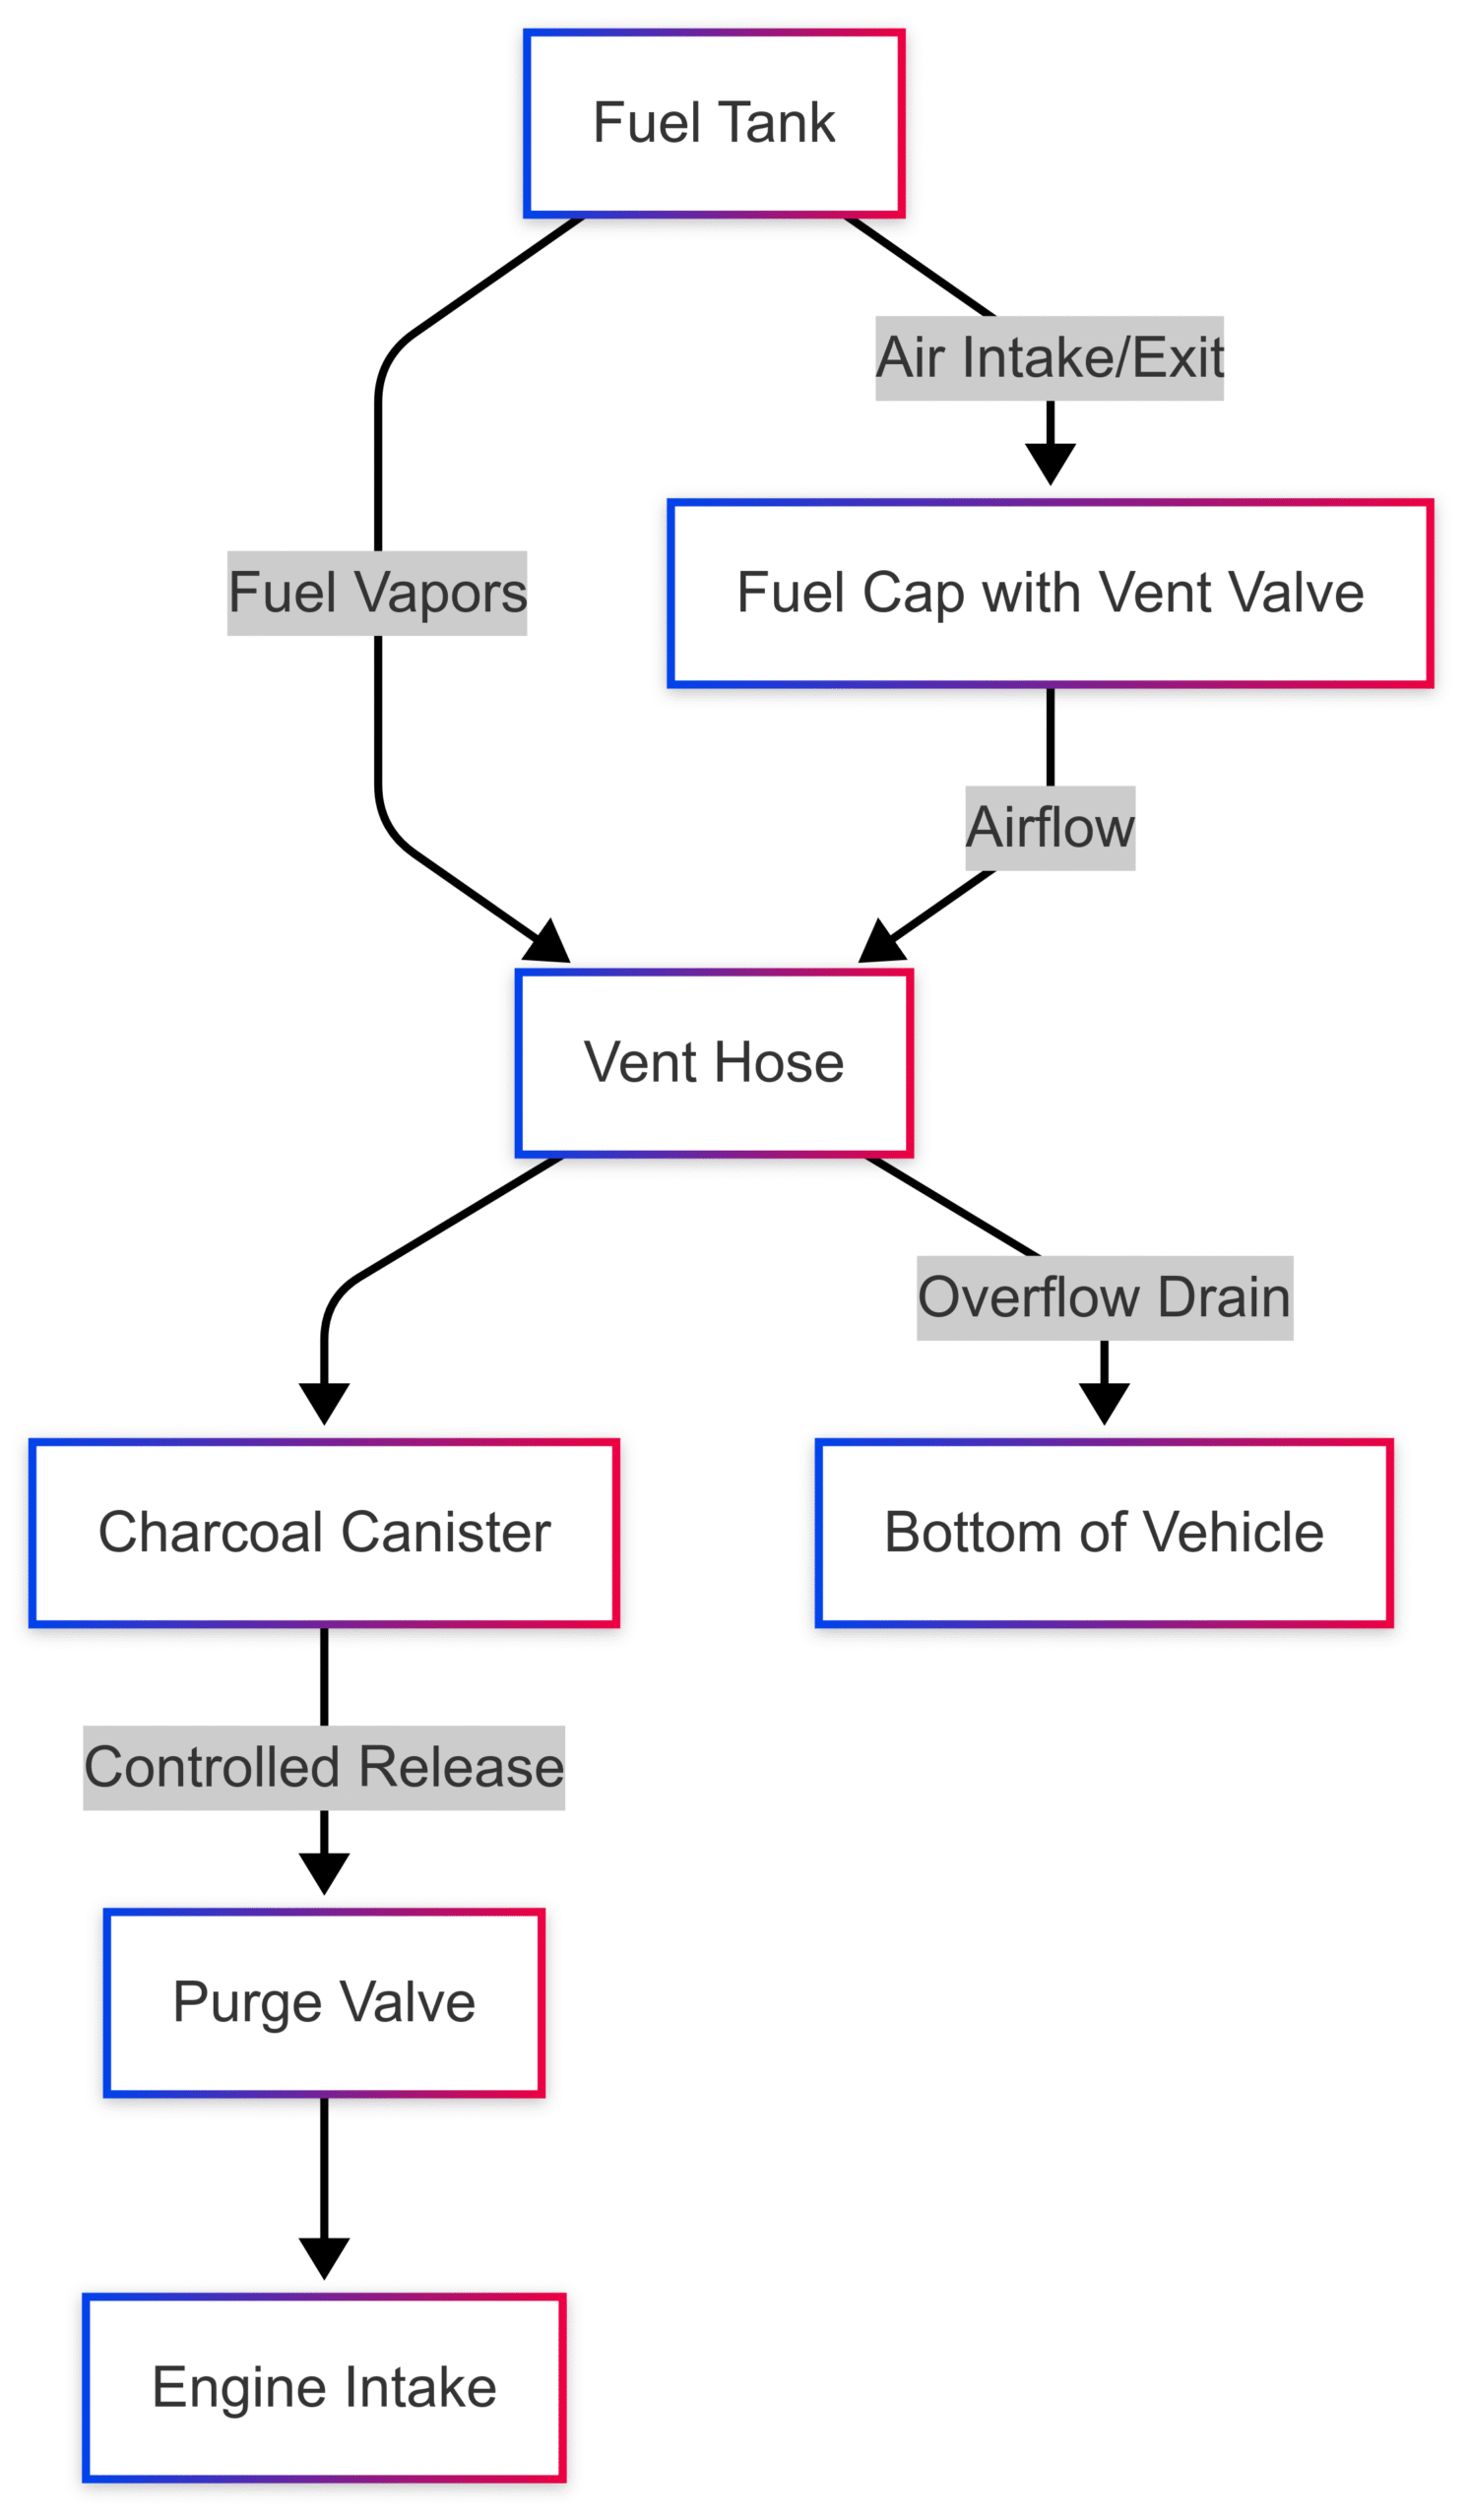
This diagram shows how the vent hose connects the tank to the EVAP system, with the fuel cap allowing air to enter or exit to equalize pressure. A clog in the vent hose or fuel cap disrupts this flow, leading to the symptoms described.
Conclusion
A clogged fuel tank vent can cause a range of issues, from difficulty refueling to engine performance problems and even tank damage. By understanding the symptoms—such as hard starting, fuel odors, or tank deformation—vehicle owners can diagnose and address the issue promptly. Simple solutions like cleaning the vent hose or replacing the fuel cap can often resolve the problem, while more complex cases may require professional intervention. Regular maintenance and inspections can prevent clogs, ensuring the fuel system operates smoothly and efficiently. Whether you drive a truck, car, or motorcycle, staying vigilant about your fuel tank vent can save you from costly repairs and keep your vehicle running at its best.
Share What happens when a tank vent gets clogged with your friends and leave a comment below with your thoughts.
Read A Guide to Boat Charity Donation until we meet in the next article.