How to Clean a Boat Fuel Tank Without Removing It
Maintaining a clean boat fuel tank is critical for ensuring optimal engine performance, preventing costly repairs, and ensuring safety on the water. Contaminants like varnish, ethanol deposits, water, and microbial growth can accumulate in the tank, especially in boats that sit unused for extended periods. Removing a fuel tank for cleaning can be a daunting and expensive task, particularly for built-in tanks with limited access. Fortunately, it’s possible to clean a boat fuel tank effectively without removing it, even in challenging cases like a 150-gallon aluminum tank with varnish and ethanol deposits. This comprehensive guide provides a detailed, step-by-step process, practical tips, and expert insights to help you restore your fuel tank to near-factory condition, all while keeping costs and complexity manageable.
Why Cleaning Your Boat Fuel Tank Matters
A boat’s fuel tank is the heart of its fuel system, and its condition directly impacts engine reliability and performance. Over time, fuel tanks can accumulate contaminants that cause significant issues:
- Clogged Fuel Lines and Filters: Varnish, sludge, and debris can block fuel flow, leading to engine sputtering or stalling.
- Reduced Fuel Efficiency: Contaminated fuel burns less efficiently, increasing consumption and costs.
- Engine Damage: Water and particulate matter can corrode fuel injectors, pumps, and other components.
- Safety Risks: Leaking or degraded fuel can create fire hazards or environmental contamination.
Ethanol-blended fuels, such as E10 (10% ethanol), are particularly problematic. Ethanol attracts water, promotes oxidation, and can dissolve older tank linings, leading to varnish and sludge buildup. Boats stored for long periods, like the 1998 Formula with a 106-gallon tank or a Crestliner sitting for 10 years, are especially prone to these issues. Regular cleaning—ideally annually or before long-term storage—prevents these problems and extends the life of your fuel system.
Assessing the Problem: Common Contaminants and Tank Conditions
Before cleaning, identify the type and extent of contamination in your fuel tank. Common issues include:
| Contaminant | Description | Symptoms |
|---|---|---|
| Varnish/Ethanol Deposits | Sticky, tea-colored residue from degraded fuel, often caused by ethanol breakdown. | Clogged filters, poor engine performance, visible deposits on tank bottom. |
| Water | Accumulates from condensation or poor fuel quality, promoting corrosion and microbial growth. | Sputtering engine, water visible in fuel samples, corrosion in aluminum tanks. |
| Sludge/Microbial Growth | Gelatinous deposits from bacteria or fungi, common in diesel or stagnant fuel. | Blocked fuel lines, foul odors, engine power loss. |
| Rust/Corrosion | Metal tank degradation, especially in steel or aluminum tanks exposed to water. | Particles in fuel, pitting on tank surfaces, potential leaks. |
For example, a 150-gallon aluminum tank with 50 gallons of fuel contaminated by varnish and ethanol deposits, as described in the forum post, likely has sticky residue on the tank bottom. Similarly, a 106-gallon tank in a 1998 Formula with frequent filter clogging suggests particulate matter or varnish. Inspect the tank using a flashlight or endoscopic camera through the sender hole to confirm the contaminant type. If pitting or corrosion is visible, assess whether cleaning is sufficient or if tank replacement is necessary.
Tools and Materials Needed
Cleaning a fuel tank without removing it requires specific tools and materials to ensure safety and effectiveness. Here’s a comprehensive list:
| Item | Purpose | Estimated Cost (USD) |
|---|---|---|
| Siphon Pump (Manual) | Safely removes fuel without sparks; hand-operated for safety. | $15–$30 |
| Fuel Containers | Stores drained fuel; must be fuel-safe (e.g., 5-gallon jerry cans). | $10–$20 each |
| Cleaning Solvents | Dissolves varnish and sludge (e.g., E85, denatured alcohol, StarTron). | $10–$25 per gallon |
| Pressure Washer (Optional) | Cleans tank interior through sender hole; low-pressure for small tanks. | $50–$150 (if not owned) |
| Flexible PVC Pipe/Rod | Reaches baffles and corners for cleaning and siphoning. | $5–$15 |
| Endoscopic Camera | Inspects tank interior through small access holes. | $20–$50 |
| Replacement Fuel Filters | Ensures clean fuel post-cleaning; marine-grade, USCG-approved. | $10–$30 each |
| Safety Gear | Gloves, safety glasses, mask to protect against fumes and spills. | $10–$25 |
| Absorbent Pads/Rags | Manages spills and wipes sludge. | $5–$15 |
| Fuel Stabilizer | Prevents future fuel degradation (e.g., STA-BIL, StarTron). | $10–$20 |
Safety Note: Avoid electric pumps unless they are ignition-protected to prevent sparks. Work in a well-ventilated area, keep ignition sources away, and have a fire extinguisher on hand.
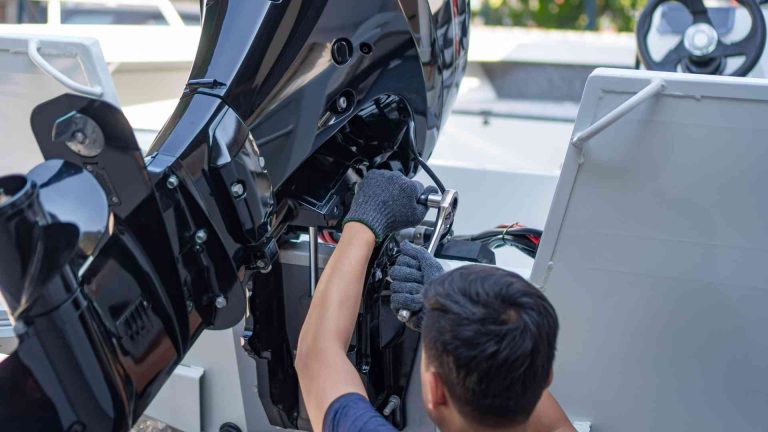
Step-by-Step Guide to Cleaning a Boat Fuel Tank Without Removal
This process is designed for tanks with limited access, such as those with only a sender hole (e.g., 1.5–2.5 inches). It draws from successful DIY methods, like those shared by Captainhaug, and expert recommendations.
Step 1: Prepare the Workspace
- Ventilation: Work outdoors or in a well-ventilated area to avoid inhaling fuel fumes, which are toxic and flammable.
- Safety Checks: Remove ignition sources (e.g., cigarettes, extension cords). Ensure the boat is stable on a trailer or lift.
- Tilt the Boat: If possible, tilt the boat to one corner (e.g., bow high, stern low) to pool contaminants for easier removal. Consult the boat’s manual for safe tilting.
Step 2: Drain the Fuel
- Access the Tank: Remove the fuel sender unit or use the fuel pickup line to access the tank. For a 150-gallon tank with 50 gallons of fuel, expect multiple 5-gallon containers.
- Siphon Safely: Use a manual siphon pump to transfer fuel into fuel-safe containers. Avoid mouth-siphoning due to toxicity.
- Inspect Fuel: Check drained fuel for water, sludge, or varnish. If heavily contaminated, do not attempt to reuse it. Dispose of old fuel at a hazardous waste facility or marina recycling program.
Pro Tip: For large tanks, consider professional fuel polishing services (e.g., USA Fuel Service), which cost $225–$500 depending on tank size and location. This is ideal if you lack time or equipment.
Step 3: Inspect the Tank Interior
- Visual Check: Use a flashlight or endoscopic camera to inspect the tank through the sender hole. Look for varnish, sludge, corrosion, or pitting.
- Assess Baffles: Most tanks have baffles (internal dividers) that complicate cleaning. Note their location to guide your cleaning strategy.
- Evaluate Condition: If severe corrosion or pitting is present, consult a professional to determine if the tank is salvageable. Minor deposits can be cleaned DIY.
Step 4: Loosen Deposits with a Solvent
- Choose a Solvent: E85 (85% ethanol) is effective for dissolving varnish and ethanol deposits, as demonstrated by Captainhaug. Alternatives include:
- Denatured Alcohol: $10–$15 per gallon; dissolves varnish but requires thorough rinsing.
- StarTron Tank Cleaner: $15–$25 per bottle; enzyme-based, safe for aluminum, breaks down sludge.
- Simple Green (Diluted): $10–$15 per gallon; gentle but less effective for heavy varnish.
- Application: Pour 1–2 gallons of solvent into the tank (adjust for tank size). For a 150-gallon tank, 2 gallons of E85 or StarTron is sufficient.
- Agitate: If on a trailer, tow the boat in figure-8 patterns or over bumpy roads to slosh the solvent. Alternatively, insert a flexible PVC pipe with a rag to scrub deposits manually.
- Let Sit: Allow the solvent to sit for 2–4 hours (or per product instructions) to break down deposits.
Warning: Avoid harsh degreasers (e.g., acetone, CRC) as they can corrode aluminum tanks. Lacquer thinner, while effective, may damage fuel lines and requires replacement post-cleaning.
Step 5: Siphon Out Solvent and Debris
- Siphon Again: Use the siphon pump to remove the solvent and loosened debris. Insert a flexible hose or PVC pipe to reach baffles and corners.
- Tilt for Access: Tilt the boat to pool liquid in one corner, as Captainhaug did by jacking up the bow.
- Repeat if Needed: If debris remains, repeat the solvent application and siphoning until the tank is clear.
Step 6: Rinse the Tank
- Water Rinse: Fill the tank with clean water (or use a garden sprayer for small volumes). For a 150-gallon tank, 5–10 gallons may suffice for rinsing.
- Pressure Wash (Optional): Use a low-pressure washer with a wand to clean through the sender hole. Focus on baffles and corners. Captainhaug used a garden sprayer with a 1/2-inch PVC pipe to reach baffles.
- Siphon Water: Use a manual or electric water transfer pump (e.g., $30–$50) to remove water and debris. Tilt the boat to ensure all water pools in one area.
- Repeat: Continue rinsing and siphoning until the water runs clear, indicating no residual solvent or debris.
Note: Varnish floats in water, making it easier to siphon out during rinsing, as Captainhaug observed.
Step 7: Dry the Tank
- Air Dry: Let the tank air dry for several hours in a well-ventilated area. Sunlight and low humidity speed up the process.
- Manual Drying: Use a shop vac or compressed air to remove residual water droplets. Captainhaug blew air through a PVC pipe to dry the tank.
- Add Heet: To absorb any remaining water, add 1–2 bottles of Heet ($5–$10) before refilling with fuel.
Step 8: Reinstall Components
- Replace Fuel Filter: Install a new, USCG-approved marine fuel filter ($10–$30). For the 1998 Formula with frequent filter clogging, consider a larger filter (e.g., Wix 33033, $15) or a secondary inline filter for added protection.
- Reconnect Fuel Lines: Ensure all connections are secure to prevent leaks. If lines were exposed to harsh solvents like lacquer thinner, replace them ($20–$50).
- Reinstall Sender Unit: Use a fuel-safe gasket sealant like Hylomar ($10–$15) to ensure a tight seal, as centerline recommended.
Step 9: Refill with Fresh Fuel
- High-Quality Fuel: Use ethanol-free fuel if available to prevent future varnish buildup. For E10, ensure it’s fresh and from a reputable source.
- Fuel Stabilizer: Add a stabilizer like STA-BIL ($10–$15) or StarTron ($10–$20) to prevent degradation, especially for storage.
- Fill Strategically: For storage, fill the tank to 95% to minimize condensation. For immediate use, fill as needed.
Step 10: Test the System
- Idle the Engine: Run the engine for 10–15 minutes to circulate fuel and check for smooth operation.
- Inspect for Leaks: Check fuel lines, filters, and the tank for leaks or fuel odors in the bilge.
- Monitor Performance: Take the boat for a test run to ensure consistent power and no sputtering.
Chart: Cleaning Process Workflow
Below is a flowchart visualizing the cleaning process for clarity:
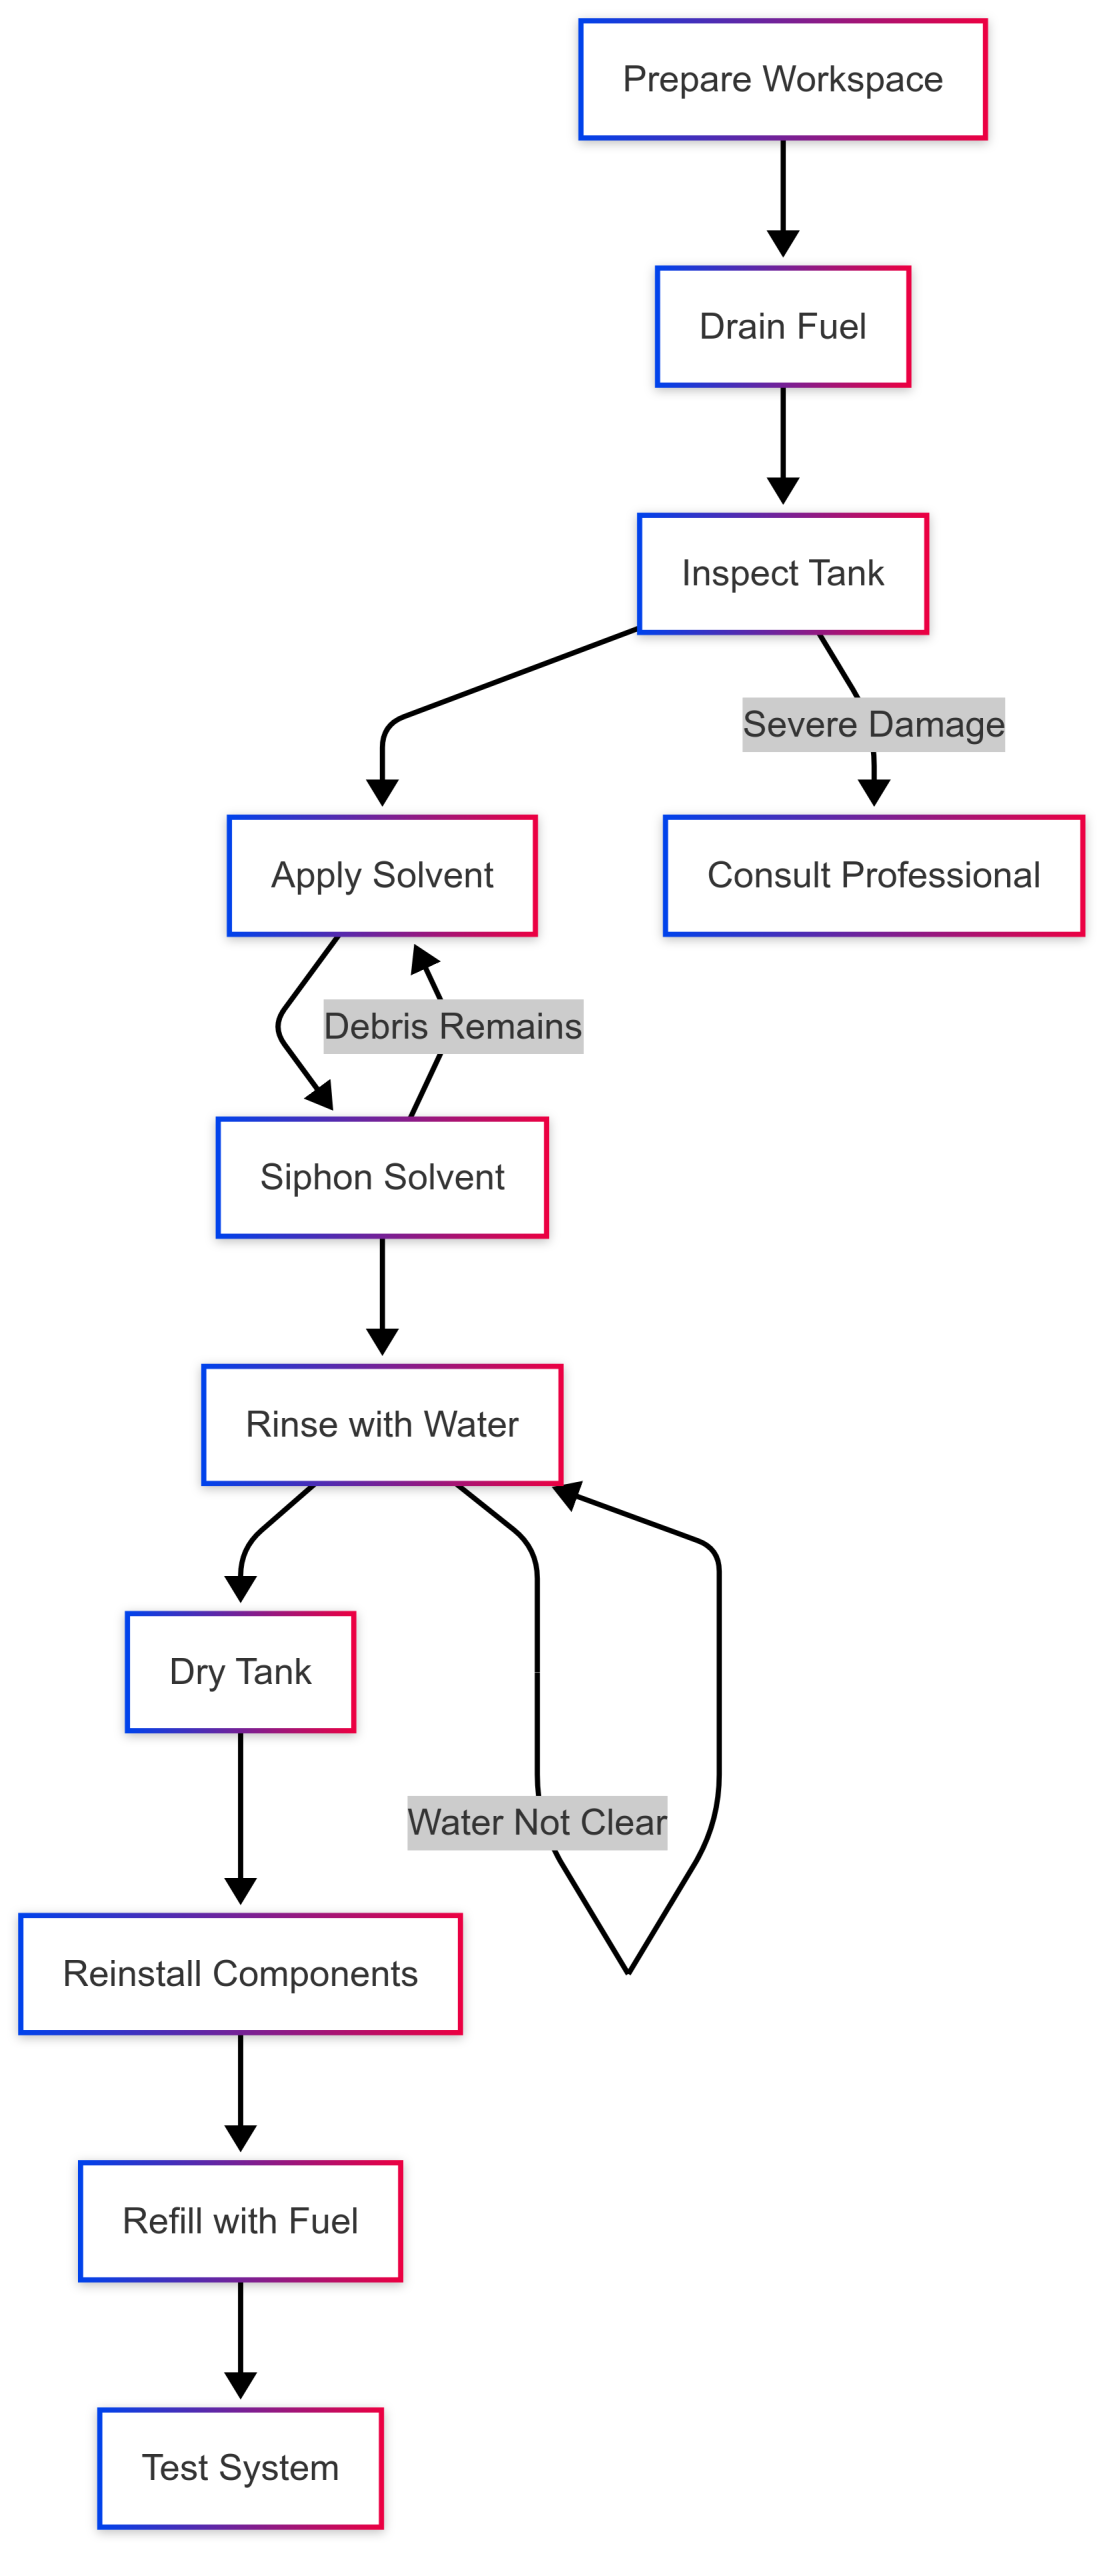
This chart outlines the sequential steps and decision points, such as repeating solvent application if debris persists or consulting a professional for severe tank damage.
Cost Comparison: DIY vs. Professional Cleaning
Cleaning a 150-gallon tank DIY can save significant costs compared to professional services, but it requires time and effort. Here’s a breakdown:
| Method | Cost (USD) | Time Required | Pros | Cons |
|---|---|---|---|---|
| DIY Cleaning | $100–$200 | 4–8 hours | Cost-effective, hands-on control, reusable tools. | Labor-intensive, risk of incomplete cleaning. |
| Professional | $225–$500 | 2–4 hours | Specialized equipment, safe disposal, thorough cleaning. | Expensive, may not address all deposits. |
Example: Captainhaug spent $100 on E85, a pump, and PVC pipe to clean a 150-gallon tank, saving $125–$400 compared to professional services costing $225–$500 for similar tanks (e.g., 140–210 gallons).
Common Challenges and Solutions
Cleaning a fuel tank without removal presents unique challenges, particularly with baffled tanks or limited access. Here are solutions to common issues:
| Challenge | Solution |
|---|---|
| Baffles Blocking Access | Use a flexible PVC pipe or rod to reach around baffles. Tilt the boat to pool debris. |
| Small Sender Hole (1.5–2.5″) | Employ an endoscopic camera and narrow tools (e.g., gun cleaning kit brush). |
| Persistent Varnish | Repeat E85 or StarTron application; agitate thoroughly with towing or manual scrubbing. |
| Water Removal | Use Heet or isopropyl alcohol post-rinse to absorb residual water. |
| Corrosion Concerns | Inspect with a camera; if pitting is minor, clean and monitor. Replace tank if severe. |
Forum Insight: Captainhaug successfully navigated baffles using a 1/2-inch PVC pipe and tilting the boat, demonstrating that persistence and creative tools can overcome access limitations.
Preventive Maintenance Tips
To keep your fuel tank clean and minimize future cleaning needs:
- Use Ethanol-Free Fuel: Reduces varnish and water absorption. Available at select marinas or fuel stations.
- Add Fuel Stabilizer: Use StarTron or STA-BIL for every fill-up, especially before storage.
- Keep Tank Full: Minimizes condensation during storage, reducing water buildup.
- Regular Inspections: Check fuel samples and filters monthly for signs of contamination.
- Replace Filters Annually: Ensures clean fuel flow and catches debris early.
Storage Tip: Before winterizing, clean the tank and fill it to 95% with stabilized fuel to prevent degradation, as recommended for the 1998 Formula.
FAQs About Cleaning Boat Fuel Tanks
Can I reuse old fuel after cleaning?
Is StarTron Tank Cleaner effective?
How do I know if my tank is too damaged to clean?
Can I use household cleaners like dish soap?
Conclusion
Cleaning a boat fuel tank without removing it is a manageable DIY project with the right tools, techniques, and patience. By following this 10-step process—draining fuel, using solvents like E85 or StarTron, rinsing thoroughly, and testing the system—you can restore tanks like a 150-gallon aluminum one with varnish deposits to optimal condition. The process saves hundreds compared to professional services, as Captainhaug demonstrated, while ensuring your boat runs smoothly and safely. Regular maintenance, including fuel stabilizers and annual inspections, will keep your fuel system in top shape, letting you focus on enjoying the water.
For marine-grade cleaners and filters, brands like Captains Preferred Products and Boat Outfitters offer reliable options at competitive prices.
Happy Boating!
Share how to clean a boat fuel tank without removing it with your friends and leave a comment below with your thoughts.
Read Setting Sail at the Cincinnati Boat, Sport & Travel Show until we meet in the next article.