
Homemade Bow Mount Trolling Motor Bracket: A DIY Guide
Imagine being out on the water, gliding smoothly towards your favorite fishing spot, guided by your very own homemade bow mount trolling motor bracket. Not only does it offer the satisfaction of a DIY project, but it also presents a practical and cost-effective solution for boaters looking to enhance their trolling motor setup without breaking the bank. In this article, we’re about to embark on a DIY adventure that will guide you through the step-by-step process of crafting a custom bracket for your trolling motor.
Our goal is to help you create a sturdy, reliable, and tailored mount that perfectly suits your needs. We’ll cover the essential materials required, provide detailed construction instructions, and ensure your safety throughout the project. Additionally, we’ll share tips and tricks to optimize your homemade bracket’s performance, giving you greater control and maneuverability on the water. With this DIY guide in hand, you’ll soon have a personalized bow mount trolling motor bracket that not only saves you money but also elevates your boating experience. Let’s get started!
Why Build Your Homemade Bow Mount Trolling Motor Bracket
Creating your homemade bow mount trolling motor bracket offers several compelling advantages, making it a worthwhile DIY project:
- Cost Savings: Commercially available trolling motor brackets can be expensive. By crafting your own, you can significantly reduce the overall cost, making it a budget-friendly alternative.
- Customization: Homemade brackets allow for complete customization. You can tailor the bracket’s size, shape, and design to perfectly fit your boat’s unique dimensions and layout. This customization ensures an ideal fit, enhancing your trolling motor’s performance.
- Adaptability: DIY brackets provide the flexibility to adapt to various trolling motor models and styles. You can design the bracket to accommodate specific motor mounts, ensuring a secure and stable attachment.
- Learning Experience: Building your bracket is an excellent DIY learning opportunity. It allows you to acquire new skills, gain a deeper understanding of your boat’s mechanics, and take pride in a job well done.
- Personal Satisfaction: Completing a DIY project is incredibly satisfying. Crafting your trolling motor bracket provides a sense of accomplishment and ownership over your boating equipment.
In the following sections, we will guide you through the step-by-step process of constructing your custom bow mount trolling motor bracket, ensuring a practical and cost-effective solution for your boating needs.
Gathering Materials and Tools for Building a Homemade Bow Mount Trolling Motor Bracket
Before you begin crafting your homemade bow mount trolling motor bracket, gather the following materials and tools:
Materials:
- Aluminum or Steel Tubing: Choose a suitable length and diameter based on your boat’s dimensions and motor weight. Aluminum is lightweight and resistant to corrosion, making it a popular choice for marine applications.
- Angle Brackets: These will be used to secure the tubing and provide stability.
- Screws, Nuts, and Washers: Select marine-grade hardware to ensure durability in a wet environment.
Tools:
- Saw: You’ll need a saw for cutting the tubing to the desired length.
- Drill: A drill is essential for creating holes for screws and bolts.
- Measuring Tape: Use this to accurately measure and mark dimensions on your materials.
- Marker or Pencil: For marking cut lines and hole placements.
- Safety Gear: Wear safety glasses, hearing protection, and gloves when working with materials and power tools.
Marine-Specific Materials:
To ensure the longevity of your homemade bracket, use marine-grade materials wherever possible. These materials are designed to withstand the harsh marine environment, including exposure to saltwater and UV radiation.
Now that you have everything you need, you’re ready to move on to constructing your bow mount trolling motor bracket.
Design and Planning
Careful planning is essential before you start building your homemade bow mount trolling motor bracket. Here’s why it’s important:
- Fit and Function: Planning ensures that your bracket will fit your boat’s bow securely and function effectively with your trolling motor. It prevents the need for costly modifications or adjustments later on.
- Material Efficiency: Effective planning helps minimize material waste, saving you both time and money.
- Safety: A well-thought-out design enhances safety by ensuring that your bracket can handle the motor’s weight and operate without issues.
Here are steps to consider during the planning phase:
- Measurements: Measure the dimensions of your boat’s bow accurately, including the width and thickness. Measure the distance from the bow to where you want to mount the trolling motor.
- Trolling Motor Specs: Refer to your trolling motor’s manual to determine its mounting requirements and specifications. This includes the distance between the motor’s mounting holes and any specific angle requirements.
- Blueprint: Create a blueprint or sketch of your bracket design. Include dimensions, hole placements, and angles. This visual representation helps you identify any potential issues before you start building.
- Material Selection: Based on your design, choose the appropriate aluminum or steel tubing and angle brackets. Ensure they are of the right size and thickness to support the trolling motor’s weight.
By taking the time to plan and design your bracket accurately, you’ll increase the likelihood of a successful construction process and a bracket that meets your specific needs.
Step-By-Step Guide for Constructing the Homemade Bow Mount Trolling Motor Bracket
Now that you have a well-thought-out plan, let’s dive into the construction process for your homemade bow mount trolling motor bracket:
Materials Needed:
- Aluminum or steel tubing
- Angle brackets
- Screws, nuts, and washers
- Measuring tape
- Saw
- Drill and drill bits
- Safety gear (gloves, safety glasses)
Steps:
1. Safety First:
Put on your safety gear, including gloves and safety glasses, to protect yourself during the construction process.
2. Tubing Cutting:
- Measure and mark the tubing based on your design and dimensions.
- Use a saw to cut the tubing to the desired lengths. Make sure your cuts are precise and straight.
3. Hole Drilling:
- Refer to your design’s hole placements, which should match the trolling motor’s mounting holes.
- Use a drill with an appropriate drill bit to create holes in the tubing for mounting. Ensure that the holes are aligned correctly.
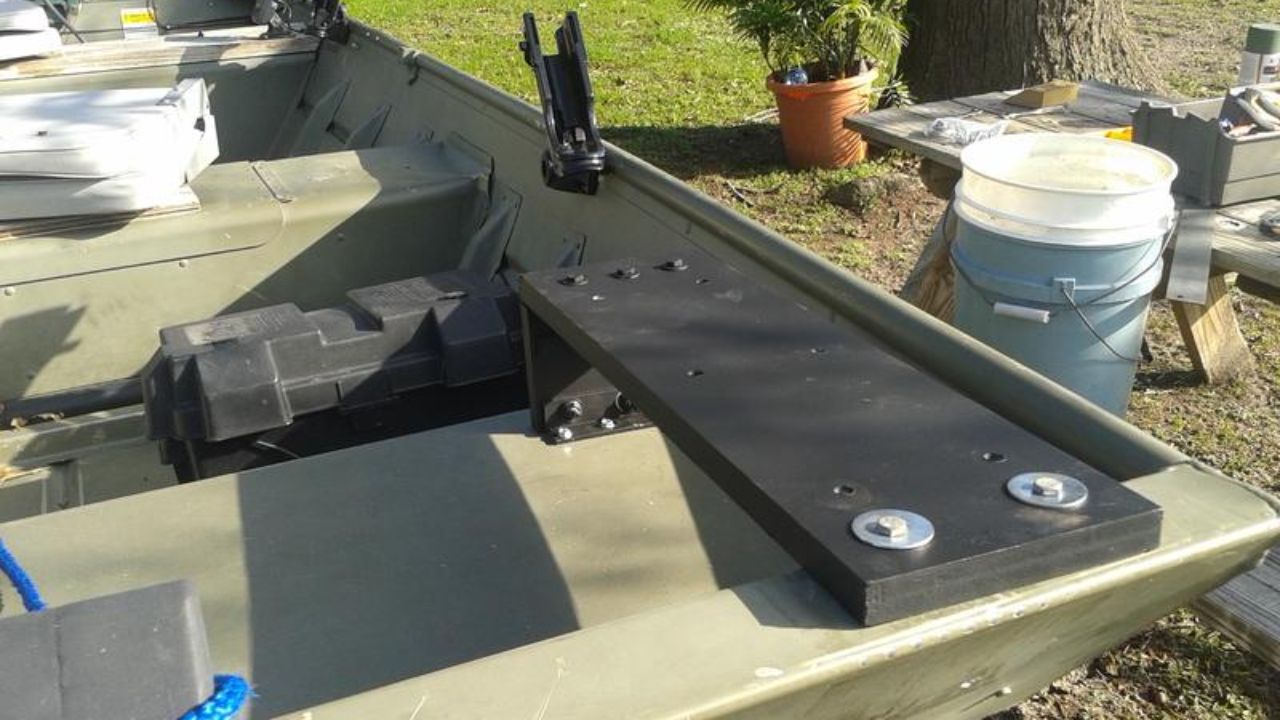
4. Assembling the Bracket:
- Attach the angle brackets to the cut tubing. These brackets will provide the necessary support and structure for your bracket.
- Secure the brackets in place using screws, nuts, and washers. Make sure they are tightened properly to prevent any wobbling or instability.
5. Final Check:
- Double-check all measurements, hole placements, and angles to ensure they match your design.
- Verify that the bracket is securely assembled and can support the weight of your trolling motor.
6. Attachment:
Mount the trolling motor onto the bracket, aligning the motor’s mounting holes with the holes you drilled in the bracket. Use the appropriate hardware to secure the motor in place.
7. Test:
Before taking your boat out on the water, perform a test run to ensure that the homemade bracket securely holds the trolling motor and functions as expected.
By following these steps meticulously, you can create a custom bow mount trolling motor bracket that perfectly suits your boat and trolling needs. Remember to prioritize safety during the construction process.
How to Attach the Trolling Motor to the Homemade Bracket
Once your homemade bow mount trolling motor bracket is constructed, you’re ready to attach the trolling motor. Here’s how to do it:
Materials Needed:
- Trolling motor
- Mounting hardware (clamps, bolts, nuts, washers)
- Wrench or pliers
Steps:
1. Position the Trolling Motor:
Place the trolling motor in the desired position on the bracket. Ensure that it aligns with the holes you drilled in the bracket.
2. Align the Motor:
Make sure the trolling motor is properly aligned with the boat’s bow. It should be centered, with the motor’s thrust direction in line with the boat’s centerline. Use your design or blueprint as a reference.
3. Secure the Trolling Motor:
- Use clamps, bolts, nuts, and washers to secure the trolling motor to the bracket.
- Insert the bolts through the mounting holes on the trolling motor and then through the corresponding holes in the bracket.
- Place washers on the bolt ends, followed by nuts.
- Tighten the nuts securely with a wrench or pliers. Ensure that the trolling motor is held firmly in place, and there is no wobbling.
4. Double-Check Alignment:
- Recheck the alignment of the trolling motor to ensure it is still centered and facing the right direction.
- Make any necessary adjustments if the alignment is off.
5. Test the Motor:
- Before heading out on the water, perform a test run with the trolling motor to ensure it operates smoothly and efficiently.
- Check for any unusual vibrations, noises, or alignment issues during this test.
6. Final Adjustments:
- If you encounter any problems during the test run, make the required adjustments to the trolling motor’s position or the bracket’s hardware.
- Once you are satisfied with the setup, your homemade trolling motor bracket is ready for use.
By following these steps and paying close attention to alignment and security, you can ensure that your trolling motor is securely attached to your homemade bracket, allowing for efficient and stable operation during your boating adventures.
Safety Precautions
Safety is paramount when building a homemade bow mount trolling motor bracket. Follow these safety precautions to ensure a secure and hazard-free construction process:
1. Wear Protective Gear:
Always wear appropriate safety gear, including safety glasses or goggles to protect your eyes from debris, and work gloves to safeguard your hands.
2. Work in a Well-Ventilated Area:
If you’re working indoors or in a confined space, ensure proper ventilation to prevent the buildup of fumes from tools or materials.
3. Handle Tools Safely:
- Familiarize yourself with the proper usage of all tools involved in the construction process.
- Keep cutting edges sharp, and use them with care.
- Keep hands and other body parts away from cutting areas to avoid accidents.
4. Use Caution When Drilling:
- When drilling holes, ensure that the workpiece is securely clamped in place to prevent it from shifting.
- Avoid drilling into any underlying structures or hidden wires on your boat.
5. Check Stability and Security:
- After constructing the bracket and mounting the trolling motor, thoroughly inspect the assembly.
- Ensure all bolts, nuts, and fasteners are securely tightened.
- Look for any signs of instability or weakness in the bracket’s design or construction.
6. Test in Controlled Conditions:
- Before taking your boat and trolling motor out on the water, perform a test run in a controlled environment.
- This allows you to identify any issues with the bracket or trolling motor setup and make adjustments as needed.
7. Inspect Regularly:
- Periodically inspect the bracket and mounting hardware for wear, corrosion, or damage.
- Replace any worn or damaged components promptly.
By following these safety precautions and conducting thorough inspections, you can build and use your homemade bow mount trolling motor bracket with confidence, knowing that it is secure and safe for your boating adventures.
Importance of Testing the Homemade Bracket in a Controlled Environment.
Once you have built and mounted your homemade bow mount trolling motor bracket, it’s crucial to thoroughly test and make any necessary adjustments to ensure optimal performance. Here’s how to go about it:
1. Controlled Environment Test:
- Before hitting the water, conduct a test run in a controlled environment, such as a calm and shallow area of a lake or a swimming pool.
- Observe how the trolling motor operates, paying attention to its stability and alignment.
2. Check for Vibrations and Noise:
- Listen for unusual vibrations or noise coming from the trolling motor or bracket. Unusual sounds can indicate misalignment or other issues.
3. Alignment Adjustment:
- If you notice that the trolling motor isn’t aligned properly or doesn’t sit level, make adjustments to the bracket.
- This may involve loosening and repositioning mounting hardware or altering the bracket’s design if necessary.
4. Secure Fasteners:
- Ensure that all bolts, nuts, and fasteners are securely tightened.
- Regularly inspect these components, especially after initial testing, to prevent loosening during use.
5. Trial Run on the Water:
- Once you’re satisfied with the bracket’s performance in a controlled environment, take your boat out for a trial run on the water.
- This allows you to test the bracket under actual boating conditions and fine-tune its performance further.
6. Monitor Stability:
- Pay close attention to how the bracket handles the trolling motor’s weight and movement while on the water.
- Ensure it remains stable and securely attached.
7. Address Issues Promptly:
- If you encounter any issues during the trial run, such as instability, vibrations, or misalignment, address them promptly.
- Make necessary adjustments or modifications to enhance performance.
8. Repeat Testing as Needed:
- Don’t hesitate to repeat testing and adjustments until you’re confident that the homemade bracket is functioning optimally.
By conducting thorough testing and making appropriate adjustments, you can ensure that your homemade bow mount trolling motor bracket performs reliably and enhances your boating experience.
Maintenance and Care
Maintaining your homemade bow mount trolling motor bracket is essential to ensure its longevity and optimal performance. Here’s a guide to keeping your DIY bracket in good condition:
- Regular Cleaning: After each use, rinse the bracket with fresh water to remove salt, debris, and any potential contaminants. Pay special attention to areas prone to corrosion, such as joints and fasteners. Cleaning will prevent the buildup of grime and salt that can lead to accelerated wear.
- Lubrication: Apply marine-grade lubricant to moving parts, such as pivot points and hinges. Lubrication reduces friction, prevents rust, and ensures smooth operation. Be sure to use lubricants compatible with the materials of your bracket.
- Inspections: Periodically inspect the bracket for signs of wear, loose fasteners, or corrosion. Pay attention to welds, bolts, and brackets, as these are critical areas. Any issues detected during inspections should be addressed promptly to prevent further damage.
- Corrosion Prevention: If you notice any signs of corrosion, use appropriate corrosion inhibitors or rust removers to treat affected areas. Regularly inspect the bracket for any paint or protective coatings that may have worn off and touch up these areas as needed.
- Secure Fasteners: Ensure that all fasteners, including nuts and bolts, are securely tightened. Loose fasteners can lead to bracket instability and reduced performance.
By following these maintenance practices, you’ll extend the life of your homemade bow mount trolling motor bracket and continue to enjoy the benefits of your DIY project on your boating adventures.
Conclusion and DIY Success
In conclusion, crafting your homemade bow mount trolling motor bracket offers a cost-effective and customizable solution for enhancing your boating experience. By considering the advantages of this DIY project, you can enjoy a bracket tailored to your boat’s specific dimensions and needs while also saving money.
The key takeaways from this article include:
- Cost Savings: Building your bracket is a budget-friendly alternative to purchasing a commercial one.
- Customization: You have the flexibility to design a bracket that perfectly fits your boat’s requirements.
- Safety: Prioritize safety throughout the construction process by wearing protective gear and thoroughly inspecting the bracket.
By following the step-by-step guide, gathering the necessary materials and tools, and adhering to safety precautions, you can embark on a successful DIY project. With proper construction and regular maintenance, you’ll have a reliable and cost-effective trolling motor bracket ready for your boating adventures. So, why wait? Dive into your DIY project and enjoy the benefits of a custom-built bracket on your next fishing trip or leisurely cruise.
Share Homemade Bow Mount Trolling Motor Bracket: A DIY Guide with your friends and Leave a comment below with your thoughts.
Read 10 Custom Boat Upholstery Ideas to Increase Look until we meet in the next article.


Hello to every body, it’s my first pay a quick visit of this web site; this blog consists of amazing and truly good data for visitors.
Easy and affordable way to build a bow mount trolling motor bracket! The instructions are clear, and I was able to customize it perfectly for my boat. It feels sturdy, and I saved a ton of money compared to buying one. Highly recommend this DIY project!
Great guide! I built my own bow mount trolling motor bracket using these easy instructions. It’s budget-friendly and totally customizable to my boat. Simple process, clear steps, and now my motor is mounted securely. Highly recommend this DIY project for anyone looking to save money and get a custom fit for their setup.
Building this homemade bow mount trolling motor bracket was surprisingly easy! The step-by-step guide made everything clear, and I saved a lot of money compared to buying a pre-made bracket. The materials were simple to find, and the bracket feels super sturdy. It’s a great DIY project if you’re looking to customize your boat setup. Highly recommend giving it a try if you enjoy DIY projects!
This guide was exactly what I needed! Super clear instructions and great photos made building my own bow mount bracket way easier than I expected. Saved me a ton of money, and it works like a charm out on the water. Highly recommend for any DIY-minded boater!
This homemade bow mount trolling motor bracket guide was exactly what I needed! The instructions were simple and clear, and I was able to build a sturdy bracket without spending a fortune. Works great on the water—super stable. Highly recommend for any DIY boat lover!
I recently followed the DIY guide for making my own bow mount trolling motor bracket, and I’m beyond impressed with the results! The instructions were easy to follow, and the materials were simple to find. I saved money and got exactly what I needed for my boat. The bracket is sturdy, well-made, and perfectly customized for my motor. It was such a rewarding project. Highly recommend this guide for anyone looking to upgrade their setup!
Fantastic guide for DIY enthusiasts! This tutorial made building a custom trolling motor bracket super easy and affordable. The step-by-step instructions are clear and practical, plus I love the customization options. Highly recommend it for anyone looking to save money and gain satisfaction from a project done right. Works great on my boat!
This DIY bow mount trolling motor bracket guide was super helpful! Easy to follow and saved me a lot of money. Worked perfectly on my boat. Highly recommend!
This homemade bow mount trolling motor bracket is a game-changer! It’s sturdy, easy to install, and perfectly fits my needs. The DIY instructions were clear and straightforward, making the setup process a breeze. It holds the motor securely, even in rough waters. Highly recommend for anyone looking to upgrade their setup!
Solid DIY solution! The homemade bow mount trolling motor bracket worked better than I expected—sturdy, easy to build with basic tools, and saved me a lot of money. Took some careful measuring, but once installed, it held up great on the water. Definitely recommend for budget-minded anglers.
This DIY guide offers a clear, step-by-step approach to building a custom bow mount trolling motor bracket. It emphasizes cost savings, customization, and safety, making it ideal for boaters seeking a budget-friendly and personalized solution. The instructions are detailed and practical, ensuring a sturdy and reliable setup for enhanced boating experiences.
Clear and practical guide! The DIY steps were easy to follow, and the materials list was super helpful. Saved money and got a sturdy trolling motor bracket. Great post!