Boat Steering Cable: How to Unfreeze & Replace
Learn how to unfreeze and replace a boat steering cable with expert tips, step-by-step guides, and recommended systems like SeaStar and BayStar.
Maintaining a functional steering system is critical for safe and enjoyable boating. A frozen or seized steering cable can render your boat difficult or impossible to control, posing safety risks and disrupting your time on the water. This comprehensive guide provides detailed instructions on diagnosing, unfreezing, and replacing a boat steering cable, drawing from expert advice and real-world troubleshooting scenarios. Whether you’re dealing with a corroded cable or a seized tilt tube, this article equips you with the knowledge and steps to restore smooth steering. We’ll also explore recommended steering systems, their specifications, and approximate costs to help you make informed decisions.
Understanding Boat Steering Cable Issues
Boat steering cables, particularly in outboard motor setups, are prone to seizing due to environmental factors like saltwater exposure, lack of maintenance, or material degradation. The most common issues include:
- Corrosion: Saltwater accelerates corrosion, especially when dissimilar metals (e.g., stainless steel cables next to aluminum tilt tubes) are involved, leading to galvanic corrosion.
- Lack of Lubrication: Over time, grease dries out, causing the cable to stick within the tilt tube or at connection points.
- Mechanical Wear: Repeated use or improper installation can cause the cable or tilt tube to wear, leading to friction and seizing.
- Improper Installation: Cables installed with sharp bends or misaligned transom holes can bind, increasing wear and tear.
Understanding these issues is the first step to diagnosing whether your steering cable can be salvaged or needs replacement.
Diagnosing a Seized Steering Cable
Before attempting repairs, pinpoint the source of the problem. A seized steering system could stem from the cable, tilt tube, helm, or motor itself. Follow these steps to diagnose:
- Test the Steering Wheel: Disconnect the steering cable from the helm (the steering mechanism under the dashboard). If the wheel turns freely, the issue lies downstream, likely in the cable or tilt tube.
- Check the Motor: Disconnect the steering arm from the motor. If the motor pivots easily by hand, the motor’s pivot points are not the issue.
- Inspect the Cable and Tilt Tube: If the steering wheel and motor move freely when disconnected, the cable or tilt tube is likely seized. Look for visible corrosion, rust, or grime on the cable or at the tilt tube’s entry and exit points.
Common Symptoms
- Steering wheel feels stiff or won’t turn.
- Motor doesn’t respond to steering inputs.
- Grinding or resistance when attempting to move the steering rod.
Tools and Materials Needed
To unfreeze or replace a steering cable, gather the following:
- Tools: Vise grips, wrench set, angle grinder with cutoff blades, cordless drill with long drill bits (e.g., 7/8″), wire brush, sandpaper, hammer, brass pin or socket extension.
- Lubricants: Penetrating oil (e.g., WD-40), marine-grade grease, aerosol oil.
- Replacement Parts: Steering cable (e.g., SeaStar or BayStar), stainless steel tilt tube, splash well boot or grommet, marine silicone sealant.
- Safety Gear: Gloves, safety glasses, and a helper for heavy lifting or applying pressure.
Step-by-Step Guide to Unfreezing a Boat Steering Cable
If the cable is not severely damaged, you may be able to unfreeze it without replacement. Follow these steps:
1. Apply Penetrating Oil
- Spray a penetrating oil like WD-40 or a marine-specific lubricant onto the steering cable, focusing on where it enters the tilt tube and at linkage points.
- Work the steering wheel back and forth to distribute the oil and break up corrosion or dried grease.
- Allow the oil to penetrate for 10–15 minutes before proceeding.
2. Manually Free the Cable
- Attach vise grips to the steering rod, about 1 inch from the tilt tube, to avoid twisting the rod’s end.
- Have a helper apply steady pressure to the steering wheel (clockwise or counterclockwise) while you rotate the vise grips up and down.
- If the rod begins to move, continue working it back and forth, applying more lubricant as needed.
3. Clean and Lubricate
- If the cable moves, disconnect it from the helm and motor to fully inspect it.
- Use a wire brush or sandpaper to remove rust or corrosion from the cable and tilt tube.
- Apply marine-grade grease to the cable and tilt tube to prevent future sticking.
4. Use Heat (With Caution)
- If the cable remains stuck, apply heat to the tilt tube using a heat gun or propane torch to expand the metal and break corrosion bonds.
- Focus heat on the tilt tube, not the cable, to avoid damaging plastic or rubber components like nylon bushings.
- Use low heat and monitor closely to prevent melting or warping.
5. Check for Movement
- After applying oil, manual force, or heat, test the cable’s movement by sliding it through the tilt tube. If it moves freely, reassemble the system and test the steering.
Note: If the cable remains seized or shows significant corrosion, replacement is the best option.
Replacing a Seized Steering Cable
If unfreezing efforts fail or the cable is damaged, replacement is necessary. Below is a detailed guide to replacing the steering cable, including tips for addressing a seized tilt tube.
Step 1: Disconnect the Old Cable
- At the Helm: Remove the steering wheel (usually held by a large central nut) and the helm’s mounting bolts (typically four bolts on rack-and-pinion systems). Pull the helm to access the cable connection.
- At the Motor: Remove the nut securing the steering rod to the tilt tube. This may require two wrenches—one on each end of the tilt tube—to prevent rotation.
- Cut the Cable (If Necessary): If the cable is stuck, use an angle grinder with a cutoff blade to cut it near the tilt tube. This makes removal easier but requires caution to avoid damaging the tilt tube or motor.
Step 2: Remove the Old Cable
- Pull the cable out from the motor end, working it through the tilt tube and transom.
- If the cable is stuck in the tilt tube, use a brass pin or socket extension to drive it out, tapping gently to avoid mushrooming the rod’s end.
- If the transom hole is misaligned (e.g., too high), you may need to cut a new hole in the splash well to reduce cable bending. Tie a string to the cable’s end to guide the new cable during installation.
Step 3: Address Tilt Tube Corrosion
- Inspect the tilt tube for rust, especially if it’s made of carbon steel. Carbon steel tubes are prone to corrosion in saltwater environments.
- Clean the tube’s interior with a long drill bit (e.g., 7/8″) or a wire brush attached to a cordless drill.
- If the tube is heavily corroded, replace it with a stainless steel version. Drive the old tube out by pushing the new tube through, tilting the motor to balance its weight.
Step 4: Install the New Cable
- Measure the old cable to determine the correct length (e.g., 12 feet) and order a replacement, such as the SeaStar Safe-T Quick-Connect or BayStar system.
- Feed the new cable through the transom hole, using the string tied to the old cable to guide it.
- Route the cable through the tilt tube and secure it with the appropriate nuts (preferably stainless steel).
- Reconnect the cable to the helm and motor, ensuring no sharp bends that could cause future binding.
Step 5: Seal the Transom
- If a new hole was cut, install a splash well boot (e.g., TH Marine CB-2, 2-inch boot, ~$15) or a rubber grommet to seal the hole and protect the cable.
- For small gaps, apply marine silicone sealant. For larger gaps, consider a starboard plate with a drilled hole to cover the old and new holes, secured with screws and silicone.
Step 6: Test and Lubricate
- Reassemble the steering system and test the wheel and motor for smooth operation.
- Apply marine-grade grease to the tilt tube and cable to ensure long-term performance.
Recommended Steering Systems and Costs
When replacing a steering cable, consider upgrading to a complete steering system for improved performance and durability. Below are two popular options:
| System | Description | Specifications | Approximate Cost |
|---|---|---|---|
| SeaStar Safe-T Quick-Connect | Rotary steering system with quick-connect cable for easy installation. Suitable for outboards up to 150 HP. | Cable lengths: 8–20 ft; stainless steel components; helm with quick-connect fittings. | $150–$200 (complete system); $80–$120 (cable only) |
| BayStar Hydraulic Steering | Hydraulic system for smoother operation, ideal for smaller boats. | For outboards up to 150 HP; includes helm, cylinder, and fluid. | $400–$600 (complete system) |
Tilt Tube Replacement:
- Stainless steel tilt tube: $50–$100 (eBay or marine retailers).
- Stainless steel nuts: $5–$15 each.
Additional Accessories:
- TH Marine CB-2 Splash Well Boot (2-inch): ~$15.
- Rubber grommets: $5–$10 for a pack.
- Marine-grade grease: $10–$20 per tube.
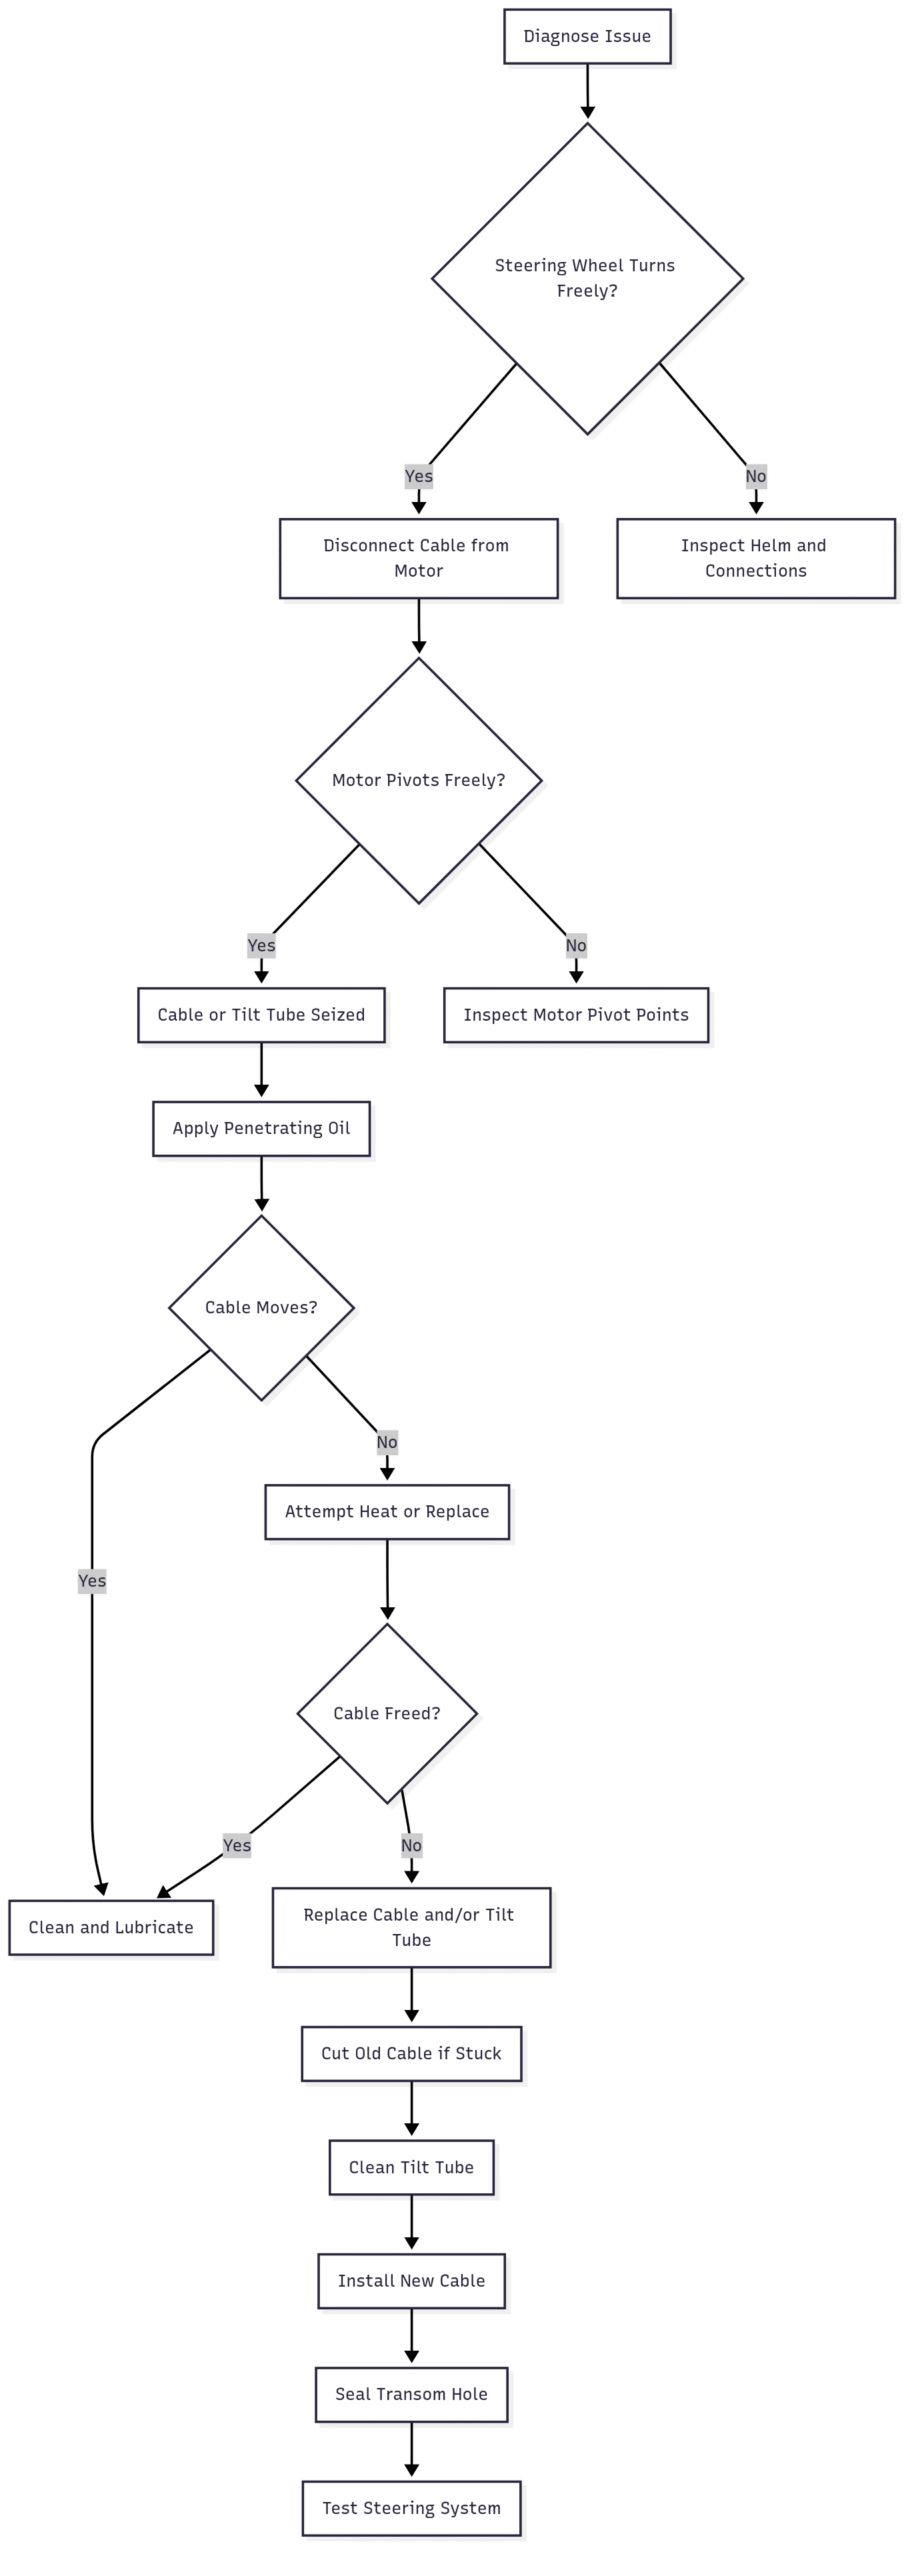
Installation Workflow (Chart)
Below is a visual representation of the steering cable replacement process using a flowchart:
Tips for Success
- Work with a Helper: Tasks like applying pressure to the steering wheel or tilting the motor are easier with assistance.
- Avoid Overheating: Excessive heat can damage nylon bushings or other components. Use low heat and monitor closely.
- Use Stainless Steel Components: In saltwater environments, stainless steel tilt tubes and nuts resist corrosion better than carbon steel.
- Measure Cable Length Accurately: Use the old cable or measure the path from helm to motor, adding 2–3 feet for bends.
- Check Transom Alignment: Misaligned transom holes can cause premature cable wear. Cut a new hole if necessary to ensure a straight path.
Common Pitfalls and How to Avoid Them
- Cutting the Cable Prematurely: Always confirm the cable is the issue before cutting, as it may be salvageable.
- Damaging the Tilt Tube: Avoid aggressive cutting or hammering that could deform the tube.
- Improper Reassembly: Ensure all connections are secure and the cable is routed without sharp bends.
- Neglecting Maintenance: Regularly lubricate the steering system with marine-grade grease to prevent future seizing.
Maintenance to Prevent Future Issues
To extend the life of your steering cable and tilt tube:
- Annual Lubrication: Apply marine-grade grease to the cable and tilt tube at the start of each boating season.
- Rinse After Use: In saltwater environments, rinse the steering system with fresh water to remove salt deposits.
- Inspect Regularly: Check for signs of corrosion, wear, or stiffness during routine maintenance.
- Use Quality Components: Invest in stainless steel tilt tubes and high-quality steering systems like SeaStar or BayStar.
Real-World Case Study
A boater with a 2003 Whaler Sport 150 (60 HP Mercury outboard) experienced a seized steering system. After troubleshooting, they confirmed the issue was a corroded tilt tube. They cut the old cable, cleaned the tilt tube with a drill bit, and replaced it with a stainless steel version purchased for $55 on eBay. The new SeaStar Safe-T system ($150) was installed without removing the motor, using a new transom hole and a 2-inch splash well boot. The process took a weekend with a helper, saving $500 compared to a marine shop quote.
Conclusion
Unfreezing or replacing a boat steering cable is a manageable DIY project with the right tools, knowledge, and patience. By diagnosing the issue, applying lubricants, or replacing the cable and tilt tube, you can restore smooth steering and enhance your boat’s safety and performance. Systems like SeaStar and BayStar offer reliable, cost-effective solutions for small to medium outboard boats. Regular maintenance and quality components can prevent future issues, ensuring years of trouble-free boating.
Share Boat Steering Cable: How to Unfreeze & Replace with your friends and Leave a comment below with your thoughts.
Read Can You Use Self-Tapping Screws on Aluminum? until we meet in the next article.