10 Simple Boat Upgrades: Easy DIY Projects
Discover 10 simple, budget-friendly DIY boat upgrades to boost performance, comfort, and style. Easy projects for any boater!
Owning a boat is more than just enjoying time on the water—it’s about tailoring your vessel to meet your needs, whether you’re fishing, cruising, or indulging in watersports. While major upgrades like adding a windlass or upgrading the engine can be costly and time-consuming, there are plenty of budget-friendly, do-it-yourself (DIY) projects that can significantly enhance your boat’s performance, comfort, and aesthetics. This comprehensive guide explores 10 simple DIY boat upgrades that are easy to implement, cost-effective, and designed to elevate your boating experience. From improving aerodynamics to adding functional accessories, these projects are perfect for boaters looking to make their vessel stand out without breaking the bank.
Why Upgrade Your Boat?
Boats, like any vehicle, can benefit from thoughtful modifications that improve functionality, safety, and enjoyment. Whether you’re a weekend angler, a wakesurfing enthusiast, or a leisurely cruiser, small upgrades can make a big difference. These DIY projects focus on simplicity and affordability, requiring minimal tools and expertise. By investing a little time and effort, you can enhance your boat’s performance, increase storage, improve safety, and add a touch of personal style.
1. Install a Bimini Top for Shade and Aerodynamics
A bimini top is a versatile upgrade that provides shade, protects against harmful UV rays, and can even improve your boat’s performance by reducing aerodynamic drag. According to boating experts, a well-designed bimini top streamlines the boat’s profile, potentially increasing speed by minimizing air resistance.
Benefits:
- Comfort: Shields passengers from sun and light rain.
- Performance: Reduces drag for better fuel efficiency and speed.
- Aesthetics: Adds a sleek, modern look to your boat.
DIY Installation:
Bimini top kits, available for $100–$500 depending on size and material, typically include stainless steel or aluminum frames and marine-grade fabric. Installation involves mounting the frame to the boat’s gunwales or deck using screws or clamps, a process that takes about 1–2 hours with basic tools like a drill and screwdriver.
Cost and Specifications:
- Price Range: $100–$500
- Materials: Marine-grade polyester or acrylic fabric, stainless steel or aluminum frame
- Tools Needed: Drill, screwdriver, measuring tape
- Time: 1–2 hours
2. Reduce Weight for Better Performance
Excess weight can slow your boat, reduce fuel efficiency, and affect handling. By removing unnecessary items and optimizing weight distribution, you can improve speed and stability.
How to Reduce Weight:
- Remove Unnecessary Gear: Clear out heavy items like unused fishing equipment, extra fuel cans, or outdated electronics.
- Optimize Storage: Store only essential items and use lightweight materials like aluminum or composite for replacements.
- Balance the Load: Place heavier items centrally or lower in the boat to improve balance and reduce drag.
Performance Impact:
According to boating studies, reducing weight by 10% can improve fuel efficiency by up to 5% and increase top speed slightly, depending on the boat’s design.
Cost and Specifications:
- Price: Free (removing items) or $50–$200 for lightweight storage solutions
- Tools Needed: None for removal; basic tools for storage upgrades
- Time: 1–3 hours
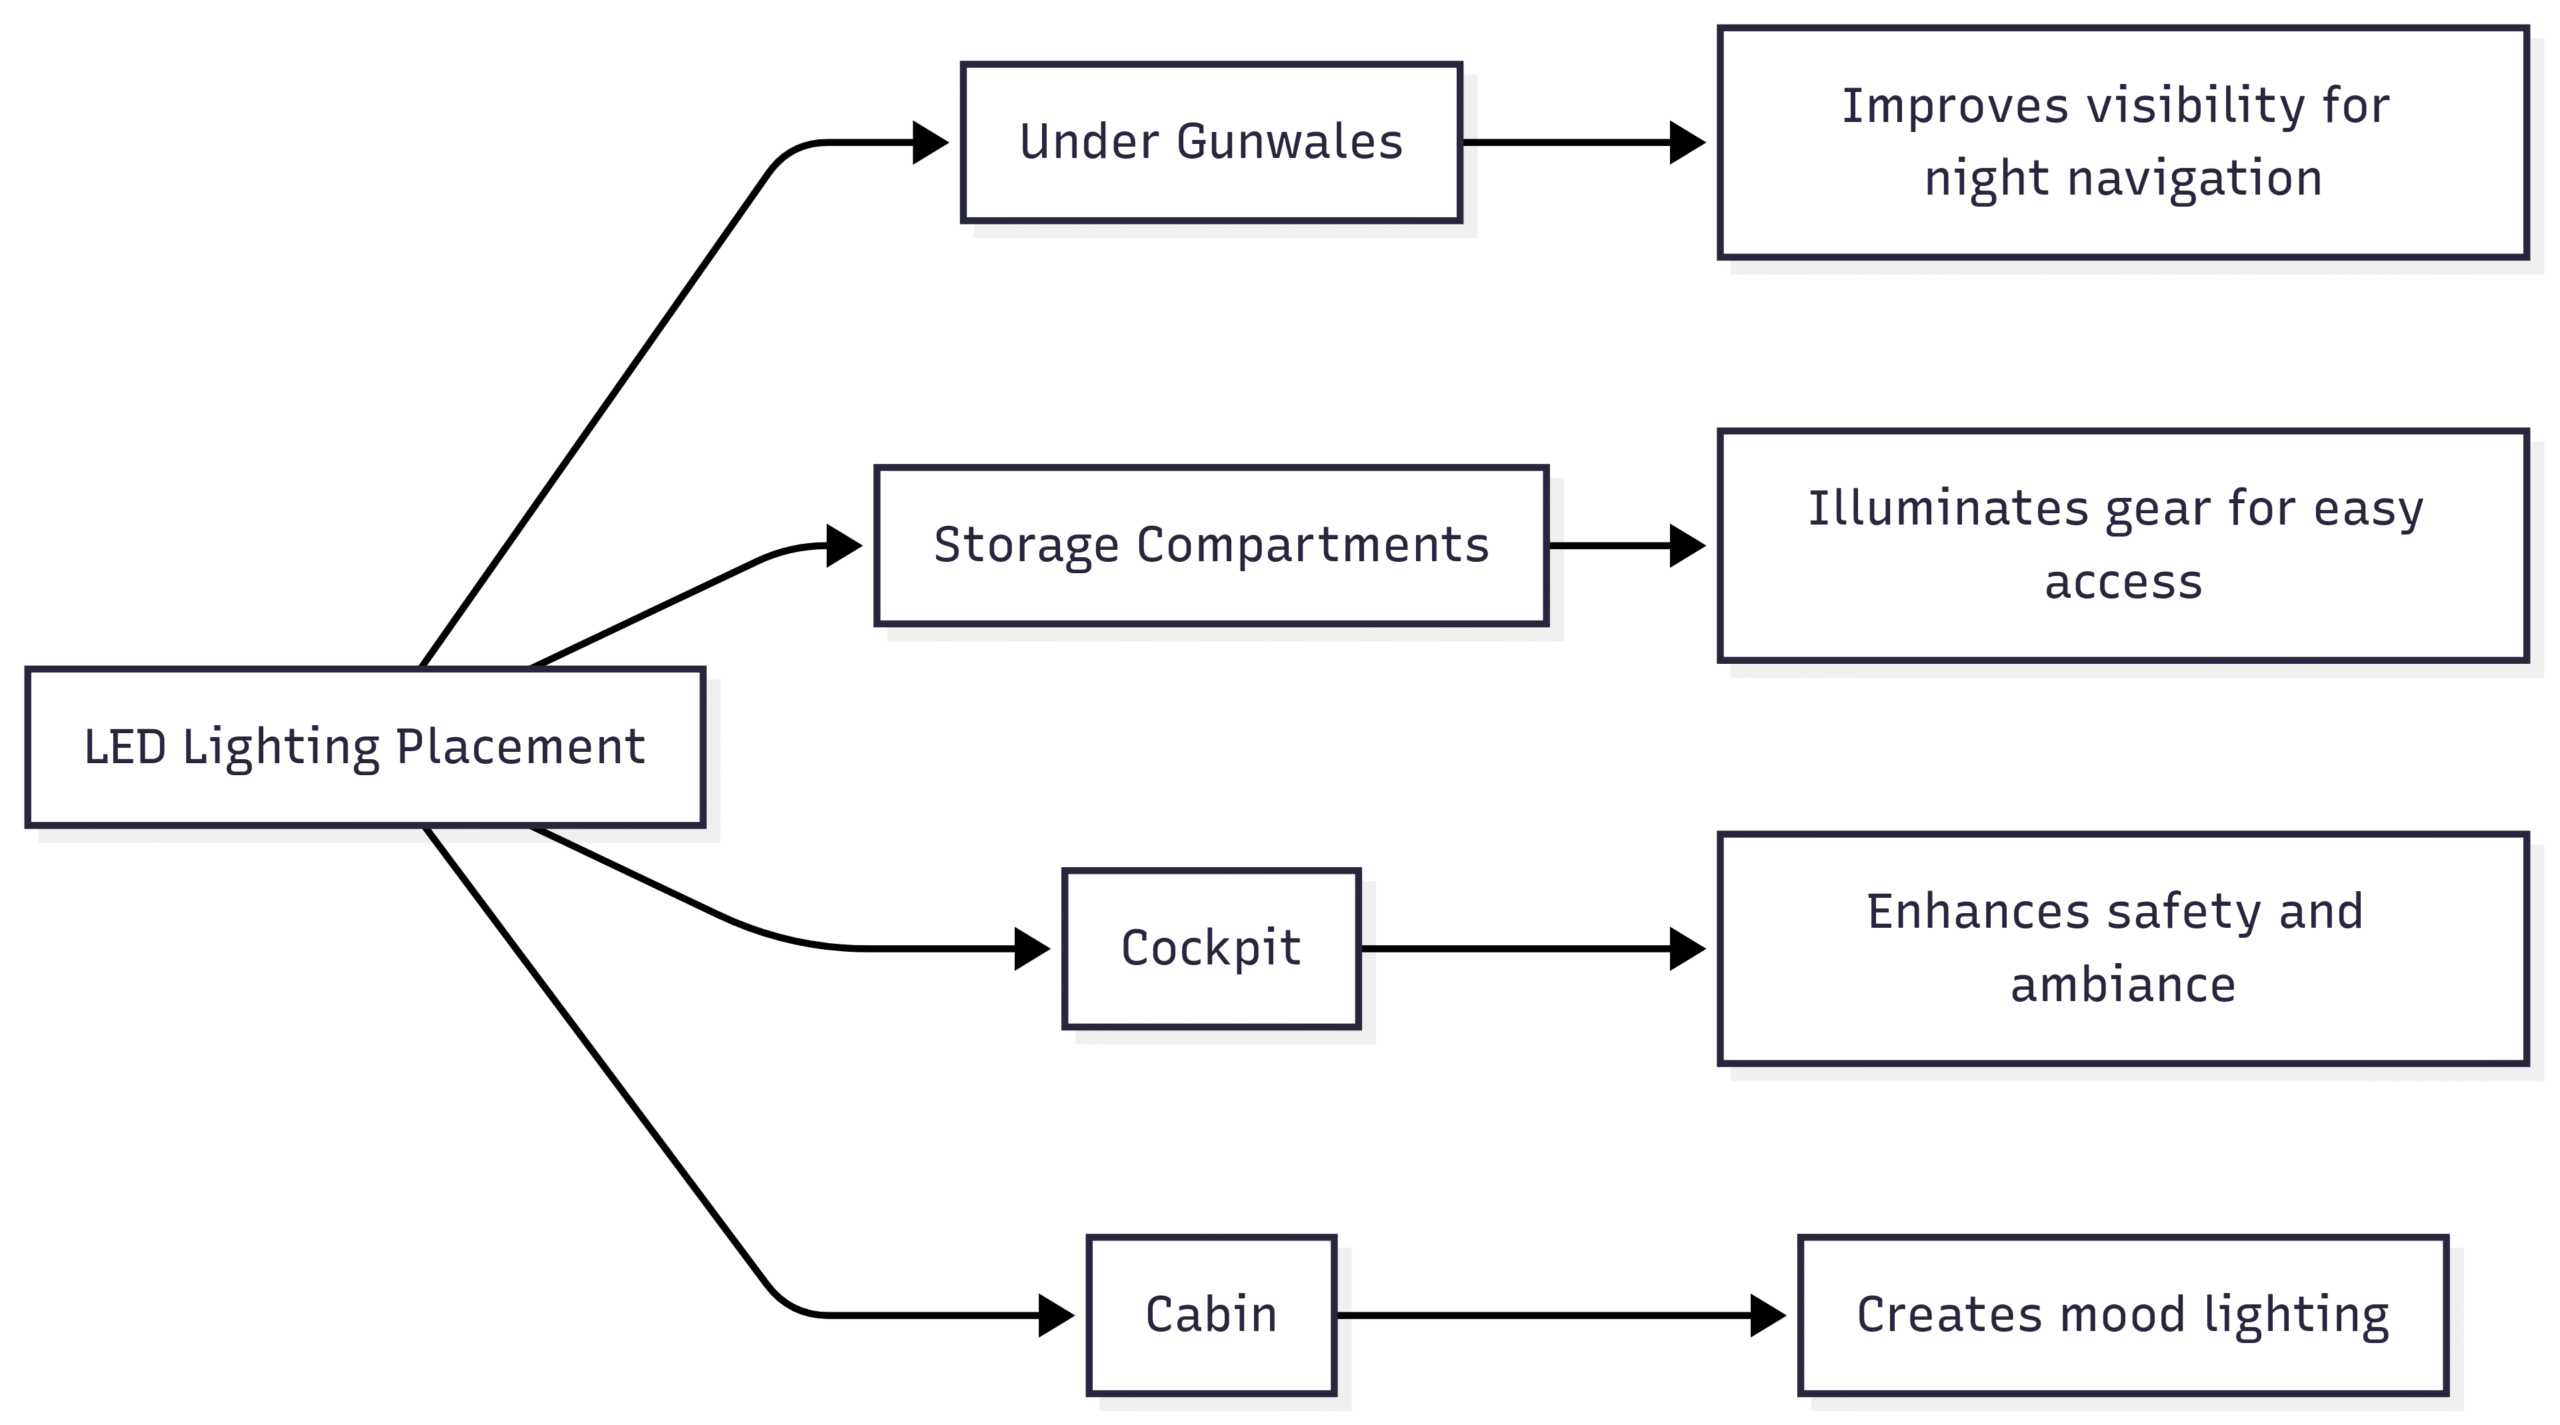
3. Add LED Lighting for Visibility and Ambiance
LED lighting is an affordable and energy-efficient way to enhance visibility, safety, and aesthetics. Installing LED strip lights under gunwales, in storage compartments, or along walkways improves nighttime navigation and adds a modern vibe.
Benefits:
- Visibility: Enhances safety during low-light conditions.
- Energy Efficiency: LEDs consume less power than traditional bulbs.
- Customization: Multicolor options allow for mood lighting.
DIY Installation:
LED strip lights, costing $20–$100, are easy to install with adhesive backing or clips. Hard-wired versions require connecting to the boat’s 12-volt system, which involves basic wiring skills.
Cost and Specifications:
- Price Range: $20–$100
- Materials: Waterproof LED strips, 12V power supply
- Tools Needed: Scissors, wire strippers, screwdriver
- Time: 1–2 hours
Chart: LED Lighting Placement
4. Upgrade Your Propeller for Better Thrust
The right propeller can transform your boat’s performance, offering better thrust, acceleration, and fuel efficiency. Upgrading to a propeller suited for your boat’s size, engine, and intended use is a game-changer.
Choosing the Right Propeller:
- Material: Stainless steel ($200–$600) for durability and performance; aluminum ($50–$200) for budget-friendly options.
- Pitch and Size: Consult your boat’s manual or a propeller sizing chart to match the propeller to your engine and boating style (e.g., high pitch for speed, low pitch for towing).
- Turning Props In or Out: Inward-turning props improve handling but may reduce top speed; outward-turning props maximize speed but can affect maneuverability.
DIY Installation:
Swapping a propeller requires a wrench and a propeller puller tool. The process takes about 30 minutes and involves removing the old propeller and securing the new one.
Cost and Specifications:
- Price Range: $50–$600
- Materials: Aluminum or stainless steel
- Tools Needed: Wrench, propeller puller
- Time: 30 minutes
Table: Propeller Material Comparison
| Material | Cost | Durability | Performance | Best For |
|---|---|---|---|---|
| Aluminum | $50–$200 | Moderate | Good | Budget, casual use |
| Stainless Steel | $200–$600 | High | Excellent | Performance, durability |
5. Install Trim Tabs for Stability
Trim tabs improve a boat’s stability and handling by allowing you to adjust its attitude in the water. They’re especially useful in rough conditions, reducing bow rise and improving fuel efficiency.
Benefits:
- Stability: Reduces rocking and improves ride comfort.
- Efficiency: Lowers fuel consumption by optimizing hull position.
- Handling: Enhances control in choppy waters.
DIY Installation:
Trim tab kits ($200–$800) include hydraulic or electric actuators and control switches. Installation involves mounting the tabs to the transom and connecting to the boat’s power system, taking 2–4 hours.
Cost and Specifications:
- Price Range: $200–$800
- Materials: Stainless steel or composite tabs, hydraulic/electric actuators
- Tools Needed: Drill, screwdriver, wrench
- Time: 2–4 hours
6. Add a Cell Phone Cradle for Convenience
A cell phone cradle keeps your device secure and accessible at the helm, preventing it from tumbling during rough seas. Options include adhesive, suction-cup, or screw-mounted cradles, some with wireless charging.
Benefits:
- Accessibility: Keeps your phone within reach for navigation or calls.
- Safety: Prevents damage from falls.
- Charging: Some models offer wireless charging for $100–$150.
DIY Installation:
Mounting takes 10–30 minutes, depending on the type (peel-and-stick, suction, or screw-mounted). Wireless charging models require connecting to the 12-volt system.
Cost and Specifications:
- Price Range: $20–$150
- Materials: Plastic or aluminum cradle
- Tools Needed: Screwdriver (for screw-mounted models), wire strippers (for charging models)
- Time: 10–30 minutes
7. Add More Rod Holders for Fishing
For anglers, extra rod holders are a must. Clamp-on or surface-mount rod holders are easy to install and accommodate multiple rods for trolling or casting.
Benefits:
- Convenience: Keeps rods organized and accessible.
- Versatility: Supports various fishing techniques.
- Affordability: Budget-friendly options start at $20.
DIY Installation:
Clamp-on rod holders require a wrench or Allen key, while surface-mount models need screws and a drill. Installation takes 15–30 minutes per holder.
Cost and Specifications:
- Price Range: $20–$100 per holder
- Materials: Plastic, aluminum, or stainless steel
- Tools Needed: Wrench, Allen key, or drill
- Time: 15–30 minutes per holder
8. Install USB Charging Ports
Keep your devices powered with USB charging ports. These are affordable, easy to install, and essential for long days on the water.
Benefits:
- Convenience: Charges phones, tablets, and other electronics.
- Affordability: Double-port units cost as little as $20.
- Ease of Use: Fits standard 1-inch cutouts.
DIY Installation:
Drill a 1-inch hole, connect the port to the boat’s 12-volt system, and secure it. The process takes 30–60 minutes.
Cost and Specifications:
- Price Range: $20–$50
- Materials: Waterproof USB port, 12V wiring
- Tools Needed: Drill, wire strippers, screwdriver
- Time: 30–60 minutes
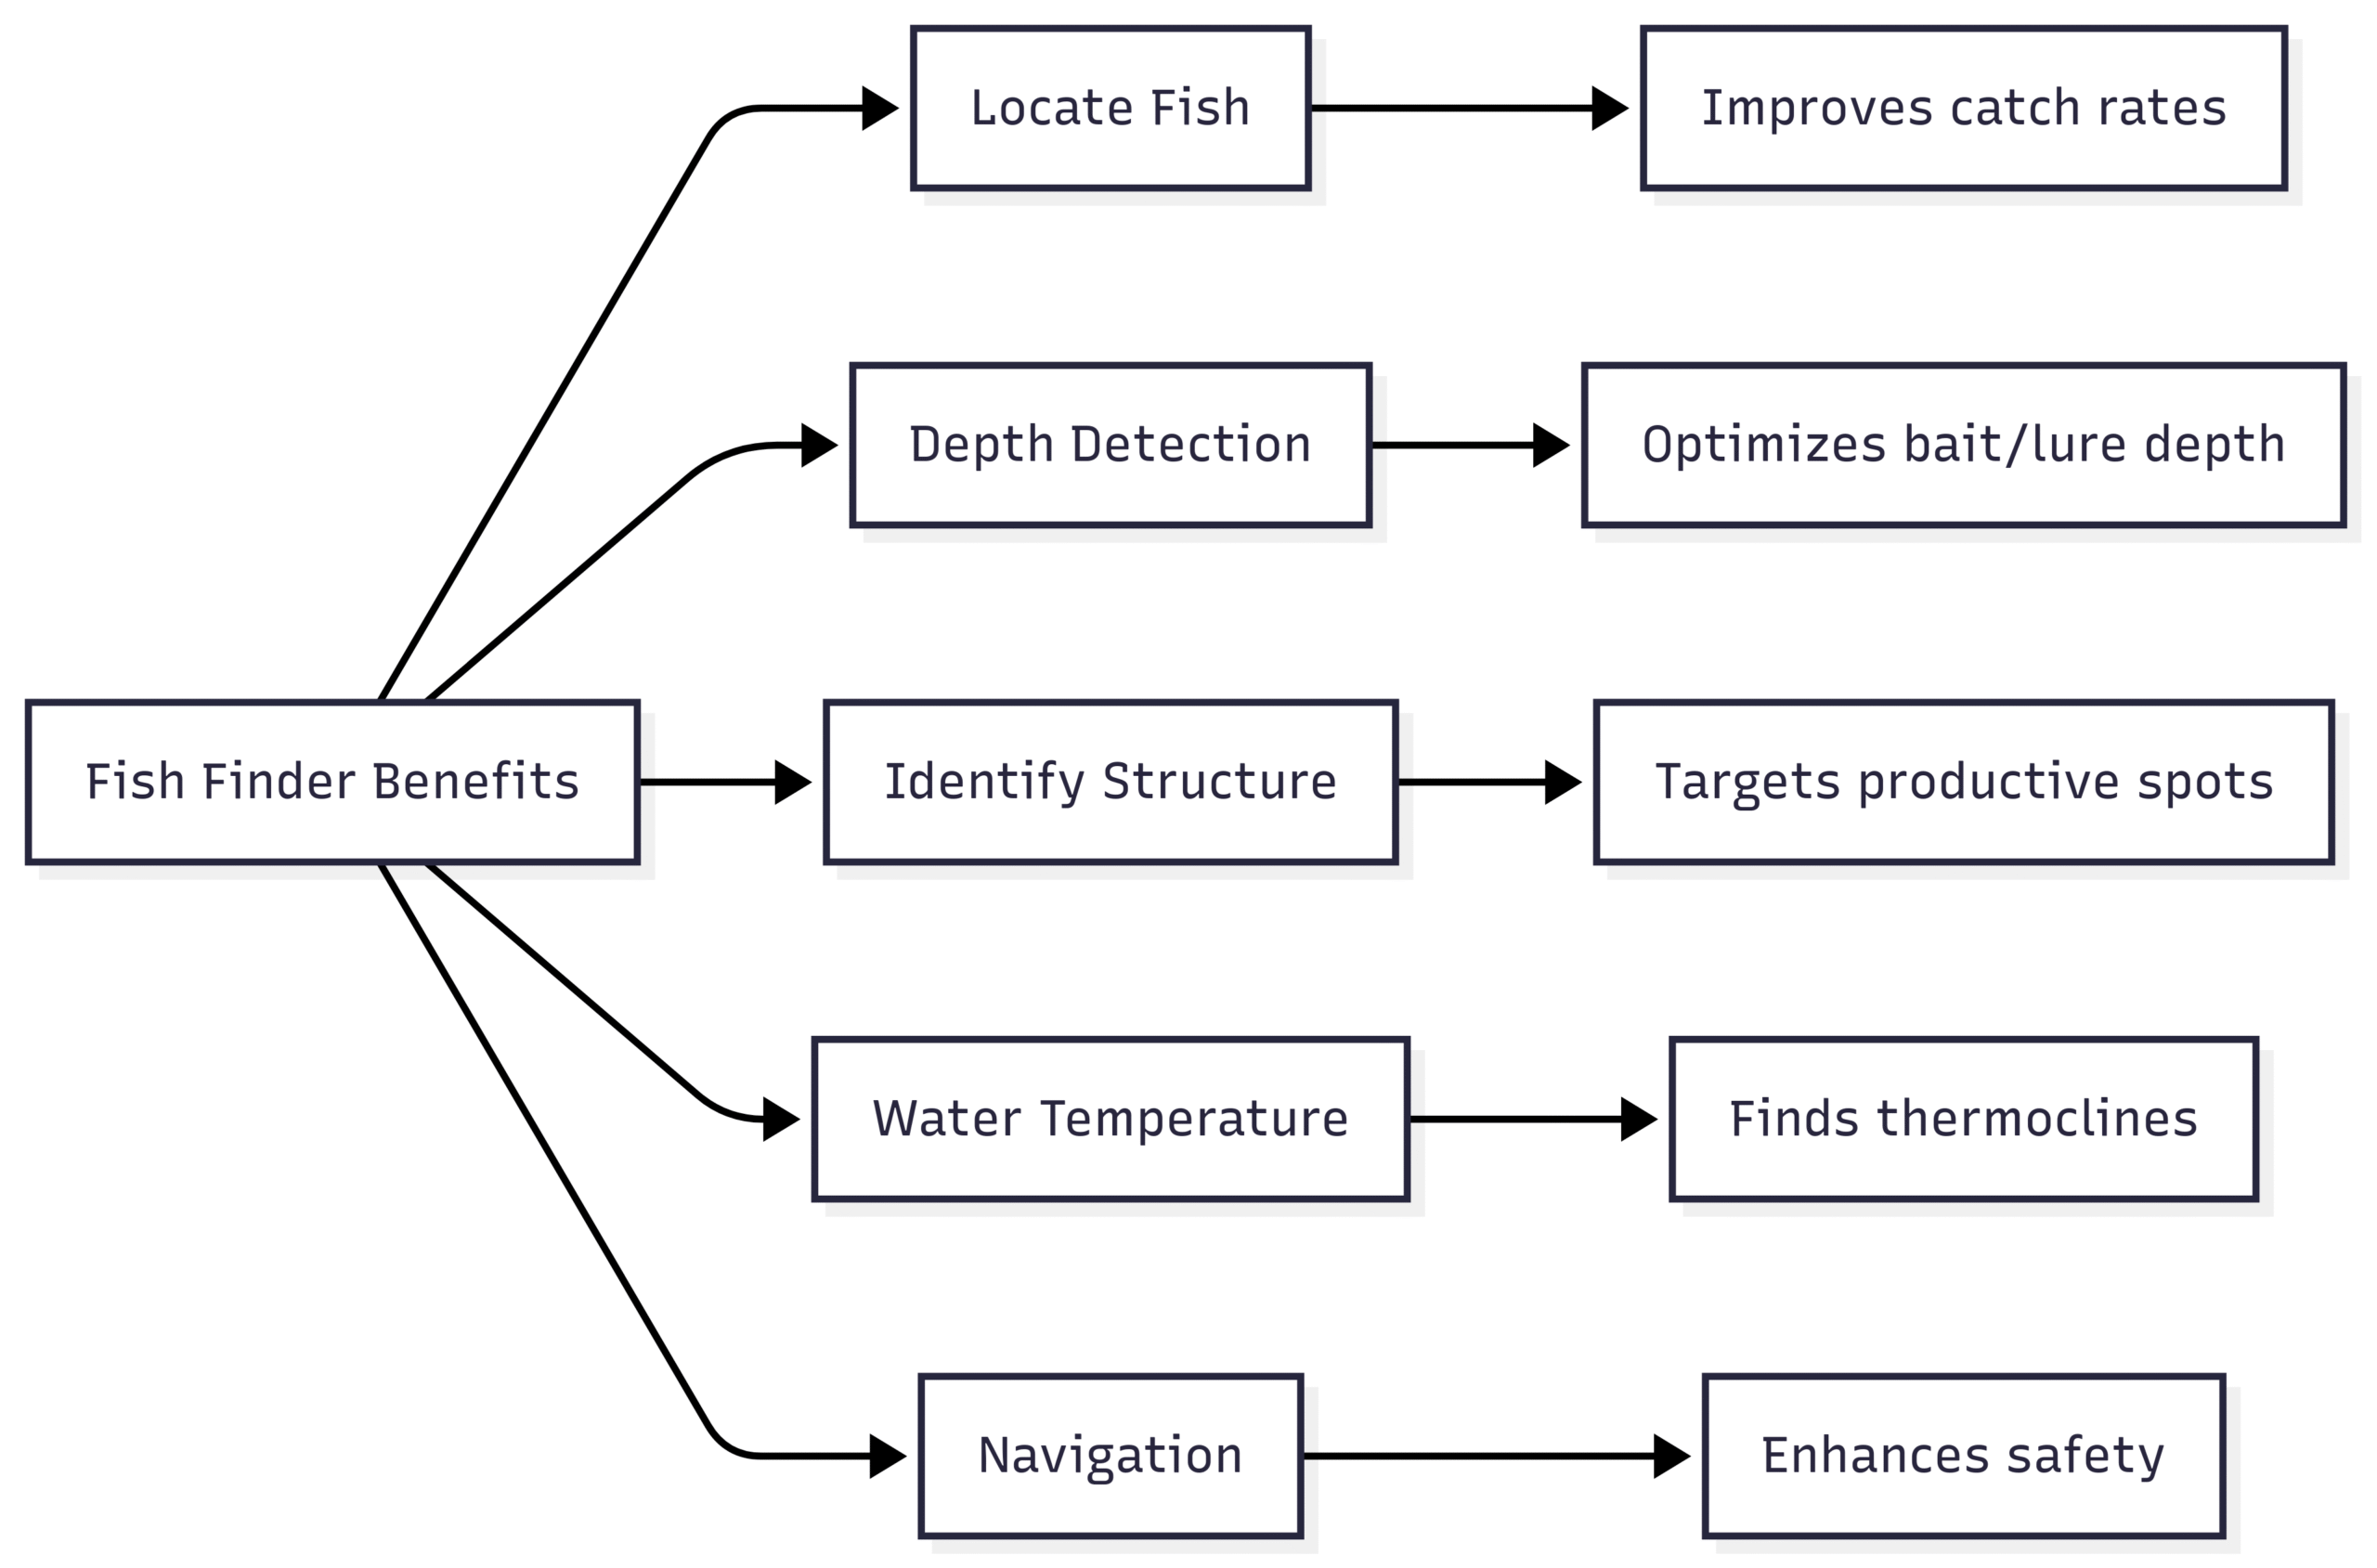
9. Upgrade Your Fish Finder
A fish finder upgrade can revolutionize your fishing experience by improving fish detection, depth sensing, and navigation. Many modern units can be updated with a software patch or a new transducer.
Benefits:
- Fish Detection: Locates fish and underwater structures.
- Navigation: Provides depth and hazard information.
- Cost-Effective: Software updates are often free; transducers cost $100–$300.
DIY Installation:
Software updates are downloaded from the manufacturer’s website and applied via WiFi or USB. Transducer replacement involves mounting the new unit and connecting it to the display, taking 1–2 hours.
Cost and Specifications:
- Price Range: $0 (software update) to $100–$300 (transducer)
- Materials: Transducer, mounting hardware
- Tools Needed: Screwdriver, wrench
- Time: 1–2 hours
Chart: Fish Finder Benefits
10. Add Creative Storage Solutions
Maximize space on your boat with DIY storage solutions. From overhead nets to under-seat compartments, these upgrades keep your gear organized and accessible.
Storage Ideas:
- Vertical Space: Use mesh pockets on bulkheads for small items.
- Under-Seat Storage: Install hinged cushions for hidden compartments.
- Overhead Nets: Secure lightweight items like towels or bedding.
- Hooks and Clips: Attach gear to railings or stanchions.
- Velcro Strips: Secure lightweight items to walls or cabinets.
DIY Installation:
Most storage solutions use adhesive, screws, or bungee cords for mounting. Installation takes 1–3 hours, depending on complexity.
Cost and Specifications:
- Price Range: $10–$100
- Materials: Mesh nets, bungee cords, Velcro, storage bins
- Tools Needed: Drill, screwdriver, scissors
- Time: 1–3 hours
Additional Performance Tips
For boaters looking to maximize speed and efficiency without adding horsepower, consider these advanced techniques:
Blueprinting the Hull
Blueprinting involves optimizing the hull’s surface for minimal drag. Sand and polish the bottom to remove imperfections, and ensure proper drive alignment. This can improve speed by 2–5%, but it requires advanced skills and tools like a sander and alignment kit.
Aero Drag Reduction
Beyond a bimini top, reduce drag by removing tall accessories or adding fairings to streamline equipment. This can improve fuel efficiency by 1–3%.
Improving Slip Angle
Adjusting the boat’s trim and weight distribution can reduce slip angle (sideways movement), improving handling. Experiment with trim tab settings and load placement during test runs.
Conclusion
Upgrading your boat doesn’t require a massive budget or professional help. These 10 DIY projects—ranging from installing a bimini top to adding storage solutions—offer practical, affordable ways to enhance performance, comfort, and style. With basic tools and a few hours, you can transform your vessel into a more functional and enjoyable space. Whether you’re fishing, cruising, or enjoying watersports, these upgrades will take your boating experience to the next level. So grab your tools, roll up your sleeves, and make your great boat even better!
Share 10 Simple Boat Upgrades: Easy DIY Projects with your friends and Leave a comment below with your thoughts.
Read How to Deal with Emergency Situations on Your Boat? Guide until we meet in the next article.