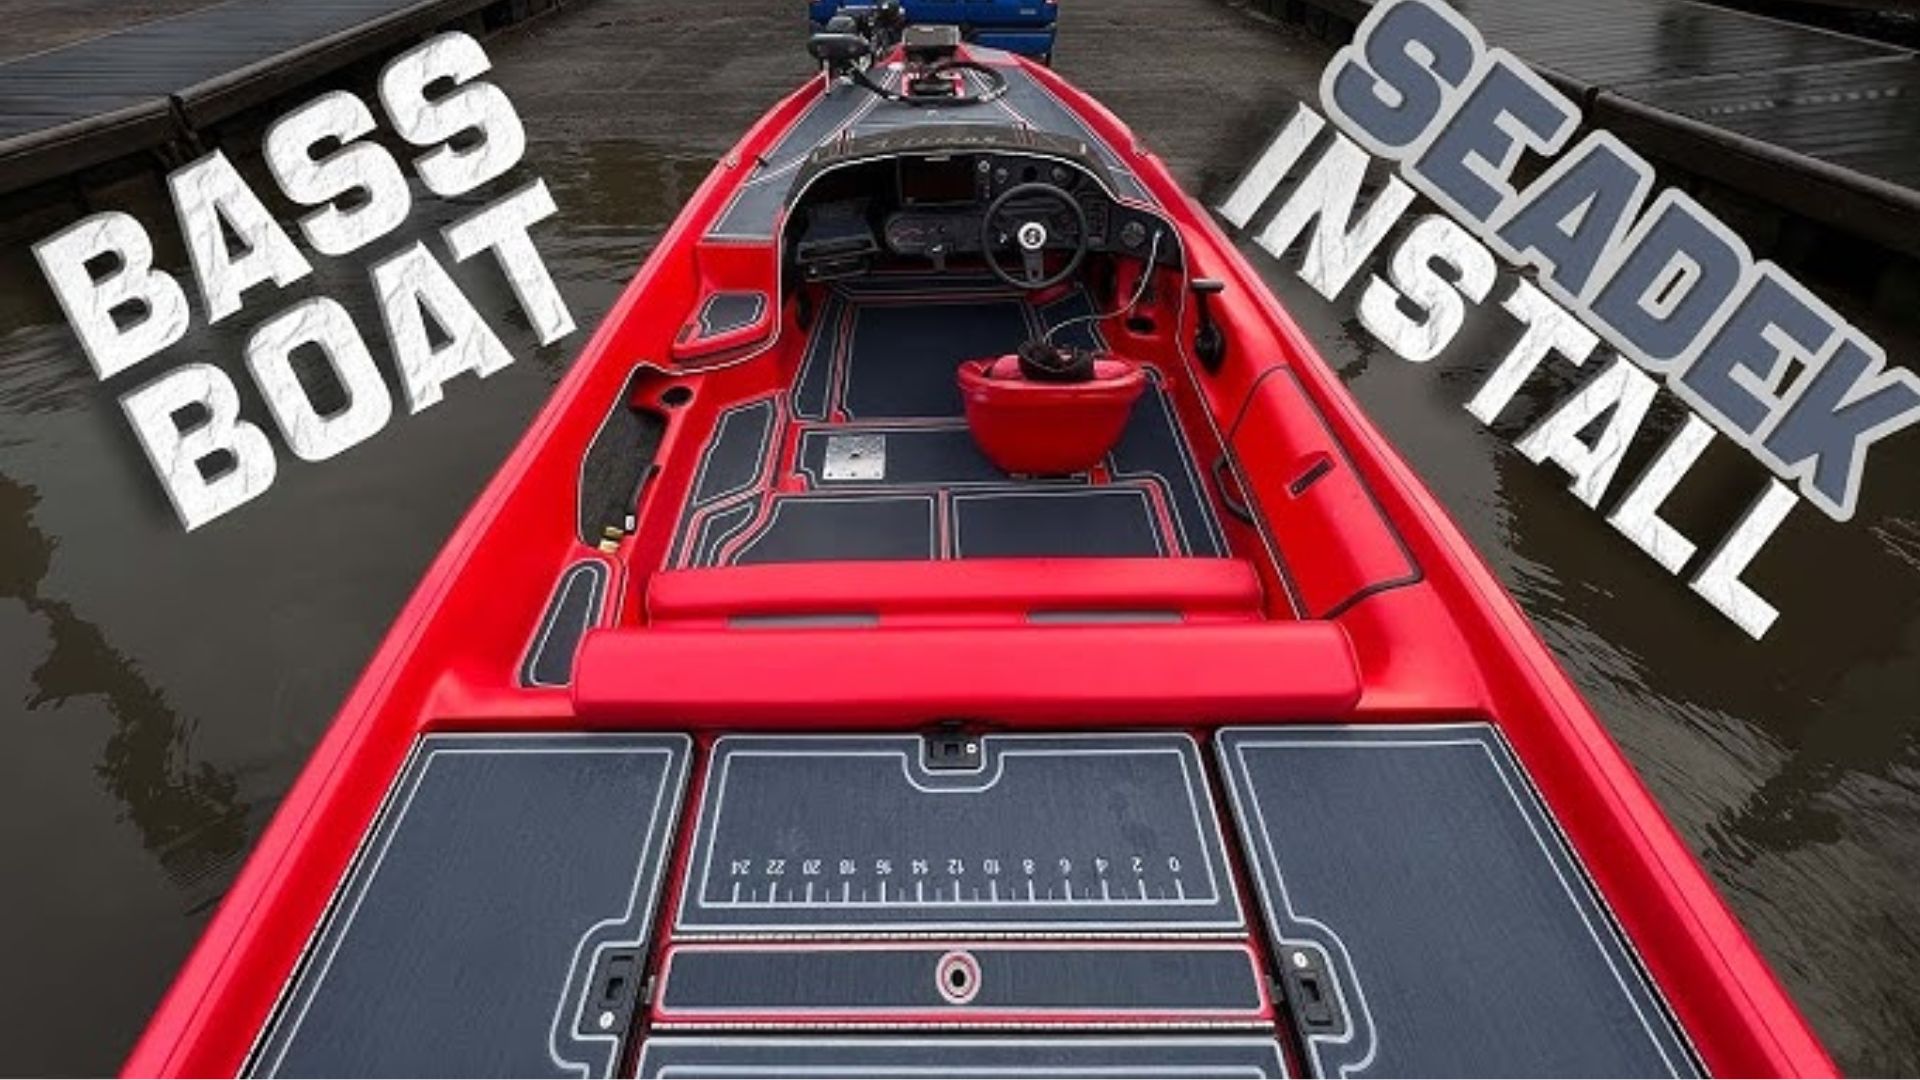
Replace Boat Carpet with SeaDek: Elevate Boat’s Flooring
Boat carpets, though a staple in marine interiors, often bear the brunt of wear and tear. Over time, exposure to water, sun, and heavy foot traffic can leave them looking worn and weathered. But fret not, for there’s a superior alternative that promises not only durability but also enhanced aesthetics and performance – SeaDek.
This article aims to be your comprehensive guide to replacing traditional boat carpet with SeaDek, a modern, high-performance material that’s making waves in the boating world. SeaDek offers a wide range of benefits, from unmatched resilience to customizable designs that can elevate your boat’s look and functionality.
We’ll delve into the significance of SeaDek, walk you through the replacement process, share invaluable installation tips, and discuss the maintenance required to keep your SeaDek flooring looking and performing at its best. Get ready to transform your boat’s interior into a sleek, comfortable, and long-lasting haven with SeaDek.
The Significance of Replacing Boat Carpet
Having a clean and comfortable boat interior is essential for a pleasant and enjoyable boating experience. Boat carpets play a pivotal role in achieving this by providing a soft, non-slip surface for occupants and protecting the boat’s floor. However, boat carpets are susceptible to deterioration over time.
Exposure to water, particularly in a marine environment, can lead to mold and mildew growth, making the carpet unsightly and unhygienic. UV rays from the sun can cause fading, reducing the carpet’s aesthetic appeal. Heavy foot traffic and the effects of time can wear down the carpet’s fibers, making it less comfortable and more prone to damage.
This is where SeaDek shines as a superior replacement option. SeaDek is a high-performance, closed-cell foam material specifically designed for marine applications. It offers exceptional durability, UV resistance, and resistance to water absorption, making it an ideal choice for boat flooring. By replacing your boat carpet with SeaDek, you can enjoy a clean, comfortable, and long-lasting interior that enhances both the aesthetics and functionality of your vessel.
Introducing SeaDek
SeaDek has rapidly gained popularity among boating enthusiasts for its exceptional qualities that elevate the boating experience. It is a revolutionary, closed-cell foam material designed to replace traditional boat carpeting, offering numerous advantages that have made it a top choice in the boating community.
One of the standout features of SeaDek is its remarkable non-slip surface. Unlike traditional boat carpets that can become slippery when wet, SeaDek provides reliable traction even in wet conditions, enhancing safety on board. This feature is particularly crucial on boats, where water exposure is inevitable.
Durability is another key factor that sets SeaDek apart. It is resistant to UV rays, ensuring that it won’t fade or deteriorate from sun exposure. SeaDek is also highly resistant to water absorption, preventing the growth of mold and mildew that often plagues traditional boat carpets.
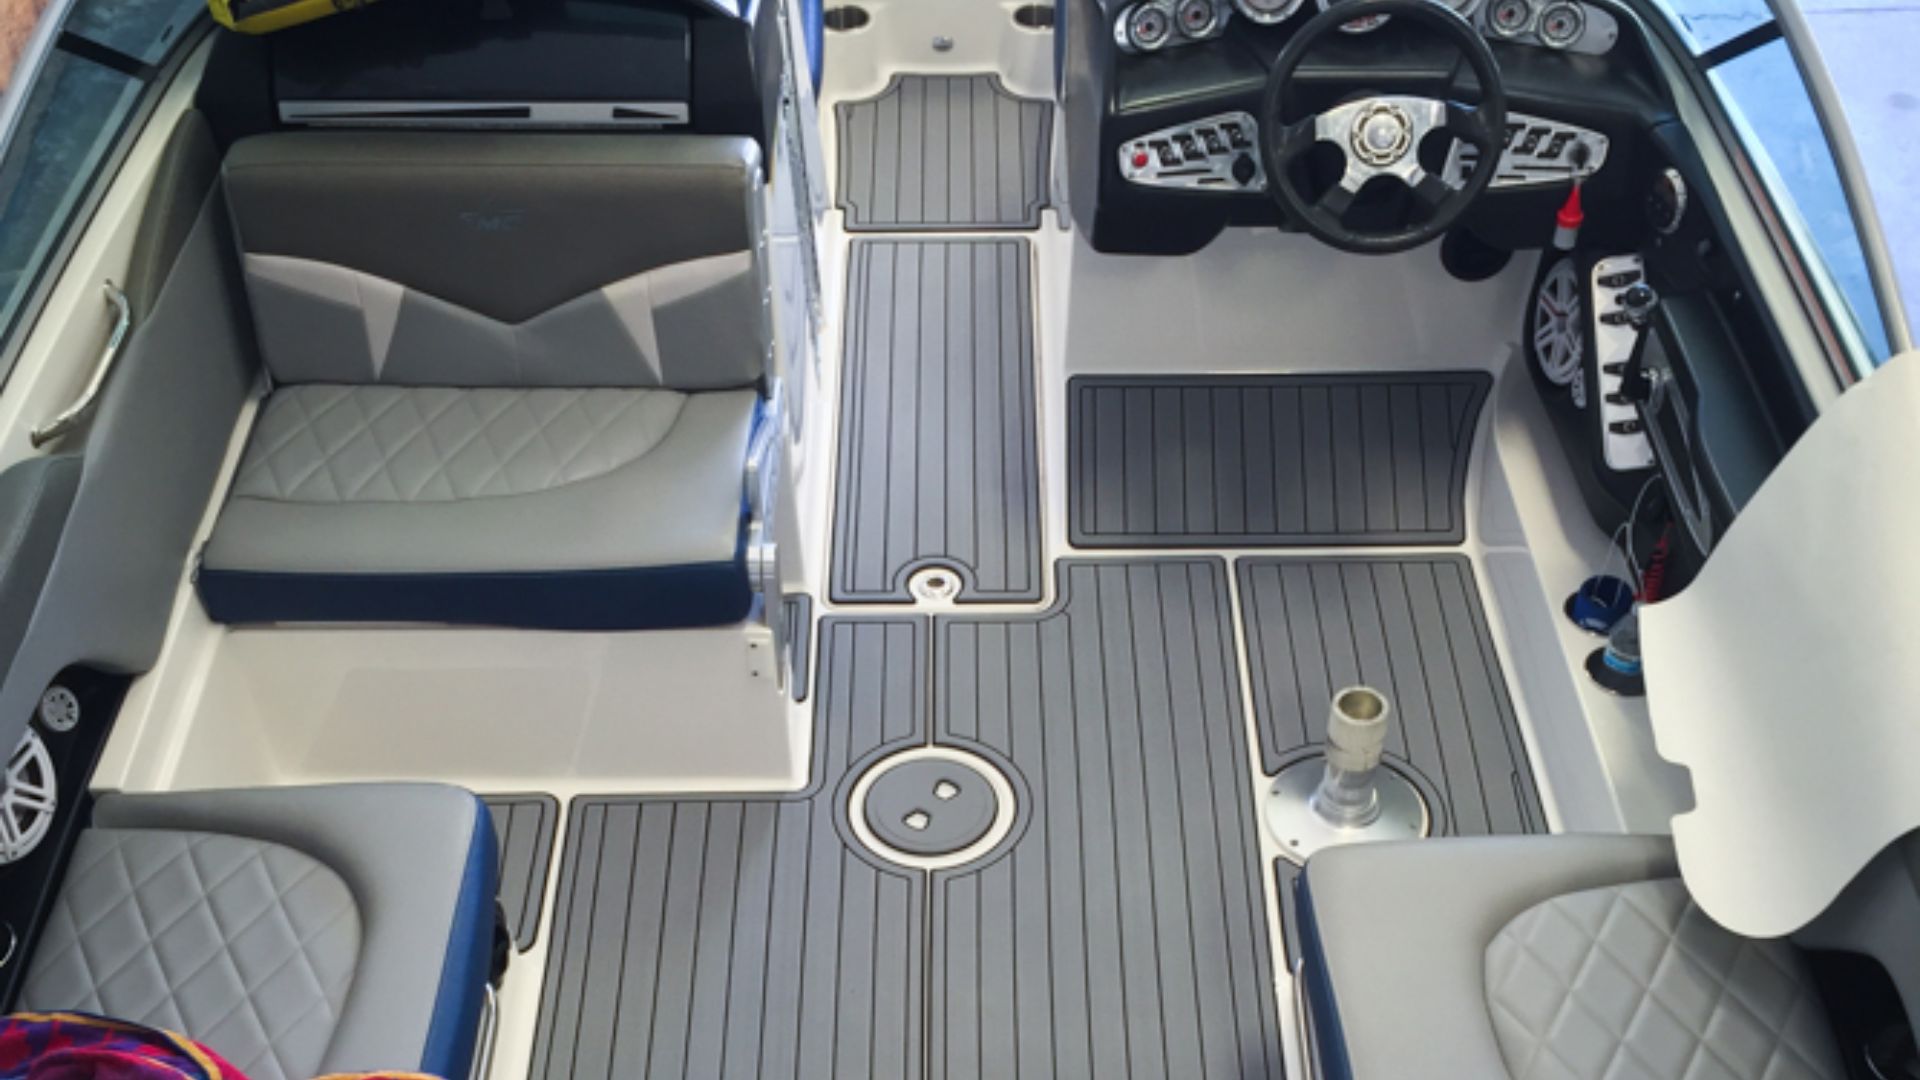
Customization is where SeaDek truly shines. Boat owners can choose from a wide range of colors, textures, and designs to create a personalized and attractive boat flooring that complements their vessel’s style. Whether you prefer a classic teak look or a bold color scheme, SeaDek offers endless possibilities.
Overall, SeaDek’s non-slip surface, durability, and customization options make it a versatile and attractive choice for boat flooring, revolutionizing the way boaters enjoy their time on the water.
Steps Required Before Replacing Boat Carpet with SeaDek
Before you embark on the journey of replacing your boat carpet with SeaDek, there are several crucial preparatory steps to ensure a successful and aesthetically pleasing installation.
1. Accurate Measurement:
Begin by meticulously measuring the area of your boat’s flooring that needs SeaDek coverage. Precision in measurement is essential, as SeaDek is custom-cut to fit your boat’s specific dimensions.
Measure not only the main flooring area but also any additional spaces like swim platforms or cockpit seating areas. It’s advisable to create a detailed diagram or template of the measured areas, which will help during the customization process.
2. SeaDek Selection:
SeaDek offers a wide variety of colors, textures, and designs to suit various boat styles and personal preferences. Take your time exploring the available options and consider factors such as your boat’s aesthetics and the intended use of the SeaDek flooring.
Some may prefer a classic teak look, while others might opt for a more vibrant or unique design. Choose the SeaDek color and texture that aligns with your boat’s style and your desired ambiance.
3. Customization:
Once you’ve selected the SeaDek design that resonates with you, it’s time to work on customization. Many SeaDek suppliers and manufacturers offer customization services, allowing you to personalize your SeaDek flooring with boat names, logos, or patterns. Think about how you can add a personal touch to make your boat truly unique.
By diligently preparing through accurate measurement and thoughtful SeaDek selection, you set the stage for a successful and visually appealing replacement process that will enhance both the functionality and aesthetics of your boat.
Step-By-Step Guide on How to Remove the Old Boat Carpet
Removing the old boat carpet is a crucial step in preparing the surface for SeaDek installation. Here’s a step-by-step guide on how to do it effectively:
Tools Needed:
- Utility knife or carpet knife
- Adhesive remover or solvent
- Pry bar or pliers
- Safety gloves and goggles
- Trash bags or containers for disposal
Steps:
- Step 1: Safety Precautions: Before you begin, put on safety gloves and goggles to protect yourself from any potential hazards.
- Step 2: Clear the Area: Remove any movable items from the boat, including furniture, electronics, and personal belongings. Clearing the area will provide you with better access to the carpet.
- Step 3: Cut the Carpet: Use a utility knife or carpet knife to cut the old carpet into manageable sections. Start at one corner or edge of the carpet and make straight cuts. Roll or fold each cut section as you go.
- Step 4: Remove Staples or Fasteners: Inspect the flooring underneath the carpet for staples, nails, or fasteners used to secure the carpet. Use pliers or a pry bar to remove these items carefully, ensuring the surface is smooth and free from obstructions.
- Step 5: Apply Adhesive Remover: If there’s adhesive residue left on the boat’s surface, apply an adhesive remover or solvent as per the manufacturer’s instructions. Allow it to sit for the recommended time to soften the adhesive.
- Step 6: Scrape and Clean: Use a scraper or putty knife to gently scrape off the adhesive residue. Work in small sections, applying consistent pressure. Wipe away the loosened residue with a clean cloth or paper towels.
- Step 7: Dispose of Old Carpet: Collect the old carpet sections, staples, and any debris, and dispose of them properly in trash bags or containers. Check local regulations for disposal guidelines.
- Step 8: Surface Inspection: After removal and cleaning, inspect the boat’s surface to ensure it’s clean, smooth, and free from any remnants of the old carpet or adhesive. Any imperfections can affect the SeaDek installation, so take your time to prepare the surface thoroughly.
Note: Adhesive removers and solvents can emit fumes, so ensure proper ventilation when using them. Additionally, follow safety instructions provided by the product manufacturer.
By following these steps carefully, you’ll prepare your boat’s surface for the SeaDek installation, ensuring a clean and secure foundation for the new flooring.
Installation Process of SeaDek as a Replacement for Boat Carpet
Installing SeaDek as a replacement for boat carpet can transform your boat’s flooring. Here’s a step-by-step guide on how to install SeaDek effectively:
Materials Needed:
- SeaDek pieces
- Acetone or isopropyl alcohol
- Clean rags
- TSP (Trisodium Phosphate) or boat soap
- Water
- Measuring tape
- Pencil
- Straight edge or ruler
- SeaDek adhesive
- Application roller or squeegee
- Utility knife or sharp blade
- Masking tape
Steps:
- Step 1: Surface Preparation: Ensure the boat’s surface is clean, dry, and free from any residue, dust, or debris. Use acetone or isopropyl alcohol and clean rags to wipe down the area thoroughly.
- Step 2: Mix Cleaning Solution: Prepare a cleaning solution by mixing TSP or boat soap with water according to the product’s instructions. Scrub the surface with the solution to remove any remaining contaminants.
- Step 3: Rinse and Dry: Rinse the surface with clean water to remove the cleaning solution. Allow it to dry completely before proceeding with the SeaDek installation.
- Step 4: Position SeaDek Pieces: Lay out the SeaDek pieces on the boat’s flooring in the desired arrangement, but do not apply adhesive yet. Use masking tape to hold them temporarily in place and ensure proper alignment.
- Step 5: Trim for a Precise Fit: Measure and mark any excess SeaDek material that needs to be trimmed to achieve a precise fit. Use a straight edge or ruler and a utility knife or sharp blade to trim along the marked lines.
- Step 6: Apply Adhesive: Remove the SeaDek pieces and apply a thin, even layer of SeaDek adhesive to the boat’s surface. Spread the adhesive with an application roller or squeegee for uniform coverage.
- Step 7: Position SeaDek: Carefully place the SeaDek pieces back onto the adhesive, ensuring proper alignment and fit. Press down firmly to ensure good contact between the SeaDek and the boat’s surface.
- Step 8: Roll and Secure: Use an application roller or squeegee to roll over the SeaDek pieces, ensuring they adhere securely to the surface. Pay special attention to edges and corners.
- Step 9: Allow Adhesive to Cure: Follow the adhesive manufacturer’s instructions regarding the curing time. Typically, this may take several hours or longer, depending on environmental conditions.
- Step 10: Final Trim and Clean-Up: Once the adhesive has cured, use a utility knife or sharp blade to make any final trimmings along the edges. Clean any adhesive residue with acetone or isopropyl alcohol.
- Step 11: Inspection: Inspect the SeaDek installation for any loose edges or corners. If needed, reapply pressure or adhesive to ensure a secure bond.
By following these steps carefully, you can ensure a successful SeaDek installation, resulting in a durable, non-slip, and attractive boat flooring that’s superior to traditional carpeting.

Regular Maintenance to Keep Your SeaDek Flooring in Top Condition
Maintaining your SeaDek flooring is essential to ensure its longevity and performance. Here are some key maintenance and care steps to follow:
- Regular Cleaning: Clean your SeaDek flooring regularly to remove dirt, grime, and salt residue. Use a soft-bristle brush or non-abrasive scrub pad for gentle cleaning.
- Gentle Cleaning Agents: When cleaning SeaDek, use mild, non-abrasive cleaning agents. Mix a solution of boat soap and water to clean the surface. Avoid harsh chemicals or abrasive cleaners that can damage the SeaDek material.
- Rinse Thoroughly: After cleaning, rinse the SeaDek thoroughly with fresh water to remove any soap residue. Make sure there’s no cleaning solution left on the surface.
- Avoid Abrasive Tools: Do not use abrasive tools, like steel wool or abrasive pads, to clean SeaDek, as they can scratch the surface.
- UV Protection: SeaDek is UV-resistant, but prolonged exposure to direct sunlight can cause fading over time. When not in use, consider covering your boat or using a boat cover to protect the SeaDek flooring from excessive UV exposure.
- Spot Cleaning: Address spills or stains promptly to prevent them from setting in. Use a gentle cleaning solution and a soft cloth or sponge to spot clean affected areas.
- Inspect Regularly: Regularly inspect your SeaDek flooring for any signs of wear, loose edges, or damage. Address any issues promptly to prevent them from worsening.
- Storage: If you store your boat for an extended period, consider removing the SeaDek pieces and storing them indoors to protect them from environmental elements.
- Preventive Measures: Use non-slip mats or rugs in high-traffic areas to reduce wear on specific sections of the SeaDek flooring.
By following these maintenance and care guidelines, you can ensure that your SeaDek flooring remains in excellent condition, providing comfort, safety, and aesthetics for your boat for years to come.
Key Benefits of SeaDek as a Replacement for Boat Carpet
SeaDek offers numerous advantages as a replacement for traditional boat carpet, making it a popular choice among boaters. Here are the key benefits:
- Durability: SeaDek is highly durable and can withstand heavy foot traffic, UV exposure, and harsh marine conditions. It resists wear, tearing, and fading, ensuring a long-lasting flooring solution.
- Comfort: SeaDek provides excellent underfoot comfort. Its cushioned surface reduces fatigue during long hours on the water, enhancing the overall boating experience.
- Non-Slip Surface: SeaDek’s non-slip surface offers exceptional traction, even when wet. This feature enhances safety by preventing slips and falls on the boat, especially during rough conditions.
- Customization: SeaDek is available in various colors, textures, and patterns, allowing boat owners to personalize their flooring to match their boat’s style. Custom logos and designs can also be incorporated, adding a unique touch.
- Enhanced Aesthetics: SeaDek enhances the appearance of your boat’s interior. Its sleek and modern look adds a touch of elegance to your vessel, making it more visually appealing.
- Easy Maintenance: Maintaining SeaDek is straightforward. It can be cleaned with mild soap and water, and it resists stains and odors. This ease of maintenance saves time and effort.
- Noise Reduction: SeaDek has noise-dampening properties, reducing the sound of footsteps and other impacts on the boat’s deck. This quieter environment contributes to a more peaceful boating experience.
- Cooler Surface: SeaDek remains cooler to the touch than many other boat flooring materials, even in direct sunlight. This feature enhances comfort on hot summer days.
- UV Resistance: SeaDek is UV-resistant, reducing the risk of fading and discoloration due to sun exposure.
- Added Value: Installing SeaDek can increase the resale value of your boat. Its durability and aesthetics make your boat more appealing to potential buyers.
Overall, SeaDek offers a superior alternative to traditional boat carpet, enhancing both the functionality and aesthetics of your boat while providing a comfortable and safe environment for boating adventures.
Conclusion and Enjoying Your SeaDek Flooring
In conclusion, SeaDek emerges as a superior replacement for traditional boat carpet, offering a host of benefits that enhance the overall boating experience. Throughout this guide, we’ve explored the significance of SeaDek, its numerous advantages, and the steps involved in replacing boat carpet with this innovative material.
From its durability, comfort, and non-slip surface to its customization options and enhanced aesthetics, SeaDek stands as a versatile and attractive choice for boat flooring. It not only improves safety and functionality but also adds a touch of elegance to your vessel.
For boat owners seeking an upgrade, we encourage you to consider SeaDek as a valuable investment in your boating adventures. With proper installation and regular maintenance, SeaDek flooring can provide long-lasting comfort, style, and durability for your boat, ensuring enjoyable experiences on the water for years to come. So, go ahead and elevate your boating experience with SeaDek – a flooring solution that combines performance and aesthetics seamlessly.
Share 10 Pedal Boat Modifications to Enhance Boating Experience with your friends and Leave a comment below with your thoughts.
Read What Can I Use for Trim and Tilt Fluid? until we meet in the next article.


