Proper Dock Tie Up When Boat Has No Cleats?
Learn how to securely tie up a boat without cleats using bow eyes, transom eyes, and spring lines for safe, long-term docking.
For boat owners, securing a vessel to a dock is a fundamental skill, but it becomes challenging when the boat lacks traditional cleats. Many ski boats, wakeboard boats, and smaller vessels, like the 2000 Tigé 20i, rely on alternative tie points such as bow eyes, transom eyes, or handrails. These setups work for short-term docking but may not hold up during extended periods or rough weather. This guide explores best practices for tying up a boat without cleats, ensuring it remains secure, protected, and free from damage during long-term marina storage. Whether docking at a cleat-equipped dock or one with metal loops or bull rails, we’ll cover techniques, equipment, and considerations to keep your boat safe.
Understanding the Challenge of Boats Without Cleats
Boats without cleats, such as ski or wakeboard boats, are designed for performance and aesthetics, often prioritizing sleek lines over external hardware that could snag tow ropes. Instead of cleats, these boats feature:
- Bow Eye: A sturdy metal loop at the bow, typically near the waterline, used for trailering or mooring.
- Transom Eyes: Metal loops on the stern (port and starboard) for securing the boat to a trailer or dock.
- Handrails: Frame-mounted rails inside the gunnel, often used for short-term tying but prone to loosening or causing line rub.
- Wakeboard Towers or Ski Poles: Structural components that can serve as midship tie points but may require careful line management to avoid damage.
The absence of cleats complicates long-term docking, as handrails may loosen over time, and lines passing over the gunnel can rub against upholstery or fiberglass, causing wear. Additionally, docks without cleats—featuring bull rails or metal loops—require specific knotting techniques or hardware to ensure a secure hold.
Key Considerations for Long-Term Docking
Before diving into tie-up techniques, consider these factors to ensure your boat remains secure and undamaged:
- Weather Exposure: Marina slips may face high winds, waves, or storms, requiring robust tie points and lines to prevent the boat from drifting or colliding with the dock or neighboring vessels.
- Dock Type: Docks may have cleats, metal loops, bull rails, or posts, each requiring different tying methods.
- Tidal or Water Level Changes: Fixed docks, unlike floating ones, don’t adjust with water levels, necessitating loose lines to accommodate rise and fall.
- Line Wear and Rub: Lines rubbing against the gunnel or dock edges can fray, and constant contact may damage the boat’s finish.
- Boat Protection: Fenders, bumpers, or padding are essential to prevent hull damage, especially in tight slips or during rough conditions.
- Hardware Durability: Using high-quality, corrosion-resistant clips or anodes protects against environmental wear in freshwater or saltwater.
Recommended Tie-Up Techniques for Boats Without Cleats
The following methods are tailored for boats without cleats, focusing on using existing tie points like bow eyes, transom eyes, and wakeboard towers. These techniques ensure stability, minimize damage, and accommodate various dock configurations.
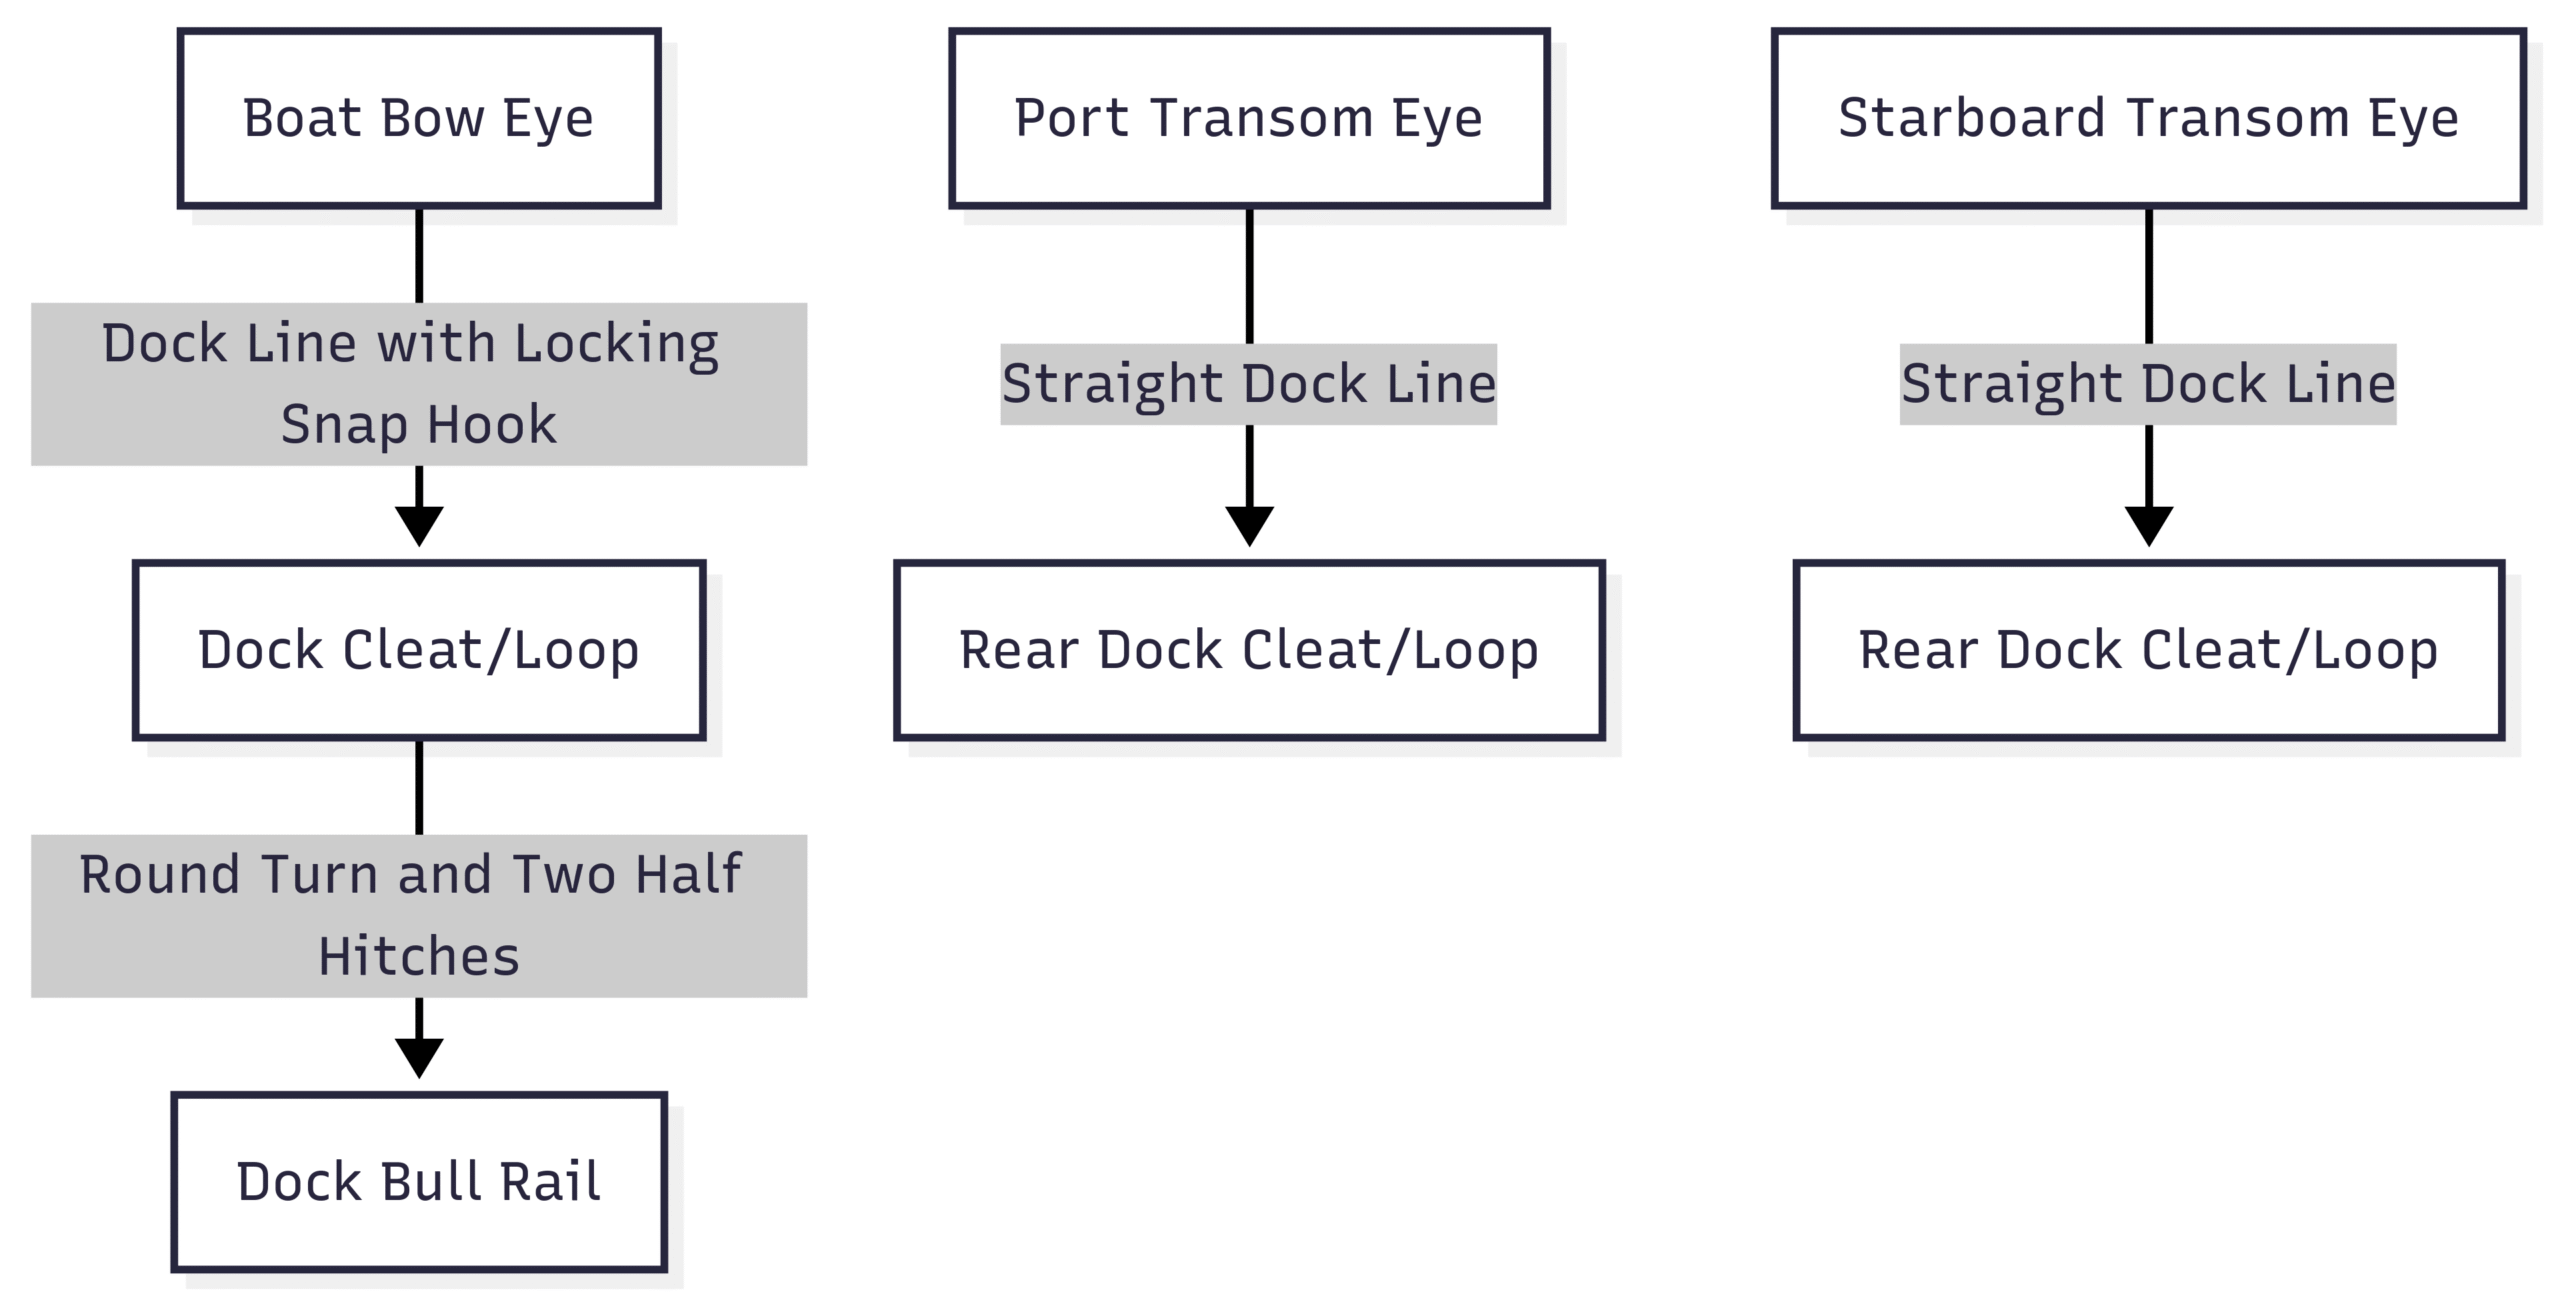
1. Bow and Stern Line Configuration with Locking Snap Hooks
This method uses the bow eye and transom eyes to secure the boat, keeping it centered in the slip without relying on handrails.
- Bow Setup: Attach a dock line to the bow eye using a locking snap hook (e.g., aluminum, corrosion-resistant, rated for 6,000 lbs, available for ~$20-$30 at marine retailers like West Marine). Run the line to a dock cleat or metal loop at the front of the slip. For docks with bull rails, pass the line under the rail, over the top, and back to the boat, securing it with a Round Turn and Two Half Hitches knot for easy release.
- Stern Setup: Attach dock lines to both transom eyes (port and starboard) using loop-ended lines or snap hooks. Tie each line to the dock’s rear cleat or loop, keeping them straight (not crossed) if the slip is wide enough. This prevents excessive movement while allowing tidal adjustments.
- Advantages: Minimizes gunnel rub, uses strong tie points, and is quick to set up or release.
- Considerations: Ensure the snap hook is locking to prevent accidental release in high winds. Inspect lines regularly for wear, replacing them annually (~$15-$50 per line depending on length and material).
Chart: Bow and Stern Line Configuration
2. Spring Line Configuration for Enhanced Stability
Spring lines prevent forward and backward movement, keeping the boat off the slip sides during waves or wind. This is ideal for long-term docking or stormy conditions.
- Setup: Attach lines to a midship point, such as the wakeboard tower or a strong handrail, and run them to dock cleats or loops. One line runs forward to a front dock cleat, and another runs aft to a rear cleat, forming a diagonal pattern. Keep lines slightly loose to allow for water level changes.
- Knot Choice: Use a Cleat Hitch for dock cleats or a Round Turn and Two Half Hitches for bull rails or loops.
- Advantages: Stabilizes the boat in rough conditions, reducing the risk of collisions with the dock or other boats.
- Considerations: If using the wakeboard tower, wrap lines with non-marking foam (~$5-$10 per foot) to prevent fiberglass damage. Midship cleats, if installed, enhance this setup’s effectiveness.
Table: Recommended Dock Line Specifications
| Line Type | Material | Diameter | Length | Price Range |
|---|---|---|---|---|
| Bow/Stern Line | Nylon (3-strand) | 3/8″-1/2″ | 15-25 ft | $15-$50 |
| Spring Line | Nylon (Double Braid) | 1/2″-5/8″ | 20-30 ft | $20-$60 |
| Locking Snap Hook | Aluminum | N/A | N/A | $20-$30 |
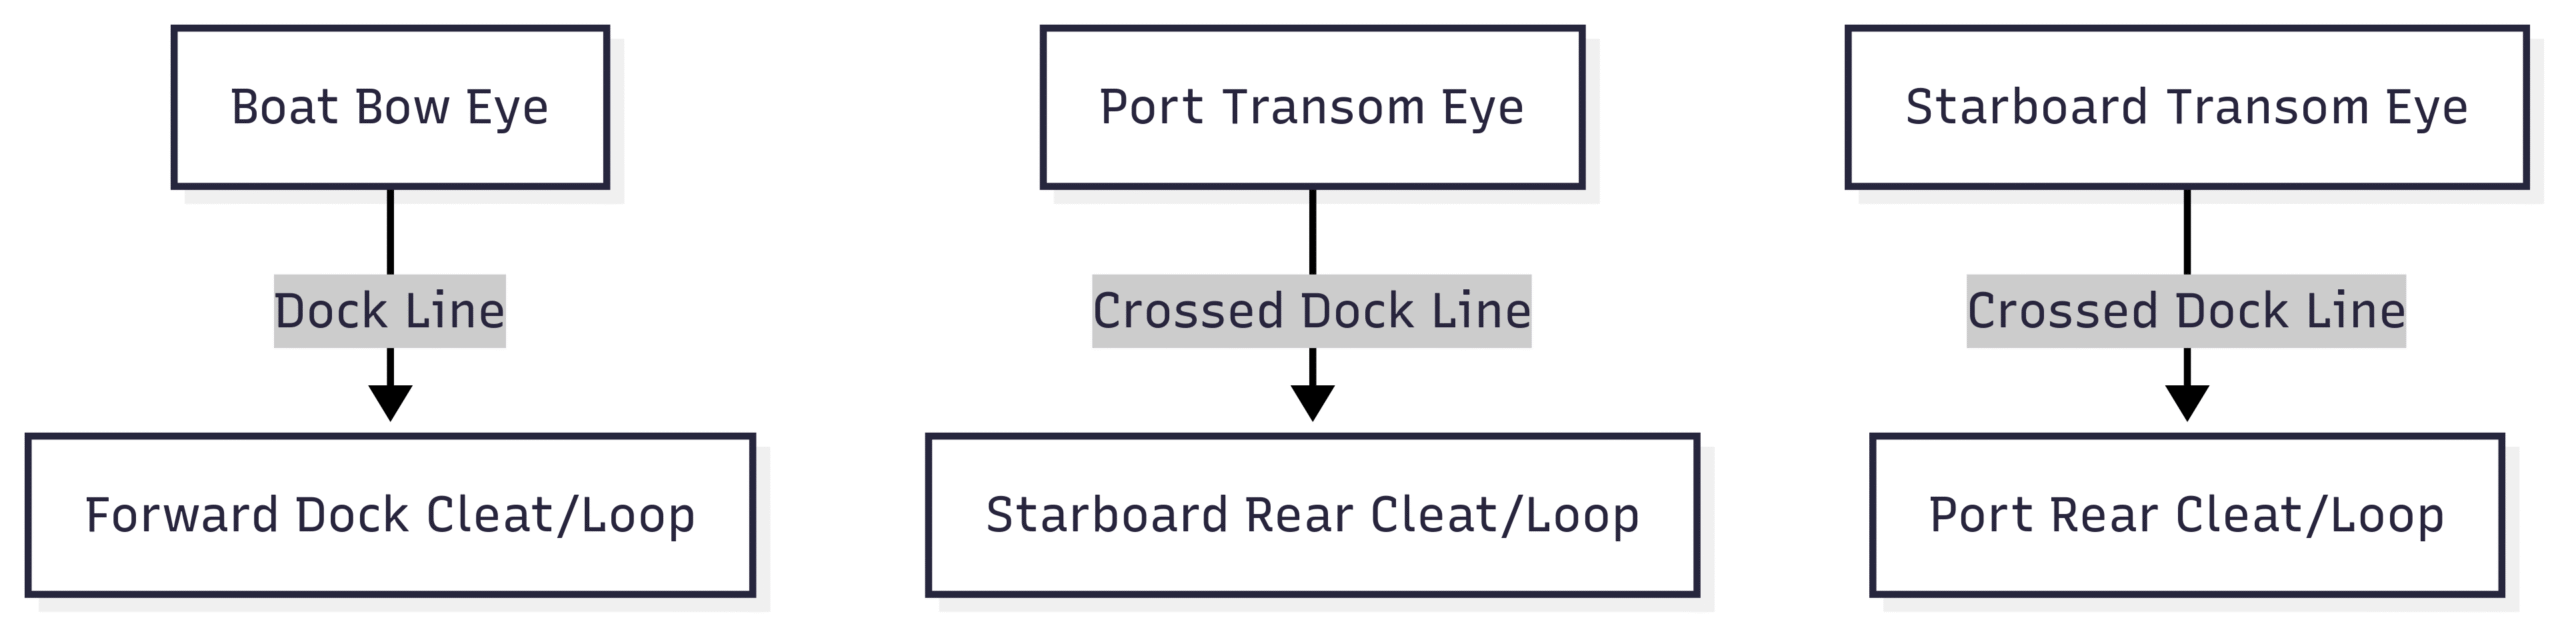
3. Crossed Stern Lines for Tight Slips
In narrow slips or when docking on one side, crossing stern lines can center the boat and prevent lateral movement.
- Setup: Attach one line from the port transom eye to the starboard dock cleat/loop and another from the starboard transom eye to the port cleat/loop, forming an “X” pattern. Combine with a bow line to the forward dock cleat.
- Advantages: Keeps the boat centered, especially in tight slips, and reduces strain on individual tie points.
- Considerations: Ensure lines are long enough (20-30 ft, ~$20-$60) to avoid excessive tension during water level changes. Use fenders ($25-$100 each) to protect the hull.
Chart: Crossed Stern Line Configuration
4. Using Dyneema Loops or Strap Loops
For boats where lines rub against the gunnel, UV-protected Dyneema or strap loops offer a soft, durable alternative.
- Setup: Attach Dyneema loops (~$10-$20 each) to the bow eye, transom eyes, or wakeboard tower. Secure dock lines to these loops, which then connect to dock cleats or loops. The soft material reduces abrasion on the boat’s surface.
- Advantages: Protects upholstery and fiberglass, is UV-resistant, and is easy to install/remove.
- Considerations: Ensure loops are rated for the boat’s weight and environmental conditions. Regular inspection is necessary to detect wear.
Installing Cleats: A Permanent Solution
While boats without cleats can be secured using existing tie points, installing cleats offers a long-term solution. Here are two options:
- Pop-Up Cleats:
- Description: Retractable cleats that sit flush with the deck when not in use, preventing tow ropes from snagging.
- Installation: Requires drilling into the deck and securing with a backing plate for strength. Professional installation costs
$100-$300 per cleat, including hardware ($50-$150 each). - Placement: Install midship and aft for spring line compatibility.
- Advantages: Provides dedicated tie points, enhances aesthetics, and supports standard docking techniques.
- Considerations: Ensure proper sealing to prevent leaks. Not ideal for owners avoiding permanent modifications.
- Webbing Cleats:
- Description: Strong webbing with a backing plate that slides between trim panels, designed for jet skis but adaptable for small boats.
- Cost: ~$20-$50 per cleat.
- Advantages: Non-invasive, easy to install, and removable.
- Considerations: May not withstand heavy loads in rough conditions.
Table: Cleat Options Comparison
| Cleat Type | Cost per Unit | Installation Cost | Durability | Aesthetic Impact |
|---|---|---|---|---|
| Pop-Up Cleat | $50-$150 | $100-$300 | High | Minimal |
| Webbing Cleat | $20-$50 | $0 (DIY) | Moderate | Moderate |
Docking at Non-Cleat Docks: Bull Rails and Metal Loops
Many marinas feature docks with bull rails (continuous wooden or metal rails) or metal loops instead of cleats, requiring specialized techniques.
Bull Rail Docking
- Technique: Pass the dock line under the bull rail, then over the top and back to the boat. Secure with a Round Turn and Two Half Hitches for stability and easy release. To depart, untie the knot and pull the line back with a single turn around the rail, avoiding the “Leap of Death” to the dock.
- Advantages: Prevents line jamming, allows crew to release lines from the boat.
- Considerations: Use gloves to handle lines under strain, and ensure lines are long enough to double back.
Metal Loop Docking
- Technique: Use double-looped dock lines (eye splices on both ends, ~$20-$60) or clip-equipped lines. Pass the loop or clip through the metal ring and secure it back to the boat or dock. For single-side docking, use spring lines to prevent forward/aft movement.
- Advantages: Simplifies tying in tight spaces, works with fixed docks.
- Considerations: Check loop or clip strength (stainless steel clips, ~$10-$25 each, are ideal for corrosion resistance).
Additional Equipment for Safe Docking
To protect your boat and ensure a secure tie-up, consider these accessories:
- Fenders/Bumpers: Use 4-6 fenders (~$25-$100 each) to cushion the boat against the dock. Place them at contact points, adjusting for water level changes.
- Anodes: Install zinc or magnesium anodes (~$20-$50) on the prop shaft or stern to prevent corrosion, especially in saltwater. Magnesium is better for freshwater.
- Seacocks: Ensure high-quality seacocks (~$50-$150) on raw water intakes to prevent flooding, replacing hose clamps if necessary.
- Non-Marking Foam: Wrap lines crossing the gunnel with foam (~$5-$10 per foot) to prevent fiberglass or upholstery damage.
Step-by-Step Guide to Tying Up a Boat Without Cleats
- Prepare Equipment:
- Gather 5 dock lines (2 stern, 2 spring, 1 bow), locking snap hooks, fenders, and anodes.
- Inspect lines and hardware for wear or corrosion.
- Position the Boat:
- Back into the slip (if possible) or go nose-in, aligning with the dock.
- Place fenders at contact points to protect the hull.
- Attach Bow Line:
- Secure a line to the bow eye with a locking snap hook.
- Tie to the forward dock cleat, loop, or bull rail using a Round Turn and Two Half Hitches.
- Secure Stern Lines:
- Attach lines to port and starboard transom eyes.
- Tie straight to rear dock cleats or cross them for tight slips.
- Add Spring Lines:
- Attach lines to the wakeboard tower or midship handrail.
- Run one forward and one aft to dock cleats/loops, keeping them slightly loose.
- Check and Adjust:
- Ensure lines allow for tidal changes (1-2 ft slack).
- Verify fenders are positioned correctly and anodes are in place.
- Regular Maintenance:
- Inspect lines, clips, and anodes monthly.
- Replace worn lines annually and reapply foam padding as needed.
Common Mistakes to Avoid
- Using Weak Hardware: Non-locking carabiners can open under strain, risking detachment. Always use locking snap hooks.
- Over-Tightening Lines: Tight lines on fixed docks can strain tie points or lift the boat, causing damage.
- Ignoring Rub Points: Lines crossing the gunnel without padding can damage upholstery or fiberglass.
- Skipping Spring Lines: Without spring lines, the boat may drift forward or backward, hitting the dock or other boats.
- Neglecting Maintenance: Frayed lines or corroded anodes can fail unexpectedly, especially in storms.
Cost Breakdown for Docking Setup
| Item | Quantity | Cost Range | Total Cost |
|---|---|---|---|
| Dock Lines (Nylon) | 5 | $15-$60 each | $75-$300 |
| Locking Snap Hooks | 3-5 | $20-$30 each | $60-$150 |
| Fenders | 4-6 | $25-$100 each | $100-$600 |
| Anode (Zinc/Magnesium) | 1 | $20-$50 | $20-$50 |
| Non-Marking Foam | 10 ft | $5-$10 per ft | $50-$100 |
| Pop-Up Cleats (Optional) | 2-4 | $50-$150 each | $100-$600 |
| Total | $405-$1,800 |
Expert Tips for Specific Scenarios
- Storm Preparation: Double up spring lines and add extra fenders during hurricanes or high winds. Check marina policies for storm protocols.
- Single-Side Docking: Use crossed stern lines and spring lines to keep the boat centered, especially in narrow slips.
- Fixed Docks: Allow extra line slack (1-2 ft) to accommodate water level changes, and use tall fenders to protect the hull.
- Marina-Specific Advice: Contact the marina (e.g., Foxhaven) to confirm dock features like bumper posts or metal loops, and ask about wind/current conditions.
Conclusion
Tying up a boat without cleats requires careful planning and the right equipment to ensure safety and prevent damage. By using bow and transom eyes, spring lines, and locking snap hooks, you can securely dock a ski or wakeboard boat like the Tigé 20i for long-term storage. For docks with bull rails or metal loops, knots like the Round Turn and Two Half Hitches simplify tying and release. Optional cleat installation or Dyneema loops can enhance convenience and protect the boat’s finish. Regular maintenance, proper fender placement, and corrosion protection with anodes are critical for long-term docking success. With these techniques, you can confidently secure your boat, even in challenging conditions, ensuring peace of mind at the marina.
Share Proper Dock Tie Up When Boat Has No Cleats? with your friends and Leave a comment below with your thoughts.
Read How to Wash Your Boat Properly: 3 Different Ways Guide until we meet in the next article.