How To Mount A Transducer On An Aluminium Boat
Learn how to mount a transducer on an aluminum boat with expert tips, step-by-step guides, and product recommendations for secure, leak-free installation.
Mounting a transducer on an aluminum boat is a critical task for anglers seeking to enhance their fishing experience with reliable sonar technology. A transducer, an essential component of a fish finder, converts electrical signals into sound waves to detect underwater objects, fish, and terrain. Proper installation ensures accurate readings, prevents hull damage, and maintains the boat’s integrity. This guide provides a detailed, step-by-step process for mounting a transducer on an aluminum boat, explores various mounting methods, and offers insights into materials, tools, and best practices to achieve a secure and effective setup.
Why Mount a Transducer on an Aluminum Boat?
Aluminum boats are popular among anglers due to their durability, lightweight construction, and affordability. Pairing an aluminum boat with a transducer-equipped fish finder can significantly improve your ability to locate fish and navigate waters effectively. However, aluminum’s thin and corrosion-prone nature requires careful consideration during transducer installation to avoid leaks, corrosion, or damage to the hull. Improper mounting, such as riveting or screwing directly into the transom, can lead to water ingress and structural issues. This article outlines the best methods to mount a transducer securely while preserving the boat’s integrity.
Understanding Transducer Mounting Options
There are several methods to mount a transducer on an aluminum boat, each with its advantages and considerations. The primary goal is to ensure the transducer is positioned to provide clear sonar readings while avoiding hull penetrations that could compromise the boat’s watertight integrity. Below are the most common approaches:
- Mounting Plate or Bracket (HDPE/Starboard): Using a high-density polyethylene (HDPE) board, often called Starboard, is a popular method. The board is adhered to the transom, and the transducer is screwed into the board, avoiding direct hull penetrations.
- Welded Aluminum Bracket: A marine-grade aluminum bracket welded to the transom provides a sturdy mounting surface for the transducer.
- Through-Hull Mounting (Inside the Hull): For minimal hull impact, transducers can be mounted inside the hull using epoxy, transmitting signals through the aluminum.
- Adhesive-Only Mounting: Some anglers use strong adhesives like 3M 5200 or VHB tape to attach a mounting block or the transducer directly, though this method requires careful surface preparation.
- Portable or Temporary Mounts: Solutions like suction cups or retractable mounts allow flexibility for anglers who frequently adjust or remove transducers.
Each method has its merits, and the choice depends on your boat’s design, transducer size, and usage conditions (e.g., high-speed boating or shallow-water fishing).
Step-by-Step Guide to Mounting a Transducer
Step 1: Gather the Necessary Equipment
Before starting, ensure you have the right tools and materials. Here’s a comprehensive list:
- Transducer: Choose a model compatible with aluminum hulls (most modern transducers work well). Popular options include Lowrance Active Imaging 3-in-1 ($299–$349) or Garmin Striker Vivid ($179–$499).
- Mounting Plate: HDPE board (3/4″ or 1″ thick, ~$20–$50) or a pre-made transducer mounting block like Stern Pad ($40–$60).
- Sealant/Adhesive: Options include 3M 4200 ($15–$20), SikaFlex 291 ($10–$15), or G-Flex 655 epoxy ($25–$30). Avoid 3M 5200 for removable installations due to its permanent bond.
- Fasteners: Stainless steel screws (#10 or #12, $5–$10) and nuts for mounting the transducer to the board.
- Tools: Drill with bits, sandpaper (80-grit), alcohol wipes, flame torch (for HDPE prep), screwdriver, and zip ties for cable management.
- Optional: 3M VHB tape ($20–$30) for adhesive-only mounting or marine-grade silicone ($8–$12) for sealing.
Step 2: Choose the Optimal Placement
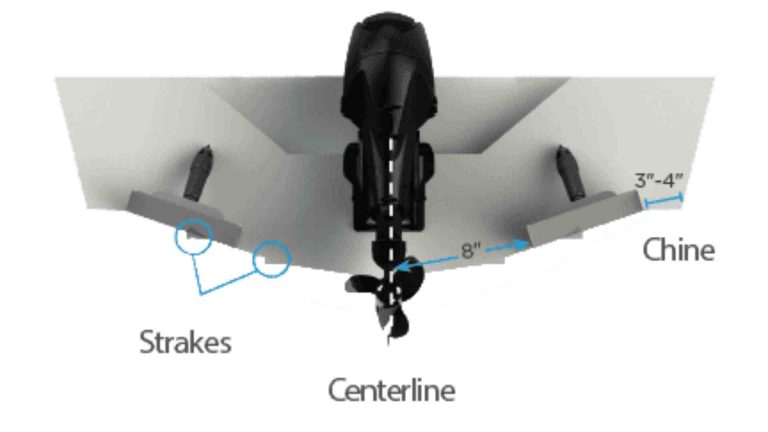
Proper placement is critical for accurate sonar performance. The transducer should be mounted on the transom, where it remains submerged and free from turbulence caused by the boat’s movement or propeller. Key considerations:
- Location: Mount near the centerline of the transom, slightly to one side of the propeller to avoid interference. Ensure the transducer’s face is below the waterline but above the boat’s bottom to prevent drag or damage.
- Angle: The transducer should be level or slightly tilted to ensure the sonar beam is directed downward. For side-scan transducers (e.g., Lowrance 3-in-1), ensure clearance for unobstructed side imaging.
- Testing: Temporarily hold the transducer over the side of the boat while running the fish finder to confirm the location provides clear readings.
Step 3: Prepare the Surfaces
Surface preparation ensures a strong bond and prevents leaks. Follow these steps:
- Clean the Transom: Sand the mounting area with 80-grit sandpaper to remove oxidation or paint, exposing bare aluminum. Wipe with alcohol to remove debris.
- Prepare the HDPE Board (if used): Sand the board’s back with 80-grit sandpaper. For epoxy bonding, lightly flame-treat the HDPE surface with a propane torch to improve adhesion (pass the flame quickly to avoid melting). Some users recommend drilling shallow, threaded holes in the HDPE to enhance the epoxy’s grip.
- Test Fit: Align the mounting plate or bracket on the transom to mark hole locations (if using screws) or confirm adhesive placement.
Step 4: Mount the Plate or Bracket
Choose one of the following methods based on your preference:
Option 1: HDPE Board with Adhesive
- Apply Adhesive: Use G-Flex 655 epoxy, Marine Tex Flex Set, or 3M VHB tape. For epoxy, apply a generous layer to the HDPE board, filling any drilled holes. For VHB tape, press firmly to ensure full contact.
- Secure the Board: Press the board onto the transom and secure it with duct tape for 24 hours to allow the adhesive to cure. If using VHB tape, apply marine-grade silicone around the edges to prevent water ingress.
- Mount the Transducer: Once cured, screw the transducer to the HDPE board using stainless steel screws. Apply a thin layer of sealant (e.g., SikaFlex 291) to the screws for added protection.
Option 2: Welded Aluminum Bracket
- Hire a Professional: A marine welder can fabricate and weld a marine-grade aluminum bracket to the transom (cost: $50–$100). Ensure the bracket is sized for your transducer, especially larger models like 12″ side-scan units.
- Attach the Transducer: Use stainless steel machine screws and nuts to secure the transducer to the bracket. Apply sealant to the screws to prevent corrosion.
Option 3: Through-Hull Mounting
- Select a Location: Choose a flat area inside the hull, typically near the stern, free from ribs or obstructions.
- Bond the Transducer: Mix slow-cure epoxy, apply it to the hull, and press the transducer into the epoxy, ensuring no air bubbles form. Hold in place until the epoxy sets (follow product instructions, typically 24 hours).
- Test Performance: Through-hull mounting may reduce sonar range slightly due to aluminum’s attenuation, so test the setup to ensure adequate performance.
Option 4: Commercial Mounting Products
- Stern Pad ($40–$60): Uses pre-applied 3M VHB tape. Clean and sand the transom, press the pad firmly, and seal edges with silicone. Screw the transducer to the pad.
- RyTek Heavy Duty Mounting Block ($50–$70): A 1″ thick HDPE block with a milled groove for sealant. Secure with two stainless screws and 3M 4200 sealant.
Step 5: Connect the Transducer Wires
- Route the Cables: Run the transducer cable to the fish finder display unit, avoiding sharp bends or interference with other electronics. Use zip ties to secure the cable along the boat’s interior.
- Mount the Display: Install the fish finder display at the helm for easy viewing. Follow the manufacturer’s instructions for electrical connections.
- Test the System: Power on the fish finder and verify that the transducer provides clear readings. Check for leaks around any screws or mounting points by pouring water over the area.
Step 6: Final Checks and Maintenance
- Inspect for Leaks: After installation, launch the boat and check for water ingress around the mounting area. Reapply sealant if necessary.
- Regular Maintenance: Periodically inspect the transducer and mounting hardware for corrosion or loosening. Clean the transducer face to ensure clear sonar signals.
- Adjustments: If sonar performance is suboptimal, adjust the transducer’s position or angle. HDPE boards allow easy repositioning without additional hull damage.
Comparison of Mounting Methods
The following table compares the primary mounting methods for transducers on aluminum boats:
| Method | Pros | Cons | Cost |
|---|---|---|---|
| HDPE Board (Adhesive) | No hull penetrations, easy to install, removable with 3M 4200 | Adhesion may weaken over time at high speeds (>20 mph) | $20–$60 |
| Welded Aluminum Bracket | Durable, allows easy transducer adjustments, professional finish | Requires welding expertise, higher initial cost | $50–$100 |
| Through-Hull Mounting | No external hardware, minimal hull impact | Reduced sonar range, permanent installation | $10–$30 (epoxy) |
| Stern Pad (VHB Tape) | Quick installation, no drilling, UV/saltwater resistant | Edge sealing required, less reliable for heavy transducers | $40–$60 |
| RyTek Mounting Block | Thick (1″), strong screw-based mounting, sealant groove | Requires drilling, higher cost | $50–$70 |
Chart: Transducer Mounting Workflow
Below is a flowchart illustrating the transducer mounting process for an aluminum boat:

Best Practices and Tips
- Avoid Rivets or Direct Screwing: Rivets and screws directly into the transom can corrode and cause leaks. Always use a mounting plate or bracket to minimize hull penetrations.
- Use Stainless Steel Fasteners: Stainless steel resists corrosion in marine environments, ensuring long-term durability.
- Test Before Permanent Mounting: Temporarily position the transducer to verify sonar performance before finalizing the installation.
- Consider Transducer Size: Larger transducers (e.g., 12″ side-scan models) require thicker (1″) HDPE boards or welded brackets for stability.
- Sealant Selection: Use 3M 4200 or SikaFlex 291 for flexibility and removability. Avoid 3M 5200 unless a permanent bond is desired.
- High-Speed Considerations: For boats exceeding 20 mph, ensure the mounting method can withstand water resistance. Welded brackets or bolted HDPE boards are preferable.
- Maintenance: Regularly inspect the transducer for marine growth or damage, especially in saltwater environments.
Product Recommendations and Specifications
Here are some recommended products for transducer mounting, including specifications and approximate prices:
1. Lowrance Active Imaging 3-in-1 Transducer
- Specifications: 83/200 kHz sonar, SideScan/DownScan imaging, 12″ length
- Price: $299–$349
- Best For: Large aluminum boats requiring side-scan capabilities
2. Stern Pad Standard Transducer Mounting Pad
- Specifications: 3/4″ thick HDPE, 3M VHB tape, 4″ x 8″ size
- Price: $40–$60
- Best For: Easy, no-drill installations
3. RyTek Heavy Duty Transducer Mounting Block
- Specifications: 1″ thick HDPE, sealant groove, uses two #10 screws
- Price: $50–$70
- Best For: Heavy transducers on high-speed boats
4. 3M 4200 Fast Cure Sealant
- Specifications: Polyurethane-based, flexible, removable, marine-grade
- Price: $15–$20 (10.3 oz)
- Best For: Sealing screws and mounting plates
5. G-Flex 655 Epoxy
- Specifications: Two-part epoxy, bonds HDPE to aluminum, high strength
- Price: $25–$30 (8 oz)
- Best For: Permanent HDPE board mounting
Troubleshooting Common Issues
- Poor Sonar Readings: Check for air bubbles under the transducer (for through-hull mounts) or turbulence around the transom. Adjust the transducer’s position or angle.
- Leaks: Inspect screws or mounting points for sealant failure. Reapply sealant and tighten fasteners.
- Adhesive Failure: Ensure proper surface preparation (sanding, flame treatment). Consider switching to a bolted HDPE board or welded bracket for high-speed boats.
- Corrosion: Use only stainless steel fasteners and marine-grade sealants to prevent corrosion in saltwater.
Safety Considerations
- Work Environment: Ensure a stable, well-ventilated workspace when drilling or applying adhesives. Wear gloves and safety glasses.
- Boat Safety: Test the installation in calm waters before extended trips. Carry a first aid kit and emergency tools (e.g., VRIEXSD 320-Piece First Aid Kit, $19.99).
- Professional Help: If unsure about welding or epoxy application, consult a marine professional to avoid damaging the hull.
Conclusion
Mounting a transducer on an aluminum boat requires careful planning, the right materials, and attention to detail to ensure a secure, leak-free installation. Using an HDPE board with adhesive or a welded aluminum bracket are the most reliable methods, offering flexibility and durability without compromising the hull. By following the steps outlined in this guide, anglers can enhance their fishing experience with accurate sonar readings while maintaining their boat’s structural integrity. Whether you’re a seasoned boater or a novice, these techniques and product recommendations will help you achieve a professional-grade transducer installation.
Share How to Mount a Transducer on an Aluminum Boat? with your friends and Leave a comment below with your thoughts.
Read Creative Jon Boat Floor Ideas: Enhancing Comfort until we meet in the next article.