
DIY Kayak Trolling Motor Steering (NO DRILLING)
Learn how to create a hands-free DIY kayak trolling motor steering system without drilling. Step-by-step guide with parts, tools, and tips.
Kayak fishing offers a unique blend of adventure and tranquility, allowing anglers to navigate serene waters while pursuing their catch. However, managing a paddle, fishing gear, and a trolling motor simultaneously can be challenging. For those seeking a hands-free steering solution, integrating a trolling motor with foot pegs offers a game-changing approach. This guide explores how to build a DIY kayak trolling motor steering system without drilling, ensuring your kayak remains intact while enhancing control and efficiency. Designed for kayak anglers, including veterans and those with disabilities, this no-drill method prioritizes accessibility, simplicity, and functionality.
Why Hands-Free Steering?
Hands-free steering transforms the kayak fishing experience by freeing your hands for casting, reeling, and managing gear. Traditional setups often rely on manual steering arms or ropes, which can be cumbersome and distracting. By connecting a trolling motor to foot pegs or a cable system, you gain precise control, allowing you to focus on fishing. This approach is particularly beneficial for individuals with limited mobility, as it minimizes physical strain and enhances independence on the water.
This guide covers:
- A detailed parts list and tools required
- Step-by-step instructions for setting up a no-drill steering system
- Tips for selecting and maintaining components
- Considerations for accessibility and customization
- Safety and lubrication solutions for smooth operation
Understanding the Trolling Motor and Kayak Setup
Trolling motors, like the Minn Kota or similar models, are typically mounted at the rear of a kayak and provide propulsion for extended trips. Most kayaks feature adjustable foot pegs for bracing, which can be repurposed for steering control. The goal is to create a system where pushing the foot pegs directs the motor without requiring permanent modifications to the kayak.
Key Components
To build a no-drill steering system, you’ll need the following:
| Component | Description | Approx. Price (USD) |
|---|---|---|
| Trolling Motor | 30-55 lb thrust (e.g., Minn Kota Endura C2) | $100–$250 |
| PWM Controller | Pulse Width Modulation for variable speed control (optional for efficiency) | $20–$50 |
| Morse 33C Cable or Similar | Throttle cable for precise steering control | $30–$60 |
| Parachute Cord | Durable, lightweight cord for connecting foot pegs to steering arm | $5–$15 |
| Carabiners | Quick-release clips for securing cords | $5–$10 (pack) |
| Foot Pegs (if not included) | Adjustable pegs for steering input | $20–$40 |
| 3D-Printed Steering Arm | Custom arm to connect motor shaft (optional, can be purchased or fabricated) | $10–$50 (if printed) |
| Wire Harness Extension | Correct gauge wires to extend controls to cockpit | $10–$20 |
| Electrical Tape | For securing and protecting wires | $5 |
| Graphite Spray | Plastic-safe lubricant for smooth foot peg movement | $8–$15 |
Tools Required
- Drill (for non-kayak modifications)
- Hand saw
- Wire snips and crimps
- Tape measure
- Screwdrivers
- Safety gloves and eye protection
- Optional: 3D printer for custom parts
Step-by-Step Guide to Building the Steering System
Step 1: Assess Your Kayak and Trolling Motor
Before starting, evaluate your kayak’s layout and trolling motor specifications. Most kayaks have foot pegs along the sides, which can be adapted for steering. Check the trolling motor’s shaft length and mounting mechanism. For a no-drill setup, avoid cutting or modifying the kayak hull. Instead, use clamps or brackets to secure the motor.
Tip: Measure the distance from the foot pegs to the motor to ensure your cable or cord length is sufficient. A typical kayak requires 6–10 feet of cord or cable.
Step 2: Mount the Trolling Motor
Secure the trolling motor to the kayak’s stern using a clamp-on bracket or an L-bracket for stability. Ensure the motor’s shaft is adjustable for tilting, which aids in shallow waters. If cutting the shaft for a streamlined look, measure twice to avoid damaging internal wiring.
Diagram: Trolling Motor Mounting
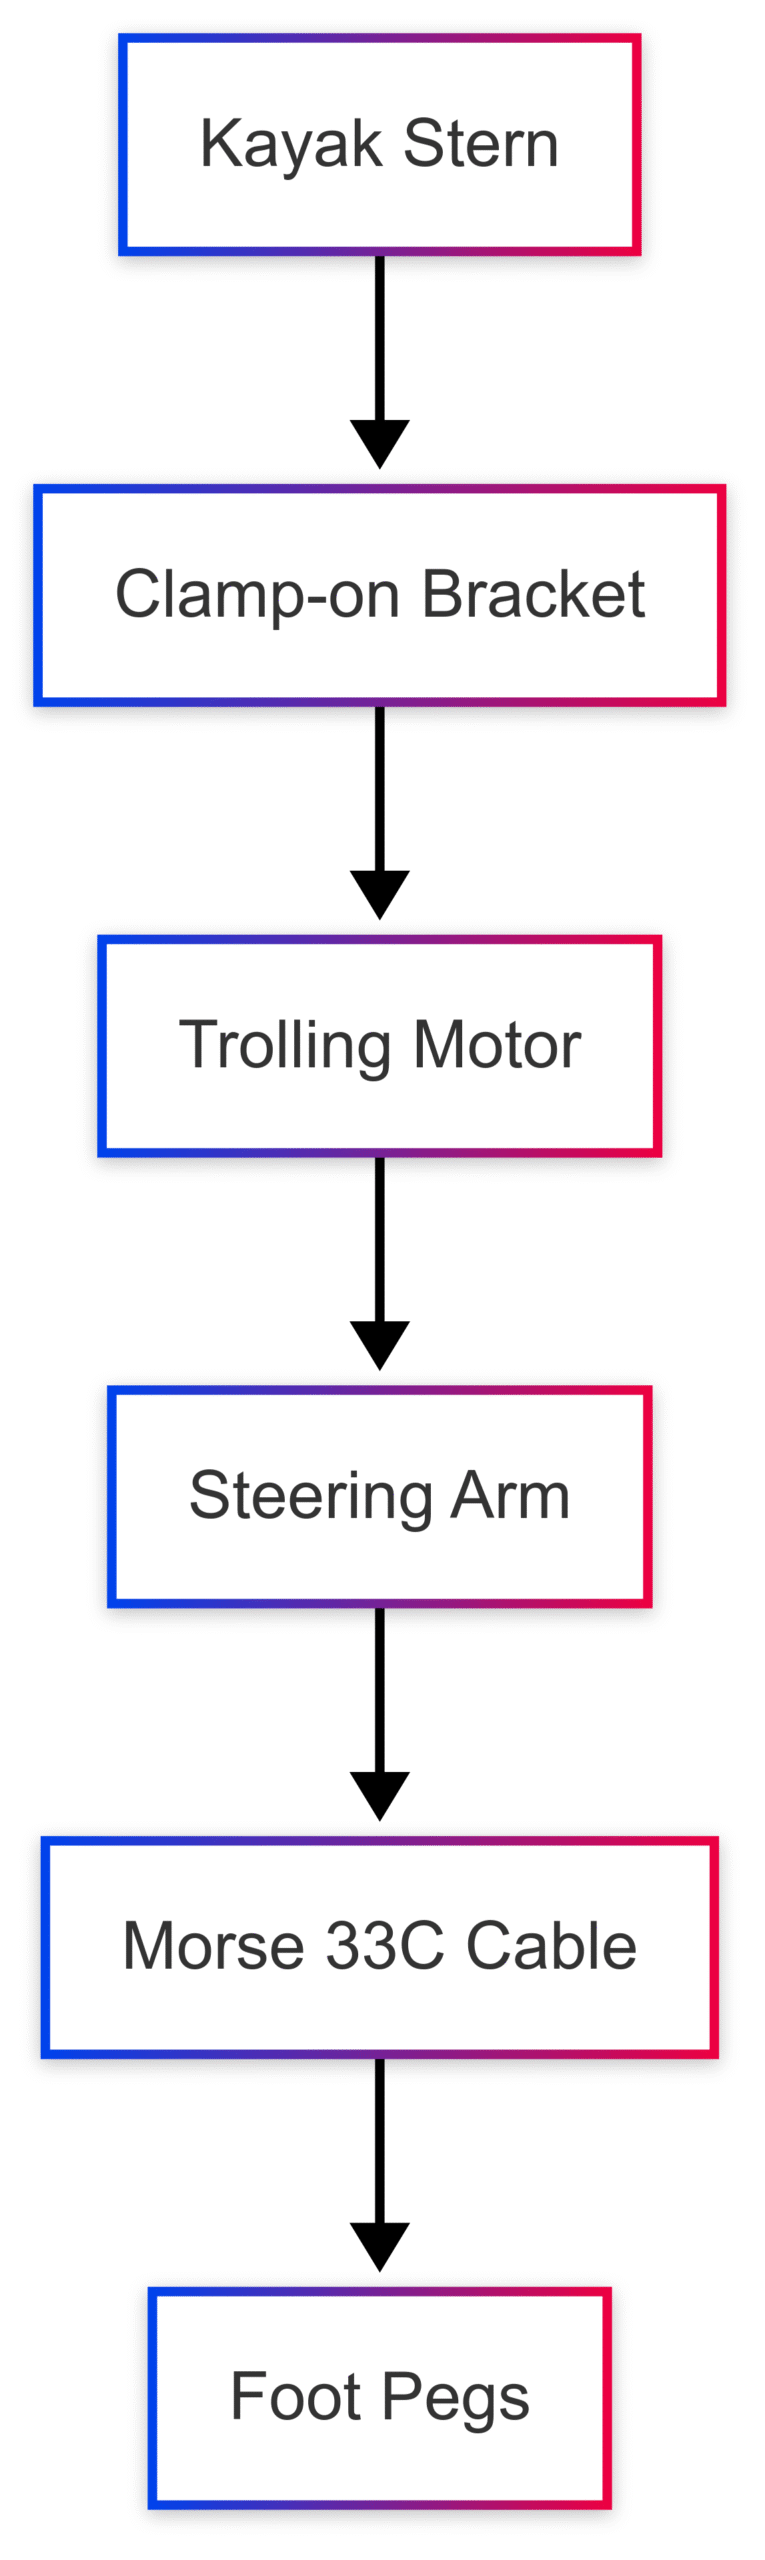
This diagram illustrates the connection from the kayak’s stern to the foot pegs via the trolling motor and cable system.
Step 3: Connect the Steering Arm
Attach a steering arm to the trolling motor shaft. You can:
- Use a 3D-printed arm (PLA for testing, ABS for durability).
- Purchase a pre-made arm from suppliers like Island Hopper Outboards.
- Fabricate one using aluminum or stainless steel for long-term use.
The arm should have multiple holes to adjust the range of motion, ensuring full turning capability. Connect the arm to the motor shaft securely, avoiding permanent modifications.
Step 4: Link Foot Pegs to the Steering Arm
Use parachute cord and carabiners to create a flexible, no-drill connection:
- Attach carabiners to the steering arm’s holes.
- Run parachute cord from each carabiner to the corresponding foot peg (left peg to left side of the arm, right peg to right side).
- Adjust the cord length to ensure the motor centers when foot pegs are neutral.
- Secure loose ends with knots or clips, keeping them accessible for adjustments.
For a more precise setup, replace cords with a Morse 33C throttle cable. This cable provides smoother control and reduces slack, though it’s slightly more complex to install.
Tip: Test the setup on land to ensure the motor responds to foot peg movements without binding.
Step 5: Add a PWM Controller (Optional)
For variable speed control, integrate a Pulse Width Modulation (PWM) controller. This is particularly useful for 5-speed trolling motors (e.g., 5 forward, 3 reverse). A PWM controller, like the one available on Amazon for $20–$50, enhances efficiency and allows remote throttle control.
Installation:
- Connect the controller to the motor’s wiring harness per the manufacturer’s instructions.
- Extend the throttle control to the cockpit using a wire harness of the correct gauge.
- House the controller in a waterproof enclosure with vents to manage heat.
Table: PWM Controller Options
| Model | Features | Price (USD) |
|---|---|---|
| Amazon Generic PWM | Basic, no reverse switch | $20–$30 |
| Island Hopper PWM | Enclosed, waterproof | $50–$80 |
| Minn Kota OEM PWM | Factory-grade, waterproof, runs cooler | $100–$125 |
Step 6: Lubricate for Smooth Operation
Foot pegs and cables must move smoothly to avoid sticking. Avoid household lubricants like WD-40, which can degrade plastic components. Instead, use graphite spray, available at hardware stores for $8–$15. Apply it sparingly to foot peg tracks and cable connections, using the provided tube to minimize mess.
Caution: Wear gloves and work in a well-ventilated area when applying graphite spray, as it can be messy.
Step 7: Extend Controls to the Cockpit
To centralize control, extend the throttle and steering to the cockpit:
- Use a wire harness to relocate the throttle knob or switch.
- For 5/3-speed motors, consider a remote switch for on/off and speed selection.
- Ensure all wires are secured with electrical tape and covered with wire sleeves to prevent tangling or water exposure.
Diagram: Control Flow
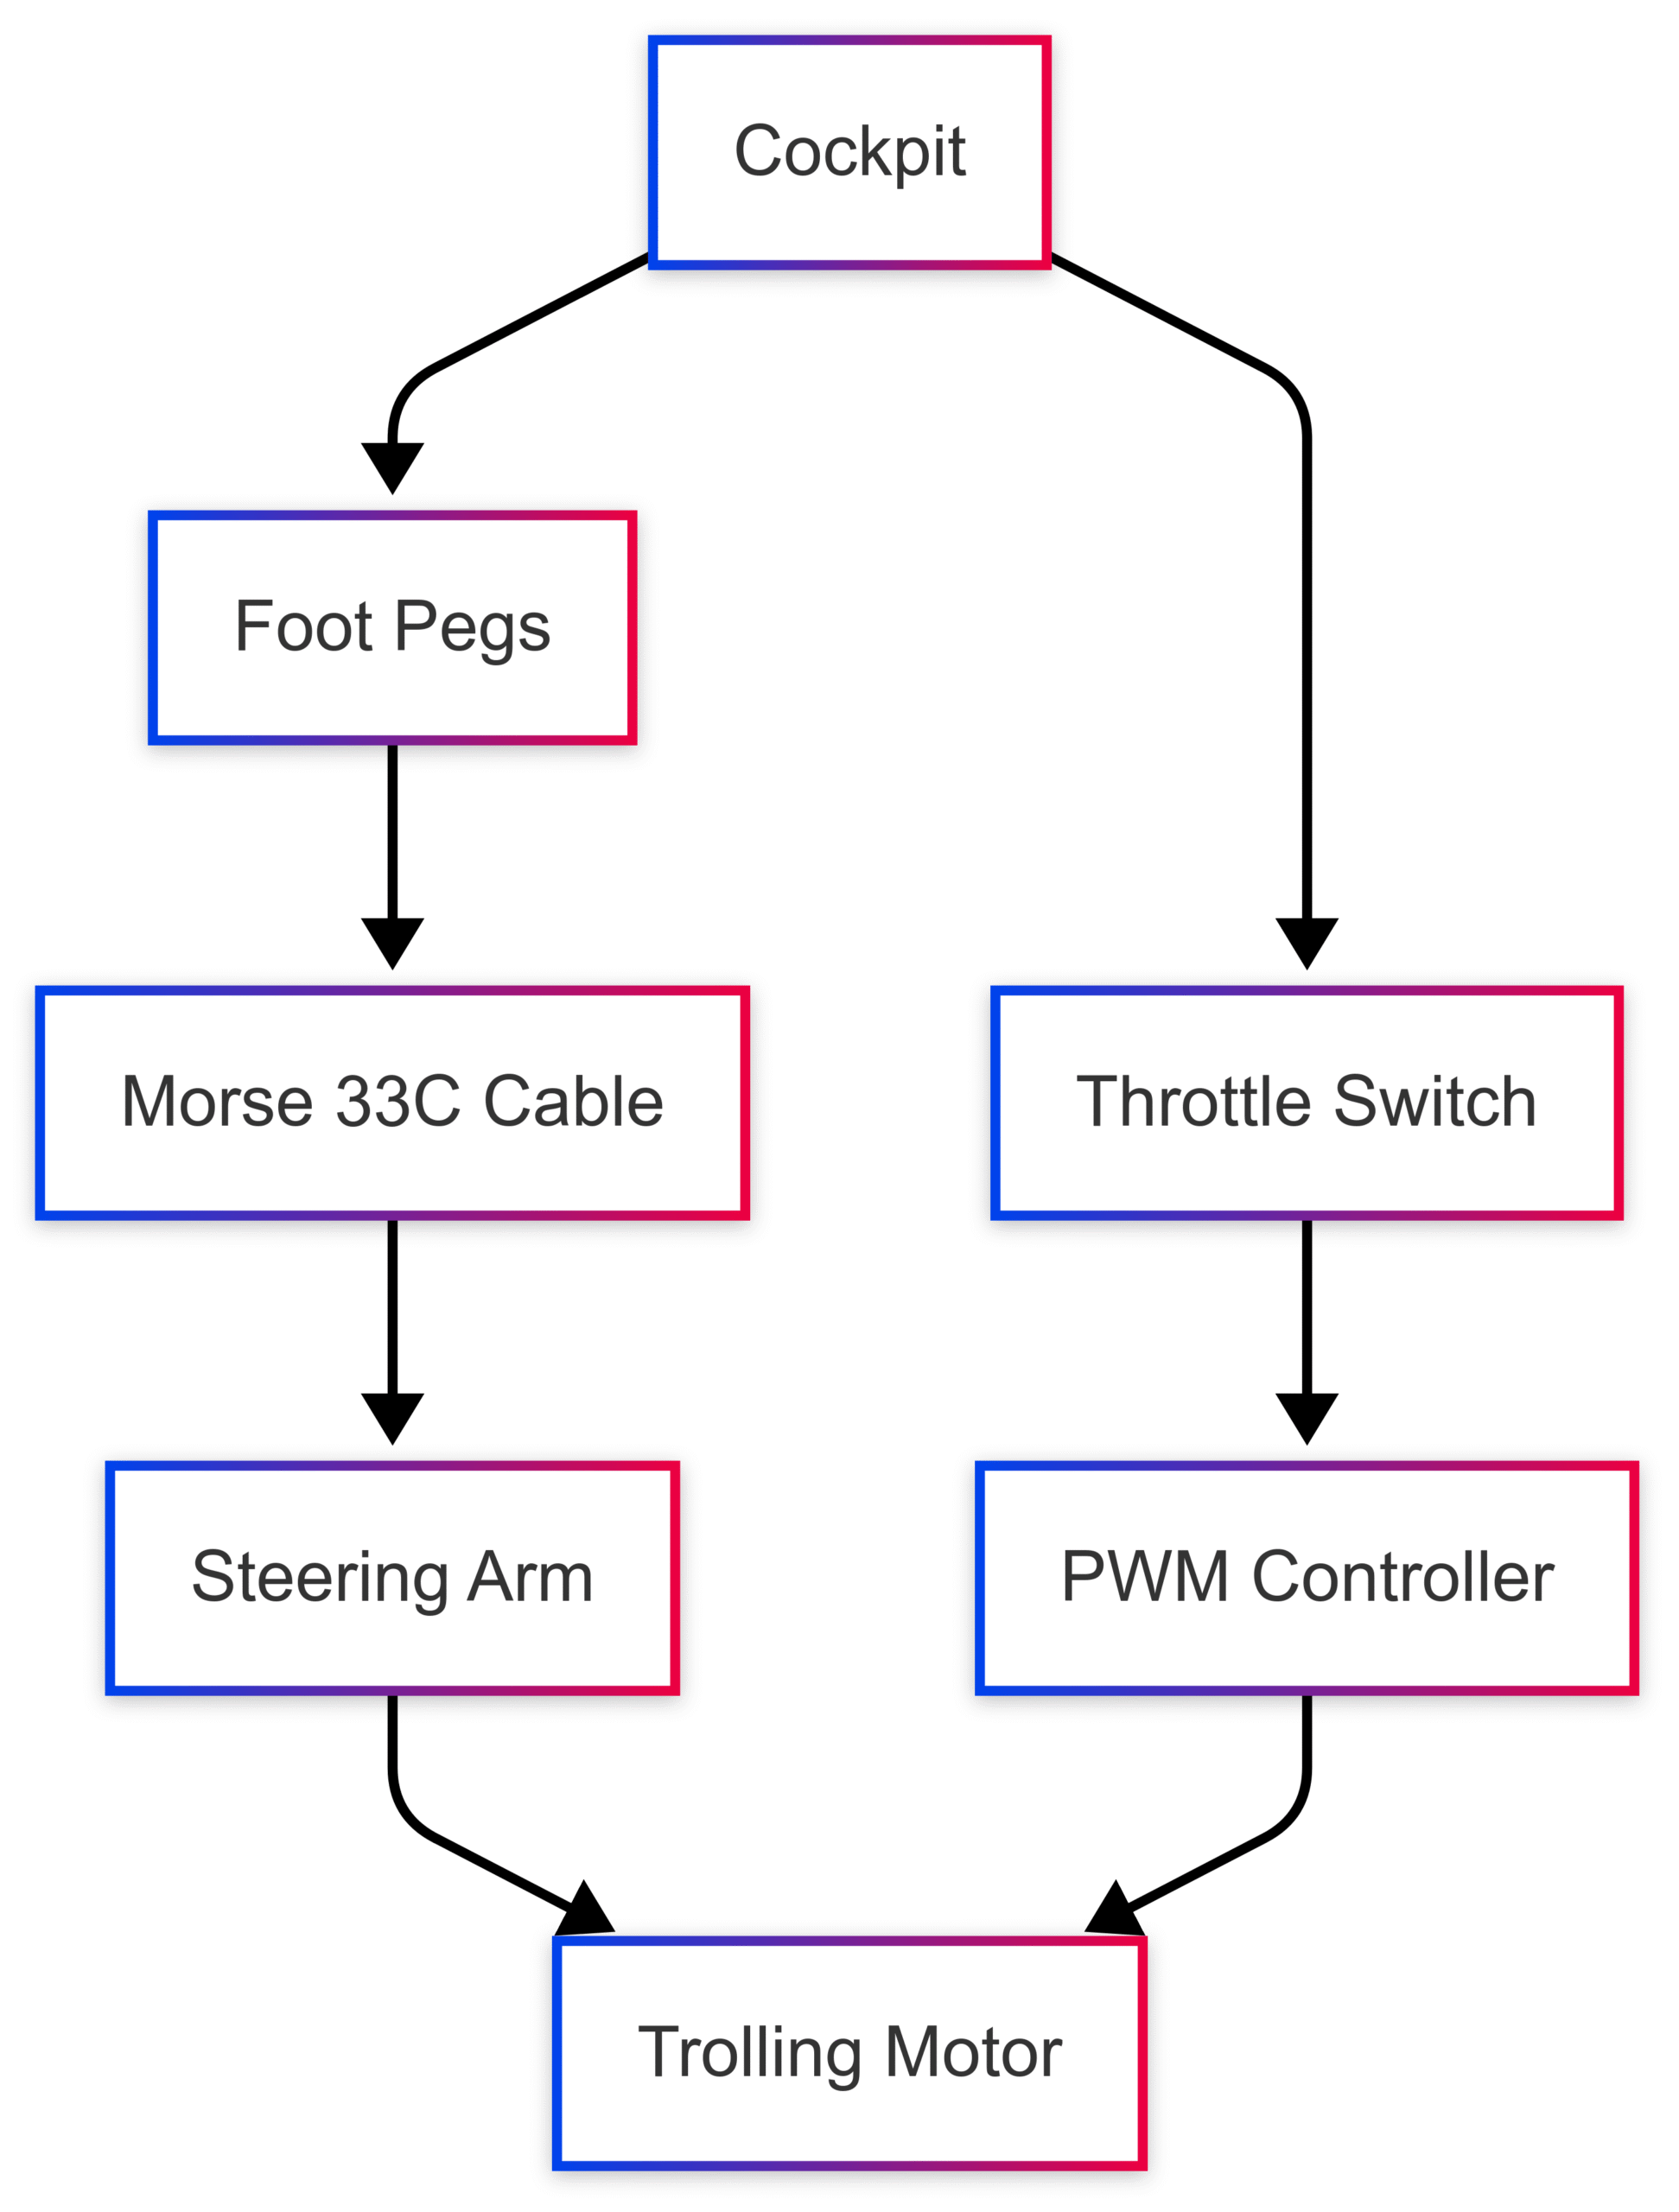
This diagram shows how cockpit inputs control both steering and propulsion.
Step 8: Test and Fine-Tune
Before hitting the water, test the system:
- Ensure the motor responds to foot peg movements (left peg turns left, right peg turns right).
- Check that the throttle control is accessible and functional.
- Verify that all components are secure and water-resistant.
- Adjust cord or cable tension to maintain a centered motor when foot pegs are neutral.
Take the kayak for a test run in calm waters to confirm performance. Note any sticking or heat buildup in the PWM controller, and adjust ventilation if needed.
Accessibility Considerations
This setup is ideal for veterans or individuals with disabilities, as it minimizes upper body strain. For those with limited leg mobility, consider:
- A linear actuator for remote steering, controlled by a hand switch or fob (available for $50–$100).
- A custom seat with additional support to maintain balance.
- Shorter cable lengths to reduce resistance for users with limited strength.
Contact local kayak fishing communities or organizations for support in customizing setups for specific needs.
Maintenance and Safety Tips
- Inspect Regularly: Check cords, cables, and connections for wear, especially after extended water exposure.
- Waterproofing: Use marine-grade sealants on exposed electrical components.
- Safety Gear: Always wear gloves and eye protection when assembling or modifying components.
- Battery Management: Ensure your trolling motor battery is fully charged and stored securely to avoid tipping.
Cost Breakdown
The total cost depends on your existing equipment and customization level:
| Item | Low-End Cost (USD) | High-End Cost (USD) |
|---|---|---|
| Trolling Motor | $100 | $250 |
| PWM Controller | $20 | $125 |
| Morse 33C Cable | $30 | $60 |
| Parachute Cord/Carabiners | $10 | $25 |
| Foot Pegs | $20 | $40 |
| 3D-Printed Steering Arm | $10 | $50 |
| Wire Harness/Electrical Tape | $15 | $25 |
| Graphite Spray | $8 | $15 |
| Total | $213 | $590 |
Community Insights and Alternatives
Kayak fishing communities, like r/kayakfishing, offer valuable insights. Some users suggest:
- Linear Actuators: For remote steering, as seen in setups by DGagner and Rbertalotto, ideal for larger boats or accessibility needs.
- Stick Steering: A pole attached to the steering arm for manual control, though less hands-free.
- Pre-Built Solutions: Companies like BassYaks and Island Hopper Outboards offer ready-made kits, though they can be pricier ($200–$500).
For inspiration, explore Instructables or YouTube for DIY builds tailored to specific kayak models.
Conclusion
A no-drill kayak trolling motor steering system empowers anglers to fish efficiently while maintaining control. By leveraging foot pegs, parachute cords, or throttle cables, you can create a hands-free setup that’s both functional and accessible. Whether you’re a seasoned kayaker or a veteran reclaiming the water, this DIY project offers freedom and flexibility without compromising your kayak’s integrity. With a modest budget and basic tools, you can hit the water with confidence, ready to focus on the catch.
Share DIY Kayak Trolling Motor Steering (NO DRILLING) with your friends and Leave a comment below with your thoughts.
Read Lifetime Teton Angler Kayak Reviews until we meet in the next article.


