Installing Marine Carpet is Easier than you Think
Learn how to install marine carpet on your boat with our detailed DIY guide. Step-by-step instructions, tools, and tips for a professional finish.
Boating enthusiasts know the importance of maintaining a vessel’s interior, and one critical aspect is the flooring. Marine carpet not only enhances the aesthetic appeal of your boat but also provides safety by reducing slip hazards and protecting the deck from harsh marine elements. Over time, exposure to water, sunlight, and salt can degrade carpet, leading to fading, mold, and structural issues. Replacing it may seem daunting, but installing marine carpet is easier than you think with the right tools, materials, and guidance. This detailed guide walks you through the process, offering practical tips, alternative flooring options, and expert insights to achieve a professional-grade finish.
Why Replace Your Boat’s Carpet?
Marine carpet serves multiple purposes beyond aesthetics. It acts as a protective barrier, shielding the deck from UV rays, water, and wear. It also absorbs moisture to create a non-slip surface, enhancing safety for passengers. However, constant exposure to the elements can cause:
- Fading and Discoloration: UV rays weaken fibers, leading to rips and a worn appearance.
- Mold and Mildew: Moisture buildup fosters unhygienic conditions and odors.
- Structural Damage: Prolonged neglect can harm the underlying deck, leading to costly repairs.
Regular inspection every 5-7 years is recommended, with replacement frequency depending on usage intensity, climate, and maintenance practices. For avid boaters or those in harsh environments, replacement may be needed sooner.
Tools and Materials Needed
Before starting, gather the following tools and materials to ensure a smooth installation process:
| Item | Purpose |
|---|---|
| Marine Carpet | UV-resistant, durable flooring material |
| Marine-Grade Adhesive | Bonds carpet to deck securely |
| Tape Measure | Ensures accurate measurements |
| Utility/Carpet Knife | Cuts carpet precisely |
| Scraper | Removes old adhesive residue |
| Mineral Spirits/Acetone | Cleans adhesive and preps surfaces |
| Small Clamps/Weights | Secures carpet during fitting and gluing |
| Trowel | Applies adhesive evenly |
| Roller/Stiff Broom | Removes air bubbles for a smooth finish |
| Rags | Cleans surfaces and removes excess adhesive |
Recommended Products
- Better Boat Scrub Brush: Ideal for cleaning adhesive residue.
- Better Boat Deck Brush: Ensures a pristine deck surface.
- Better Boat Marine Sealant: Provides additional sealing for durability.
Step-by-Step Guide to Installing Marine Carpet
Follow these detailed steps to replace your boat’s carpet effectively:
Step 1: Remove the Old Carpet
- Clear the Deck: Remove seats, fixtures, and accessories. Label each component’s location and orientation for easy reassembly.
- Stabilize the Boat: Secure the trailer with wheel chocks and a dock at the tongue wheel.
- Disconnect Power: Unplug the boat’s battery to ensure safety.
- Remove Carpet: Start at a corner and gently pull up the old carpet. Use a utility knife or vibrating tool with a scraper blade for stubborn areas. Label each piece’s orientation (e.g., with arrows pointing to the bow) to use as templates.
- Clean the Deck: Scrape off adhesive residue using a scraper and mineral spirits or acetone. For tough spots, use sandpaper or a heat gun cautiously. Clean the deck with warm, soapy water and a soft brush, then let it dry completely (preferably overnight).
- Inspect for Damage: Check the deck for rot, mold, or structural issues. Address any problems with mildew remover or marine sealant before proceeding.
Tip: Take photos of components, especially wiring, to simplify reassembly. Store hardware in labeled, resealable bags.
Step 2: Measure and Cut the New Carpet
- Prepare the Carpet: Unroll the marine carpet on a clean, dry surface in sunlight (65°F-90°F) for several hours to soften the backing, making it easier to handle.
- Rough Cut: Measure the boat’s deck and other carpeted areas (e.g., walls, speaker boxes) with a tape measure, adding extra for adjustments. Cut the carpet to approximate size using a sharp utility knife.
- Fit the Carpet: Lay the carpet on the deck, securing it with clamps or weights to prevent shifting. Custom-cut for an exact fit, ensuring the carpet’s directional pile aligns across all pieces.
- Secure One Side: Clamp or weigh down the left (port) side, folding the carpet lengthwise (bow to stern) to expose the right side of the deck.
Tip: Always cut slightly larger than needed to allow for wrapping edges around hatches or panels. Replace the knife blade frequently to ensure clean cuts.
Step 3: Apply the Adhesive
- Check Weather Conditions: Ensure 24-48 hours of dry weather (65°F-90°F) before starting.
- Apply Glue: Use a trowel to spread marine-grade adhesive on the back of the carpet in circular motions, aiming for a thickness akin to a heavy coat of paint. Avoid puddling or dry spots.
- Position the Carpet: Let the glue become tacky, then unfold the carpet onto the glued deck area. Align carefully, as the adhesive bonds permanently once in contact. Smooth out wrinkles immediately.
- Repeat for Other Side: Remove clamps from the port side, fold the carpet over, and repeat the gluing process for the remaining deck.
- Remove Air Bubbles: Use a roller or stiff broom to press the carpet from the center outward, ensuring full contact and eliminating air pockets.
- Cure Time: Allow the adhesive to set for 3-4 hours. Avoid foot traffic for 24 hours and water exposure for 48 hours to ensure a full cure.
Tip: If adhesive gets on the carpet, clean it immediately with warm, soapy water to prevent permanent staining.
Step 4: Reassemble and Enjoy
- Reinstall Components: Once the carpet is fully cured, reattach seats, fixtures, and hardware using your labeled bags and photos as guides.
- Final Inspection: Vacuum the carpet and check for loose edges or bubbles. Go over the carpet with a roller if needed.
- Hit the Water: Your boat is now ready for adventure with a fresh, durable, and stylish new carpet!
Choosing the Right Marine Carpet
Selecting the appropriate carpet is crucial for durability and aesthetics. Here are key factors to consider:
Carpet Ounce Weight
- 12-Ounce: Lightweight but less durable; backing may show on wrapped surfaces.
- 18-20-Ounce: Balances durability and pliability, ideal for most boats.
- 32-Ounce: Very durable but thick, potentially complicating hatch operation.
Material and Texture
- UV-Resistant Fibers: Prevent fading and extend lifespan.
- Textured Surfaces: Hide stains and provide better grip.
- Marine-Grade Backing: Resists mold and mildew, ensuring hygiene.
Ordering Tips
- Request Samples: Colors and textures may differ from online images. Samples help you make an informed choice.
- Order Extra: Purchase 1.5-2 times the deck length to account for errors, wrapping, and additional areas like hatches or walls.
- Manufacturer vs. DIY: Pre-cut carpets from manufacturers are convenient but expensive. Cutting your own saves money and is manageable with proper tools.
Price Range:
- Marine Carpet: $10-$30 per square yard (18-20 oz, depending on quality).
- Marine-Grade Adhesive: $20-$50 per gallon.
- Tools: $50-$150 (if not already owned).
Alternative Flooring Options
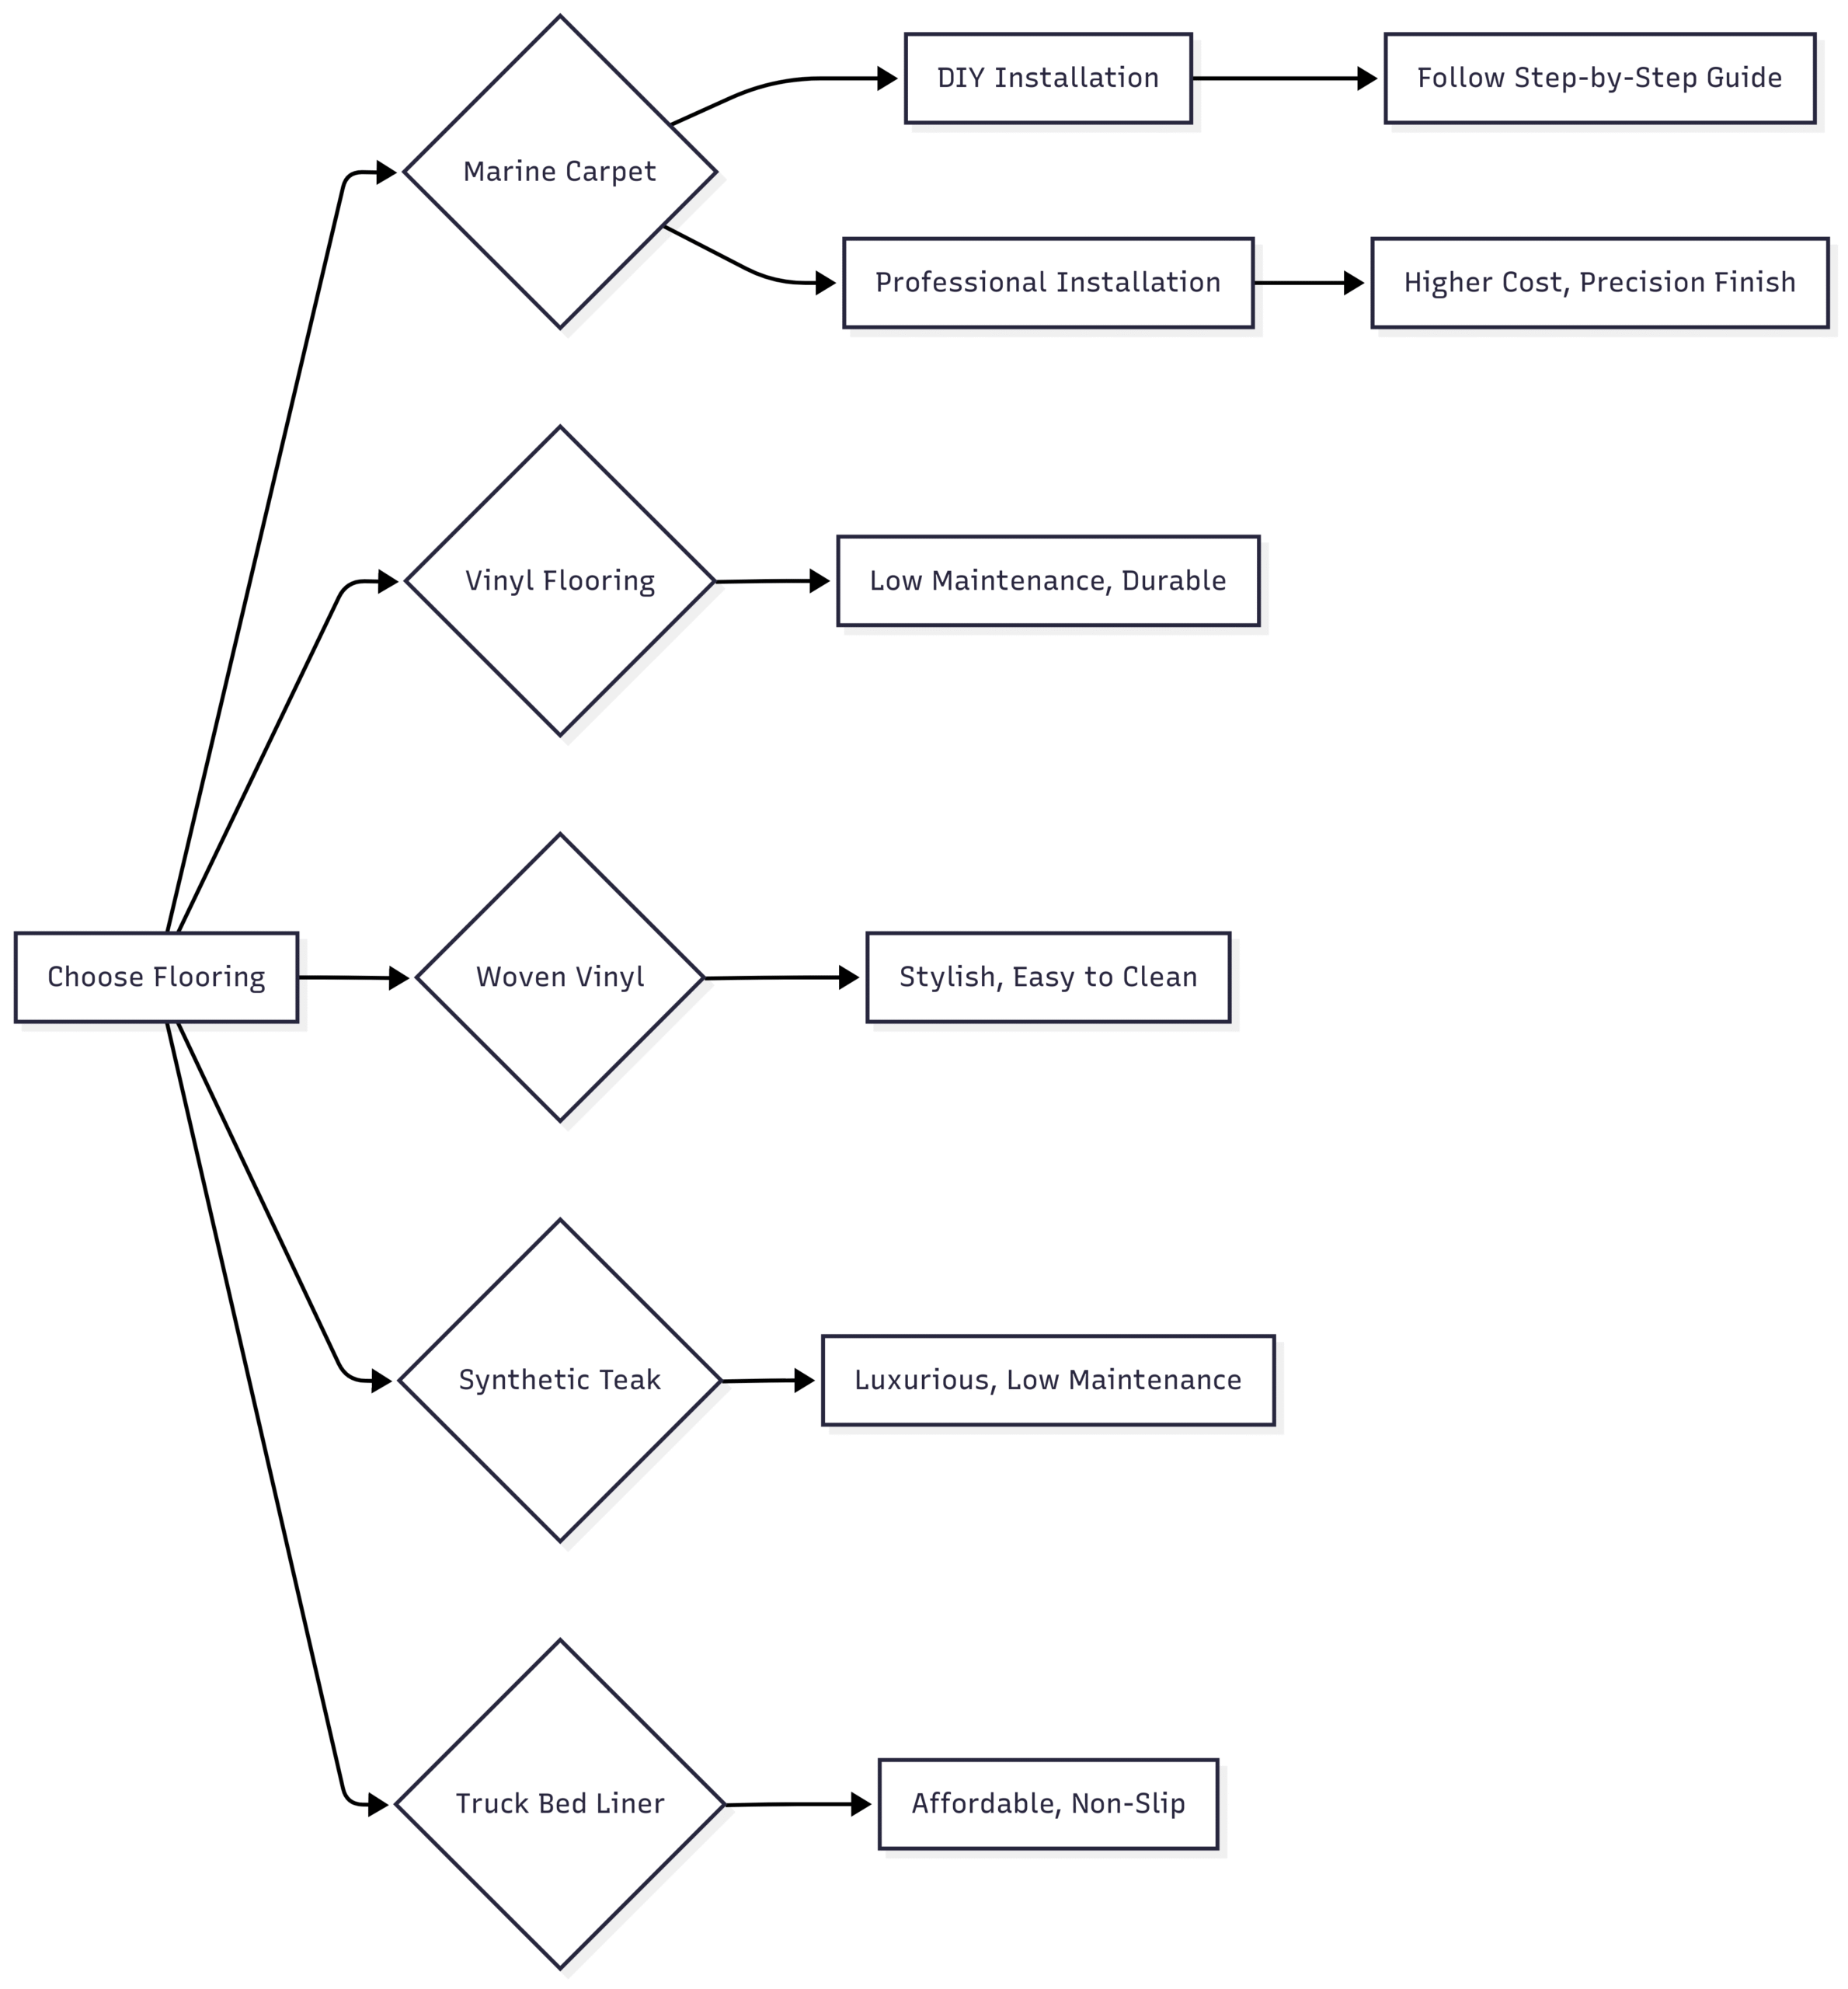
While marine carpet is a popular choice, some boaters prefer alternatives for enhanced durability or low maintenance. Here’s a comparison:
| Flooring Type | Pros | Cons | Price (per sq. ft.) |
|---|---|---|---|
| Marine-Grade Carpet | Comfortable, customizable, UV-resistant, good grip | Prone to mold, requires regular cleaning | $1-$3 |
| Vinyl Flooring | Water-resistant, durable, low maintenance, variety of styles | Less cushioned, can feel hard underfoot | $2-$5 |
| Woven Vinyl | Stylish, mold-resistant, easy to clean, comfortable | Higher cost, may require professional installation | $4-$8 |
| Synthetic Teak | Luxurious look, UV-resistant, low maintenance | Expensive, may not suit all boat aesthetics | $8-$15 |
| Truck Bed Liner (Durabak) | Affordable, waterproof, durable, non-slip, easy DIY application | Less aesthetic, limited color options | $1-$2 |
Durabak Marine Paint Application
For those considering Durabak as a carpet alternative:
- Prep the Deck: Remove old carpet, clean with a non-chlorinated cleaner, and sand with 60-grit sandpaper.
- Prime (if needed): Apply self-etching primer (e.g., Metcote) for metal surfaces. For fiberglass or wood, wipe with Xylene.
- Apply Smooth Durabak: Use a stipple roller for the first coat, brushing edges.
- Add Textured Durabak: Apply 1-2 coats for grip after the smooth coat dries (1-2 hours).
- Cure: Allow 24 hours before walking and 5-6 days for heavy use.
Price: $100-$150 per gallon (covers ~100 sq. ft.).
Tips from the Boating Community
Insights from boating forums, such as a discussion on a 1994 Sea Ray 220BR, highlight common concerns:
- Vertical Surfaces: For carpeted sides or seat boxes, replacing with matching marine carpet or textured vinyl is recommended. SeaDek on vertical surfaces may look out of place.
- Snap-In Carpet Challenges: Snap-in options require a presentable underlying deck, which may not be feasible for older boats with rough fiberglass or plywood.
- Hybrid Solutions: Combining carpet for horizontal surfaces and vinyl for vertical ones is common in fishing boats and pontoons.
DIY vs. Professional Installation
DIY Benefits
- Cost Savings: Save on labor costs by cutting and installing yourself.
- Customization: Tailor the carpet to your boat’s unique contours.
- Satisfaction: Completing the project yourself is rewarding.
Professional Benefits
- Precision: Experts ensure a flawless fit and finish.
- Time-Saving: Faster completion, especially for complex layouts.
- Warranty: Some installers offer guarantees on workmanship.
Recommendation: For first-timers or boats with intricate designs, hiring a professional may yield better results. For budget-conscious boaters with time and patience, DIY is achievable with careful planning.
Maintenance Tips for Longevity
- Regular Cleaning: Vacuum and clean with marine-safe soap after each trip to prevent mold.
- Prompt Stain Removal: Address spills immediately to avoid permanent marks.
- UV Protection: Use boat covers or store in shaded areas to reduce fading.
- Annual Inspections: Check for wear, especially in high-traffic areas.
Conclusion
Installing marine carpet is a manageable DIY project that revitalizes your boat’s appearance, safety, and functionality. By following this guide, you can achieve a professional finish while saving on costs. Whether you stick with marine carpet or explore alternatives like Durabak or woven vinyl, the key is preparation, precision, and patience. With the right approach, your boat will be ready to hit the water in style, offering comfort and durability for years to come.
Happy Boating!
Share Installing Marine Carpet is Easier than you Think with your friends and leave a comment below with your thoughts.
Read Pontoon Boat Blocks: A Comprehensive Guide until we meet in the next article.