
How to Tie on a Boat Fender: A Boater’s Step-by-Step Guide
Learn how to tie a boat fender with our step-by-step guide. Protect your vessel with expert tips on fender types, knots, and placement.
Boating offers unparalleled freedom on the water, but protecting your vessel from damage during docking or rafting is critical. Boat fenders are the unsung heroes of safe boating, acting as cushioned barriers to prevent scratches, dents, and costly repairs. Properly tying and positioning fenders is a fundamental skill every boater must master to ensure their vessel remains pristine. This comprehensive guide provides a detailed, step-by-step approach to tying boat fenders, selecting the right equipment, and avoiding common mistakes. Whether you’re a novice or a seasoned boater, this article will equip you with the knowledge to safeguard your boat effectively.
What Is a Boat Fender and Why Is It Important?
A boat fender is a cushioned bumper that protects your vessel from impact when docking against a pier, piling, or another boat. Made from durable materials like vinyl or rubber, fenders absorb the force of contact, shielding your boat’s hull from scratches, dents, or structural damage. Without fenders, even minor bumps from waves, wind, or wakes can mar your boat’s gelcoat or cause stress cracks over time.
Fenders are essential not only for protecting your investment but also for demonstrating good boating etiquette. They prevent damage to neighboring boats or dock infrastructure, fostering goodwill in crowded marinas or rafting scenarios. Properly deployed fenders provide peace of mind, allowing you to focus on enjoying your time on the water rather than worrying about costly repairs.
Key Benefits of Boat Fenders
- Hull Protection: Prevents scratches, dents, and structural damage.
- Cost Savings: Reduces the need for expensive repairs or repainting.
- Boating Etiquette: Protects neighboring boats and docks.
- Versatility: Useful in various docking and rafting situations.
Types of Boat Fenders
Choosing the right fender depends on your boat’s size, docking conditions, and storage capacity. Below is an overview of the most common fender types, their specifications, and their best uses.
Cylindrical Fenders
- Shape: Long, tube-like, often inflatable.
- Best For: Small to medium-sized boats (up to 40 feet).
- Use Case: Versatile for docking against piers or rafting with other boats.
- Advantages: Easy to position vertically or horizontally, widely available, and affordable.
- Typical Sizes: 6–10 inches in diameter, 15–36 inches in length.
- Price Range: $20–$100 per fender, depending on size and material.
Round (Ball) Fenders
- Shape: Spherical, providing a wide contact area.
- Best For: Larger boats (40+ feet) or heavy-duty docking.
- Use Case: Ideal for rough waters or pilings with significant gaps.
- Advantages: Maximum impact absorption due to larger surface area.
- Typical Sizes: 12–24 inches in diameter.
- Price Range: $50–$200 per fender.
Flat or Contour Fenders
- Shape: Flat or shaped to fit specific hull designs.
- Best For: Pontoon boats, small vessels, or boats with limited storage.
- Use Case: Docking in tight spaces or against flat surfaces.
- Advantages: Compact, easy to store, and tailored for specific boat types.
- Typical Sizes: 12–24 inches wide, 6–12 inches high.
- Price Range: $30–$150 per fender.
Specialty Fenders
- Examples: Step fenders (for boarding), pontoon-specific fenders.
- Best For: Unique docking needs or specific boat designs.
- Price Range: $40–$200, depending on customization.
| Fender Type | Best For | Size Range | Price Range |
|---|---|---|---|
| Cylindrical | Small to medium boats | 6–10″ diameter, 15–36″ length | $20–$100 |
| Round (Ball) | Larger boats, rough conditions | 12–24″ diameter | $50–$200 |
| Flat/Contour | Pontoons, small boats | 12–24″ wide, 6–12″ high | $30–$150 |
| Specialty | Specific boat designs | Varies | $40–$200 |
Choosing Tip: For recreational boats under 20 feet, cylindrical fenders (6–8 inches in diameter) are typically sufficient. Larger boats (40+ feet) benefit from round fenders or a combination of cylindrical and round for comprehensive protection.
How Many Fenders Do You Need?
The number of fenders depends on your boat’s length and docking conditions. A general rule is one fender per 10 feet of boat length, with a minimum of three fenders. For example:
- 20-foot boat: 3 fenders minimum.
- 40-foot boat: 4–5 fenders.
- 60-foot boat: 6–8 fenders.
In challenging conditions (e.g., strong currents, heavy wakes, or rafting), add extra fenders to vulnerable areas like the bow, stern, and beam (the widest part of the boat). Carrying spares ensures you’re prepared for unexpected docking scenarios, such as tight marina slips or rafting with multiple boats.
Fender Placement Strategy
- Beam: Place at least one fender at the widest point, as this area is most likely to contact the dock.
- Bow and Stern: Protect the front and rear to prevent damage from swinging or shifting.
- Even Spacing: Distribute fenders evenly every 8–10 feet along the hull for balanced coverage.
Tools and Equipment Needed
To tie fenders effectively, you’ll need the following:
- Boat Fenders: Select based on your boat size and docking needs.
- Fender Lines: Marine-grade, non-slippery rope (3/8 to 1/2 inch diameter recommended for durability).
- Attachment Points: Sturdy cleats, stanchions, or padeyes on your boat.
- Optional: Adjustable fender hangers for quick height adjustments.
Pro Tip: Choose fender lines slightly thicker than your dock lines (e.g., 1/2 inch) for better grip and durability. Inspect lines regularly for fraying or UV damage to ensure reliability.
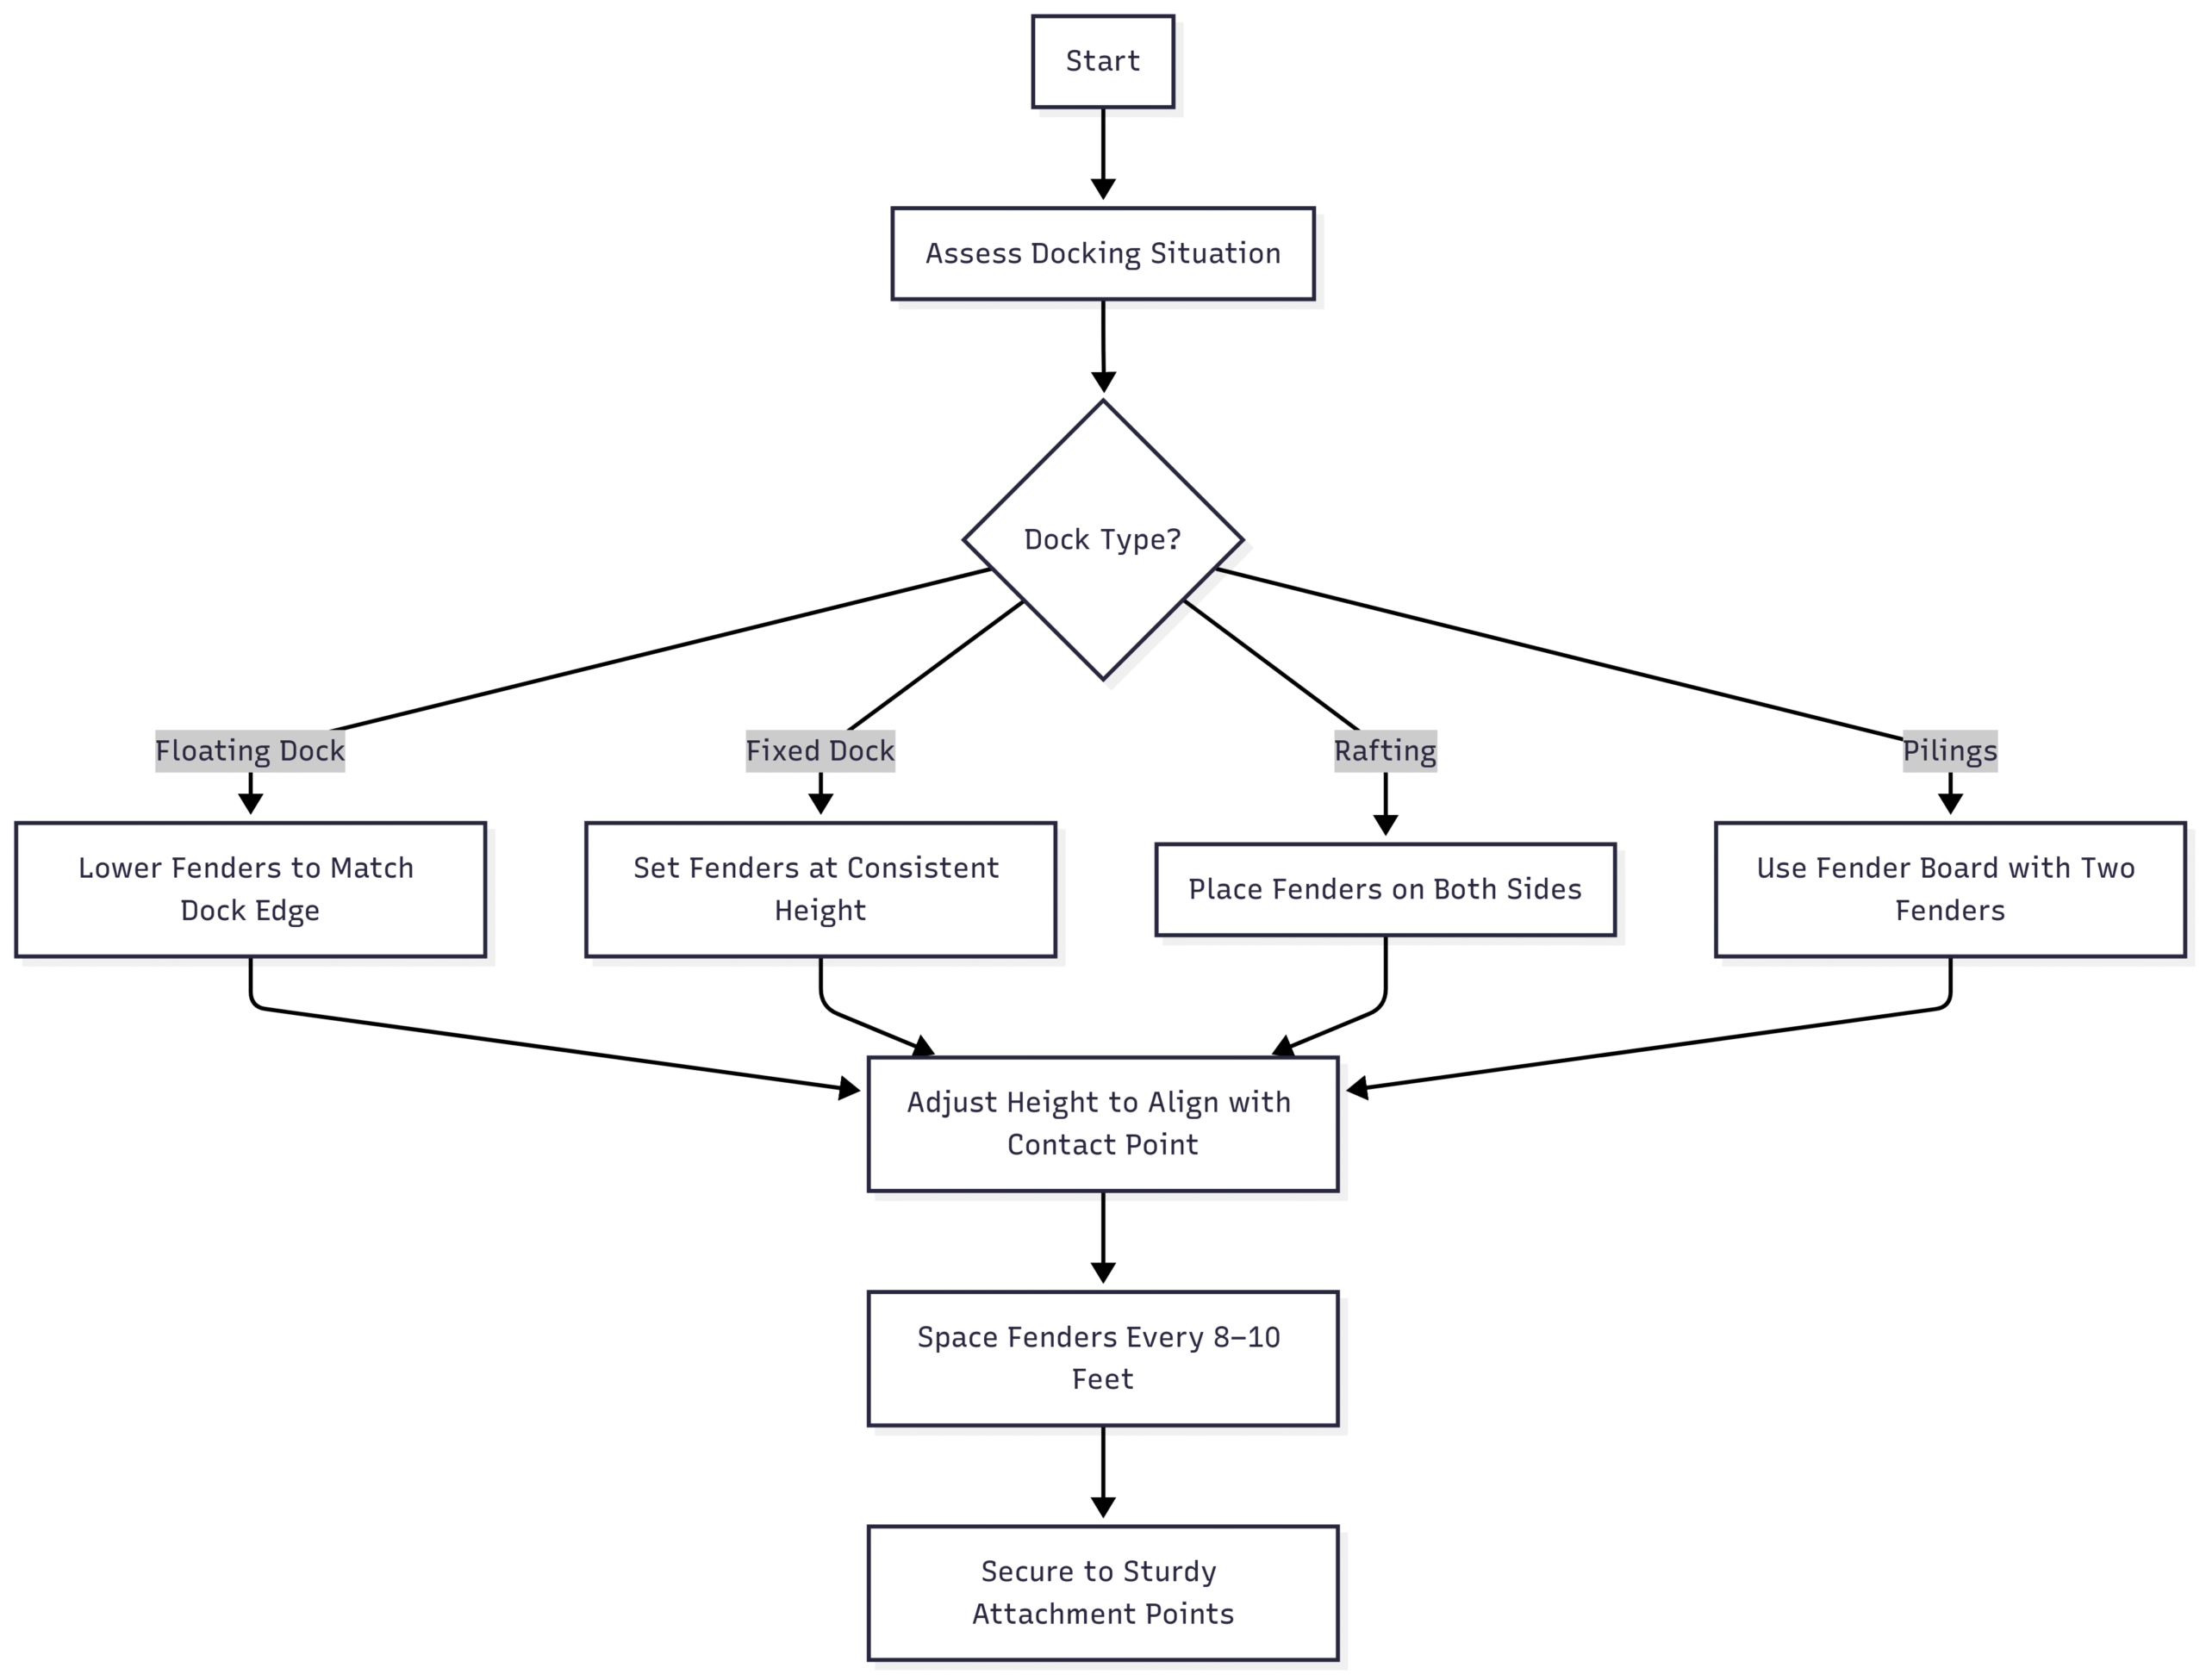
Where and How to Position Boat Fenders
Proper fender placement maximizes protection and prevents damage. Follow these guidelines to position fenders correctly:
Set the Correct Height
- Goal: Align the fender’s midpoint with the dock’s edge or another boat’s hull.
- Why It Matters: Fenders too high or low won’t absorb impact effectively, leaving your hull exposed.
- How to Adjust: Stand on the boat, hold the fender line, and lower or raise the fender to match the contact point. Recheck after docking, as tides or wakes may shift positions.
Space Fenders Evenly
- Beam: Always place a fender at the widest part of the boat.
- Bow and Stern: Add fenders to protect against swinging or angled docking.
- Spacing Rule: One fender every 8–10 feet, with extras in high-impact areas.
Adjust for Docking Conditions
- Floating Docks: Position fenders lower to match the dock’s fluctuating height.
- Fixed Docks: Set fenders at a consistent height, checking alignment after tying off.
- Rafting: Place fenders on both sides to prevent hull-to-hull contact.
- Pilings: Use fender boards (planks attached to two fenders) to bridge gaps between pilings.
Orientation
- Vertical: Best for docks, seawalls, or other boats.
- Horizontal: Ideal for pilings or posts to cover a wider area.
Pro Tip: Use a fender board for pilings with large gaps. Attach two cylindrical fenders to a sturdy board (e.g., 2×6 inches, 4–6 feet long) to create a continuous barrier.
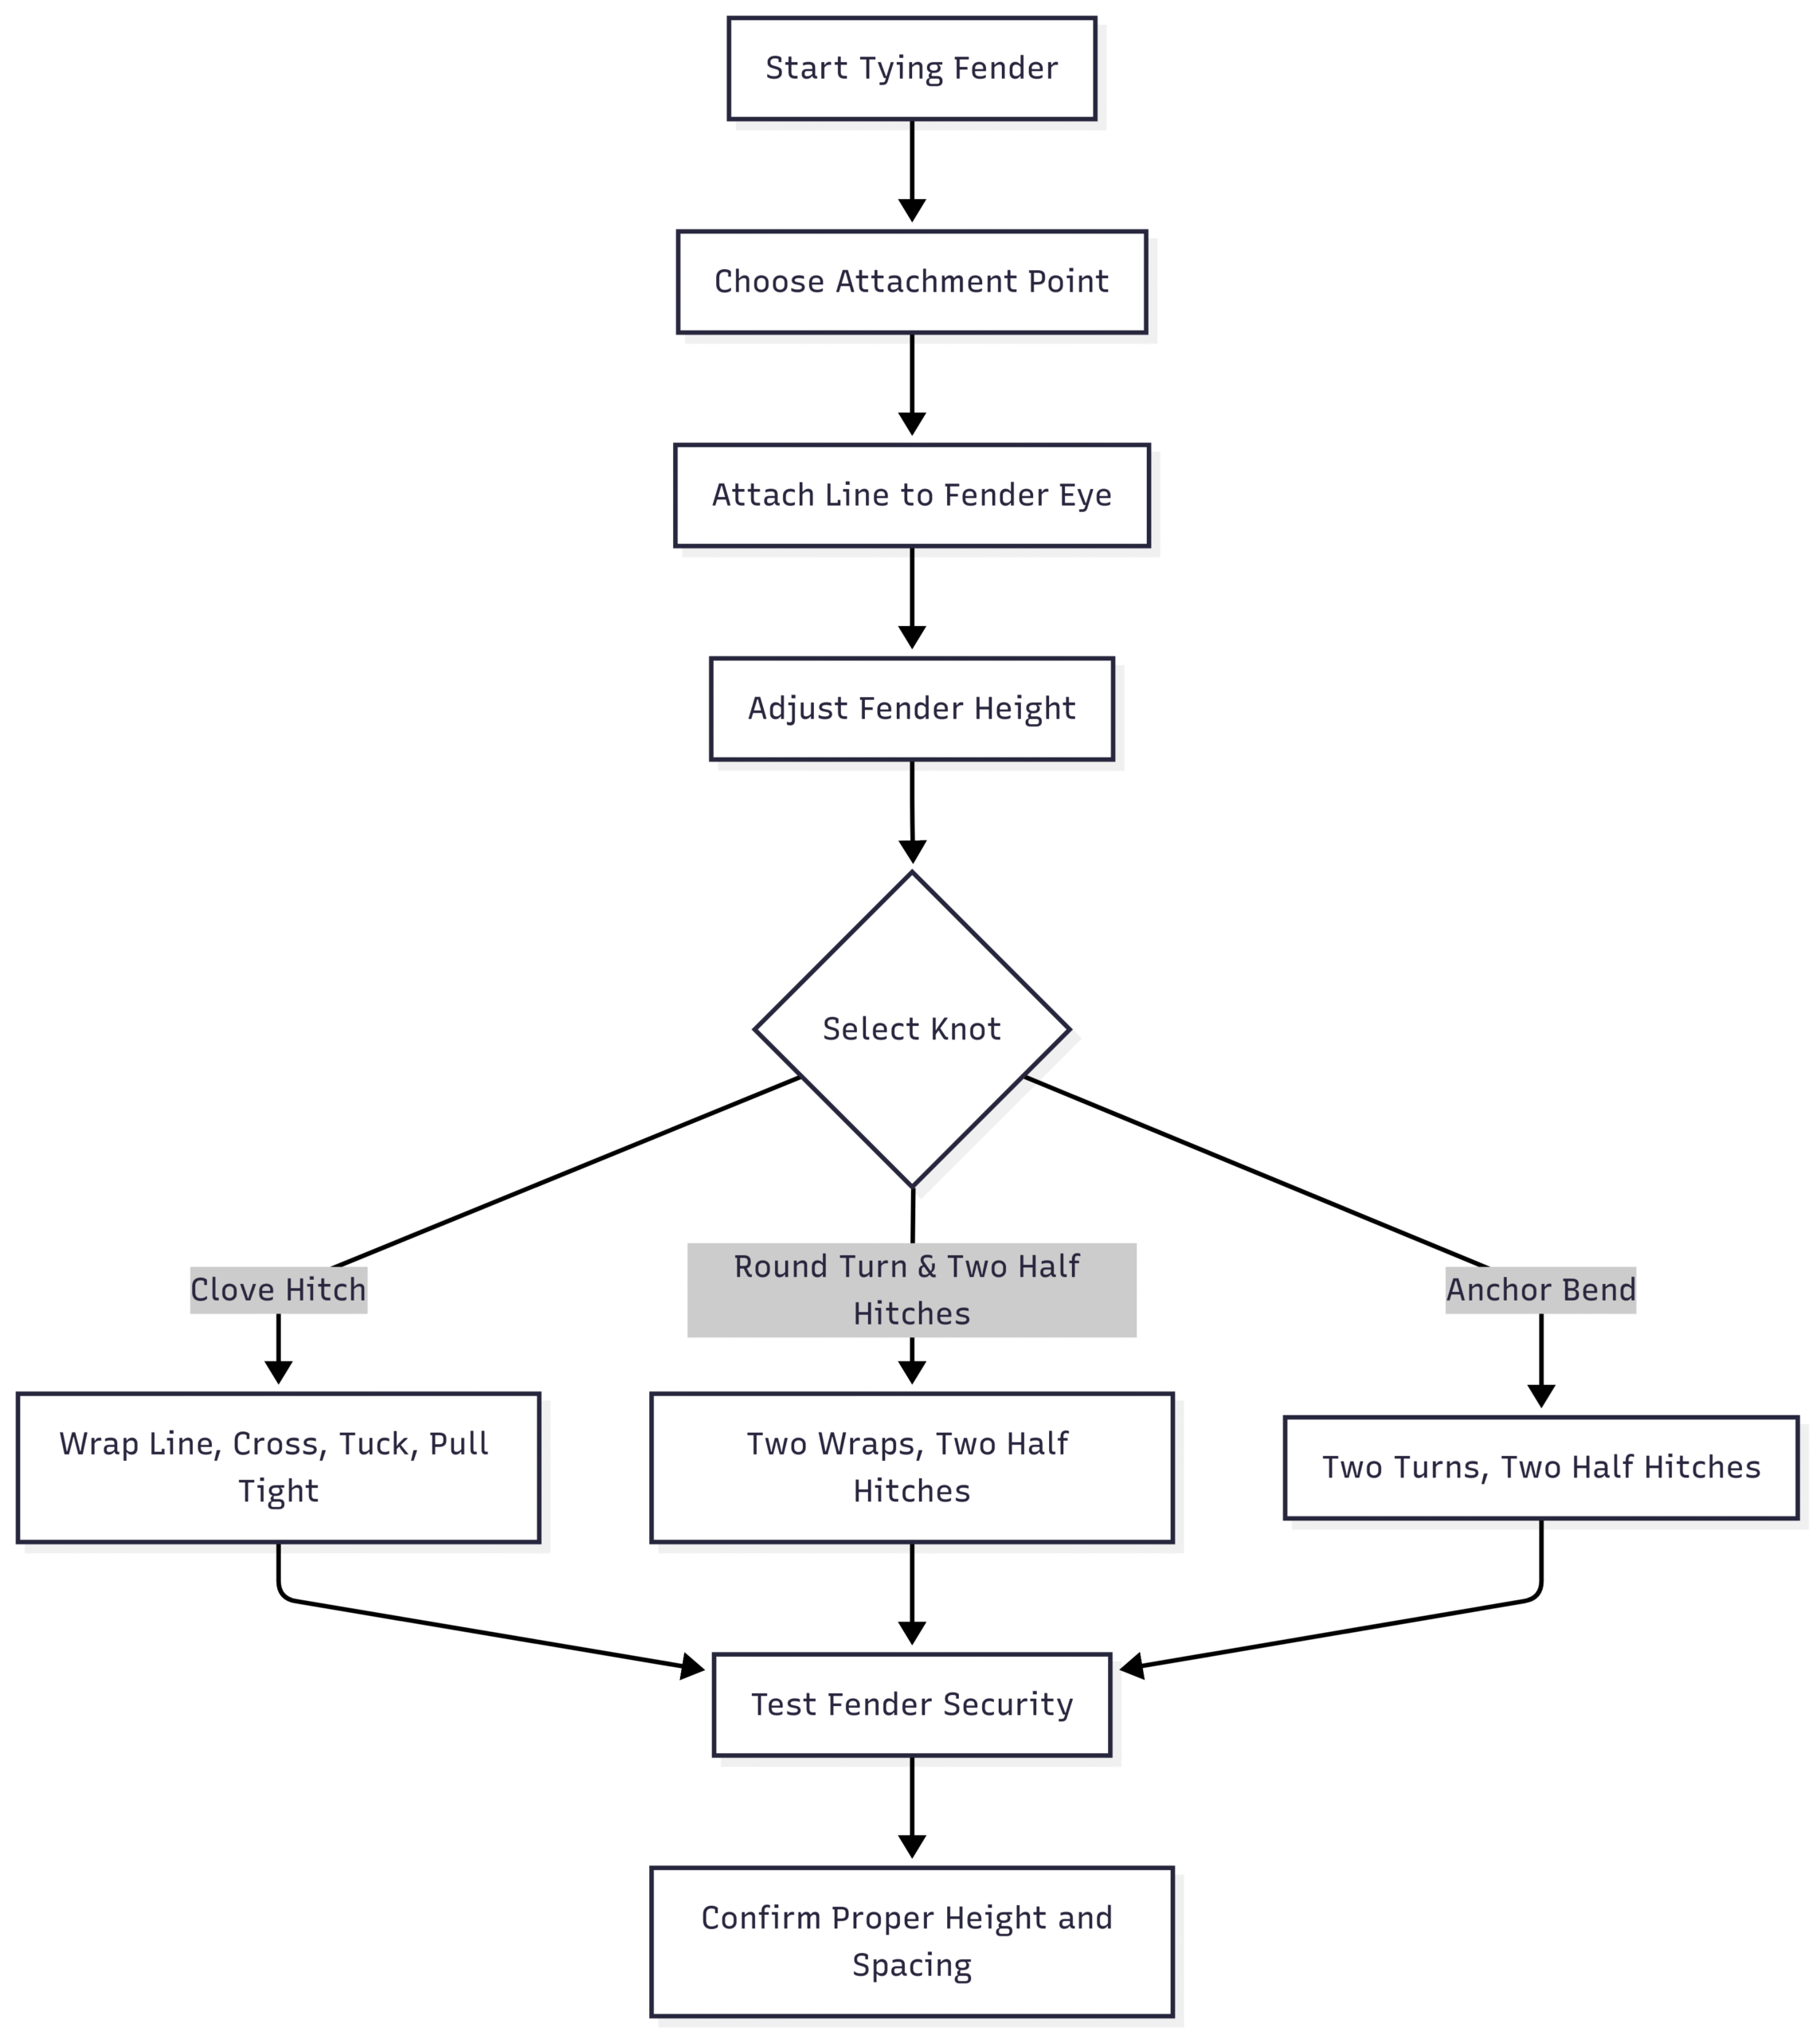
Step-by-Step Guide: How to Tie a Boat Fender
Follow these steps to tie fenders securely and ensure maximum protection:
1. Choose a Sturdy Attachment Point
- Select a cleat, stanchion, or padeye low on the boat to minimize swinging.
- Avoid weak points like loose rails or lifeline tops, which may fail under pressure.
2. Attach the Fender Line
- Secure the line to the fender’s eye using a bowline or overhand knot.
- Ensure the knot is tight to prevent slipping during use.
3. Adjust the Fender Height
- Hang the fender over the side and adjust the line length so the fender’s midpoint aligns with the dock or another boat’s hull.
- Test the height by gently pushing the boat toward the dock to confirm coverage.
4. Tie the Fender Line
Use one of these reliable knots for secure attachment:
Clove Hitch
- Steps:
- Wrap the line around the rail or cleat.
- Cross the line over itself to form an “X.”
- Wrap the line around again, tucking the free end under the last loop.
- Pull tight to secure.
- Best For: Short-term docking or frequent adjustments.
- Note: Check periodically in rough conditions, as it may loosen.
Round Turn and Two Half Hitches
- Steps:
- Wrap the line around the rail or cleat twice (round turn).
- Pass the free end over and under the standing line to form a half hitch.
- Repeat for a second half hitch and pull tight.
- Best For: Long-term docking or rough waters.
Anchor Bend
- Steps:
- Take two full turns around the rail or cleat.
- Pass the free end under the turns and tie a half hitch.
- Add a second half hitch for extra security.
- Best For: Semi-permanent fender setups.
5. Test the Fender
- Tug the line to ensure the knot is secure and the fender stays in place.
- Confirm the fender doesn’t swing excessively or slip out of position.
Common Mistakes and How to Avoid Them
Even experienced boaters can make errors when tying fenders. Here are five common mistakes and how to prevent them:
- Incorrect Height Adjustment
- Issue: Fenders too high or low fail to protect the hull.
- Solution: Always align the fender’s midpoint with the dock or hull and recheck after docking.
- Using the Wrong Knot
- Issue: Slippery or complex knots can loosen or jam, making adjustments difficult.
- Solution: Stick to simple, reliable knots like the clove hitch or round turn and two half hitches.
- Insufficient Fenders
- Issue: Too few fenders leave parts of the hull exposed.
- Solution: Use one fender per 10 feet of boat length, plus extras for the bow and stern.
- Weak Attachment Points
- Issue: Tying to loose rails or lifeline tops can cause fenders to fail.
- Solution: Use sturdy cleats, stanchions, or padeyes low on the boat.
- Leaving Fenders Dragging
- Issue: Fenders left hanging while cruising can wear out or fall overboard.
- Solution: Secure fenders in racks or lockers when not in use.
Fender Care and Maintenance
Proper care extends the life of your fenders and ensures they perform reliably. Follow these tips:
- Inspect Regularly: Check for cracks, UV damage, or worn attachment points before each trip.
- Clean After Use: Rinse with fresh water to remove salt and grime. Use mild soap for stubborn stains.
- Protect from UV: Store in shaded areas or use UV protectant sprays for vinyl fenders.
- Maintain Inflation: For inflatable fenders, follow manufacturer PSI guidelines (typically 1.5–2.5 PSI).
- Store Properly: Use fender racks, mesh bags, or lockers to prevent damage.
- Rotate Fenders: Alternate their positions to ensure even wear.
Pro Tips for Expert Fender Management
- Use Adjustable Fender Hangers: These allow quick height adjustments without retying knots.
- Label Lines: Mark fender lines for specific attachment points to streamline setup.
- Carry Spares: Keep extra fenders onboard for unexpected docking scenarios.
- Match Fender Size to Boat: Larger boats need bigger fenders (e.g., 10–12 inches in diameter for 40+ foot boats).
- Use Fender Covers: Protect fenders from scuffs and UV damage with fitted covers.
FAQs
How many fenders do I need for my boat?
At least one fender per 10 feet of boat length, with a minimum of three. Add extras for rough conditions or rafting.
What size fenders are best?
- Boats under 20 feet: 6–8 inch diameter cylindrical fenders.
- Boats 20–40 feet: 8–10 inch diameter cylindrical or 12–15 inch round fenders.
- Boats over 40 feet: 10–12 inch diameter cylindrical or 15–24 inch round fenders.
Can I use alternative materials as fenders?
In emergencies, pool noodles or tires can work temporarily but lack the durability and effectiveness of marine-grade fenders.
What’s the best knot for fenders?
- Clove hitch for quick adjustments.
- Round turn and two half hitches for long-term security.
- Anchor bend for semi-permanent setups.
Conclusion
Tying a boat fender correctly is a critical skill that protects your vessel from damage and enhances your boating experience. By choosing the right fender type, positioning them properly, and securing them with reliable knots, you ensure your boat stays safe in any docking scenario. Regular maintenance and attention to detail—like checking knots, adjusting heights, and storing fenders properly—will keep your equipment in top condition and your boat looking pristine.
With this guide, you’re equipped to tie fenders like a pro, whether you’re docking at a busy marina or rafting up with friends. Practice your knots, inspect your gear, and set sail with confidence, knowing your boat is well-protected.
Share How to Tie on a Boat Fender: A Boater’s Step-by-Step Guide with your friends and Leave a comment below with your thoughts.
Read What Is Length Overall (LOA) in Boat and Why Does It Matter? until we meet in the next article.


Thanks a bunch for sharing this with all people you actually realize what you are speaking approximately!