How to Test a Boat Fuel Gauge: Simple Steps and Tips
Learn how to test a boat fuel gauge with simple steps, troubleshooting tips, and maintenance advice for accurate readings and safe boating in Florida.
Boating in Florida’s expansive 8,436-mile coastline, with its bustling waterways and remote offshore areas, demands reliable equipment to ensure safety and enjoyment. Among the critical components of any boat is the fuel gauge, a device that provides real-time insight into your fuel tank’s level, helping you avoid the perilous situation of running out of fuel far from shore. A malfunctioning fuel gauge can lead to inconvenient delays or, worse, leave you stranded in challenging conditions. This comprehensive guide outlines how to test, troubleshoot, and maintain your boat’s fuel gauge system, ensuring accurate readings and peace of mind on the water.
Understanding Boat Fuel Gauge Systems
A boat’s fuel gauge system is a deceptively simple yet critical setup that informs you of your fuel status. The system comprises three main components:
- Fuel Gauge: Typically an analog display on the dashboard, marked with “F” (full), “E” (empty), and fractional increments (e.g., 1/4, 1/2, 3/4). Digital gauges exist but are less common in recreational boats.
- Fuel Sender Unit: A sensor inside the fuel tank, often a float mechanism on a rod or sliding float on a shaft, that measures fuel levels and sends electrical signals to the gauge.
- Wiring and Connections: The electrical pathways, typically a 12-volt DC system, connecting the sender to the gauge. These include a black ground wire, a pink sender wire (per American Boat and Yacht Council standards), and a positive wire (red or purple, depending on the switch).
These components work together to translate the physical fuel level into a readable gauge display. However, factors like corrosion, vibration, and Florida’s salty marine environment can disrupt their performance, leading to inaccurate or non-functional readings.
Why Accurate Fuel Gauges Matter
An accurate fuel gauge is vital for safe boating, especially in Florida’s busy waters. Running out of fuel in a crowded shipping lane or a remote offshore area can be dangerous, particularly during adverse weather conditions. A reliable gauge eliminates guesswork, allowing you to plan trips with confidence and avoid hazardous situations. Regular testing and maintenance of the fuel gauge system are essential to ensure its reliability.
Tools Required for Testing
To test and maintain your boat’s fuel gauge system, you’ll need the following tools:
- Ohm Meter: Measures resistance in the sender unit to verify its functionality.
- Voltage Meter/Multimeter: Checks the power supply and ground connections, ensuring the gauge receives adequate voltage (typically 12 volts).
- Basic Hand Tools: Screwdrivers, wrenches, and pliers to access and adjust components.
- Wire Connectors and Electrical Tape: Secures and waterproofs connections during testing.
- Fine Emery Paper: Cleans corrosion from electrical contacts.
- Dielectric Grease: Prevents moisture-related corrosion on connections.
- Optional: Jumper wire with alligator clips for testing gauge response.
These tools, costing around $50 for a basic multimeter and additional minimal expenses for connectors and grease, are a worthwhile investment for maintaining your boat’s electrical systems.
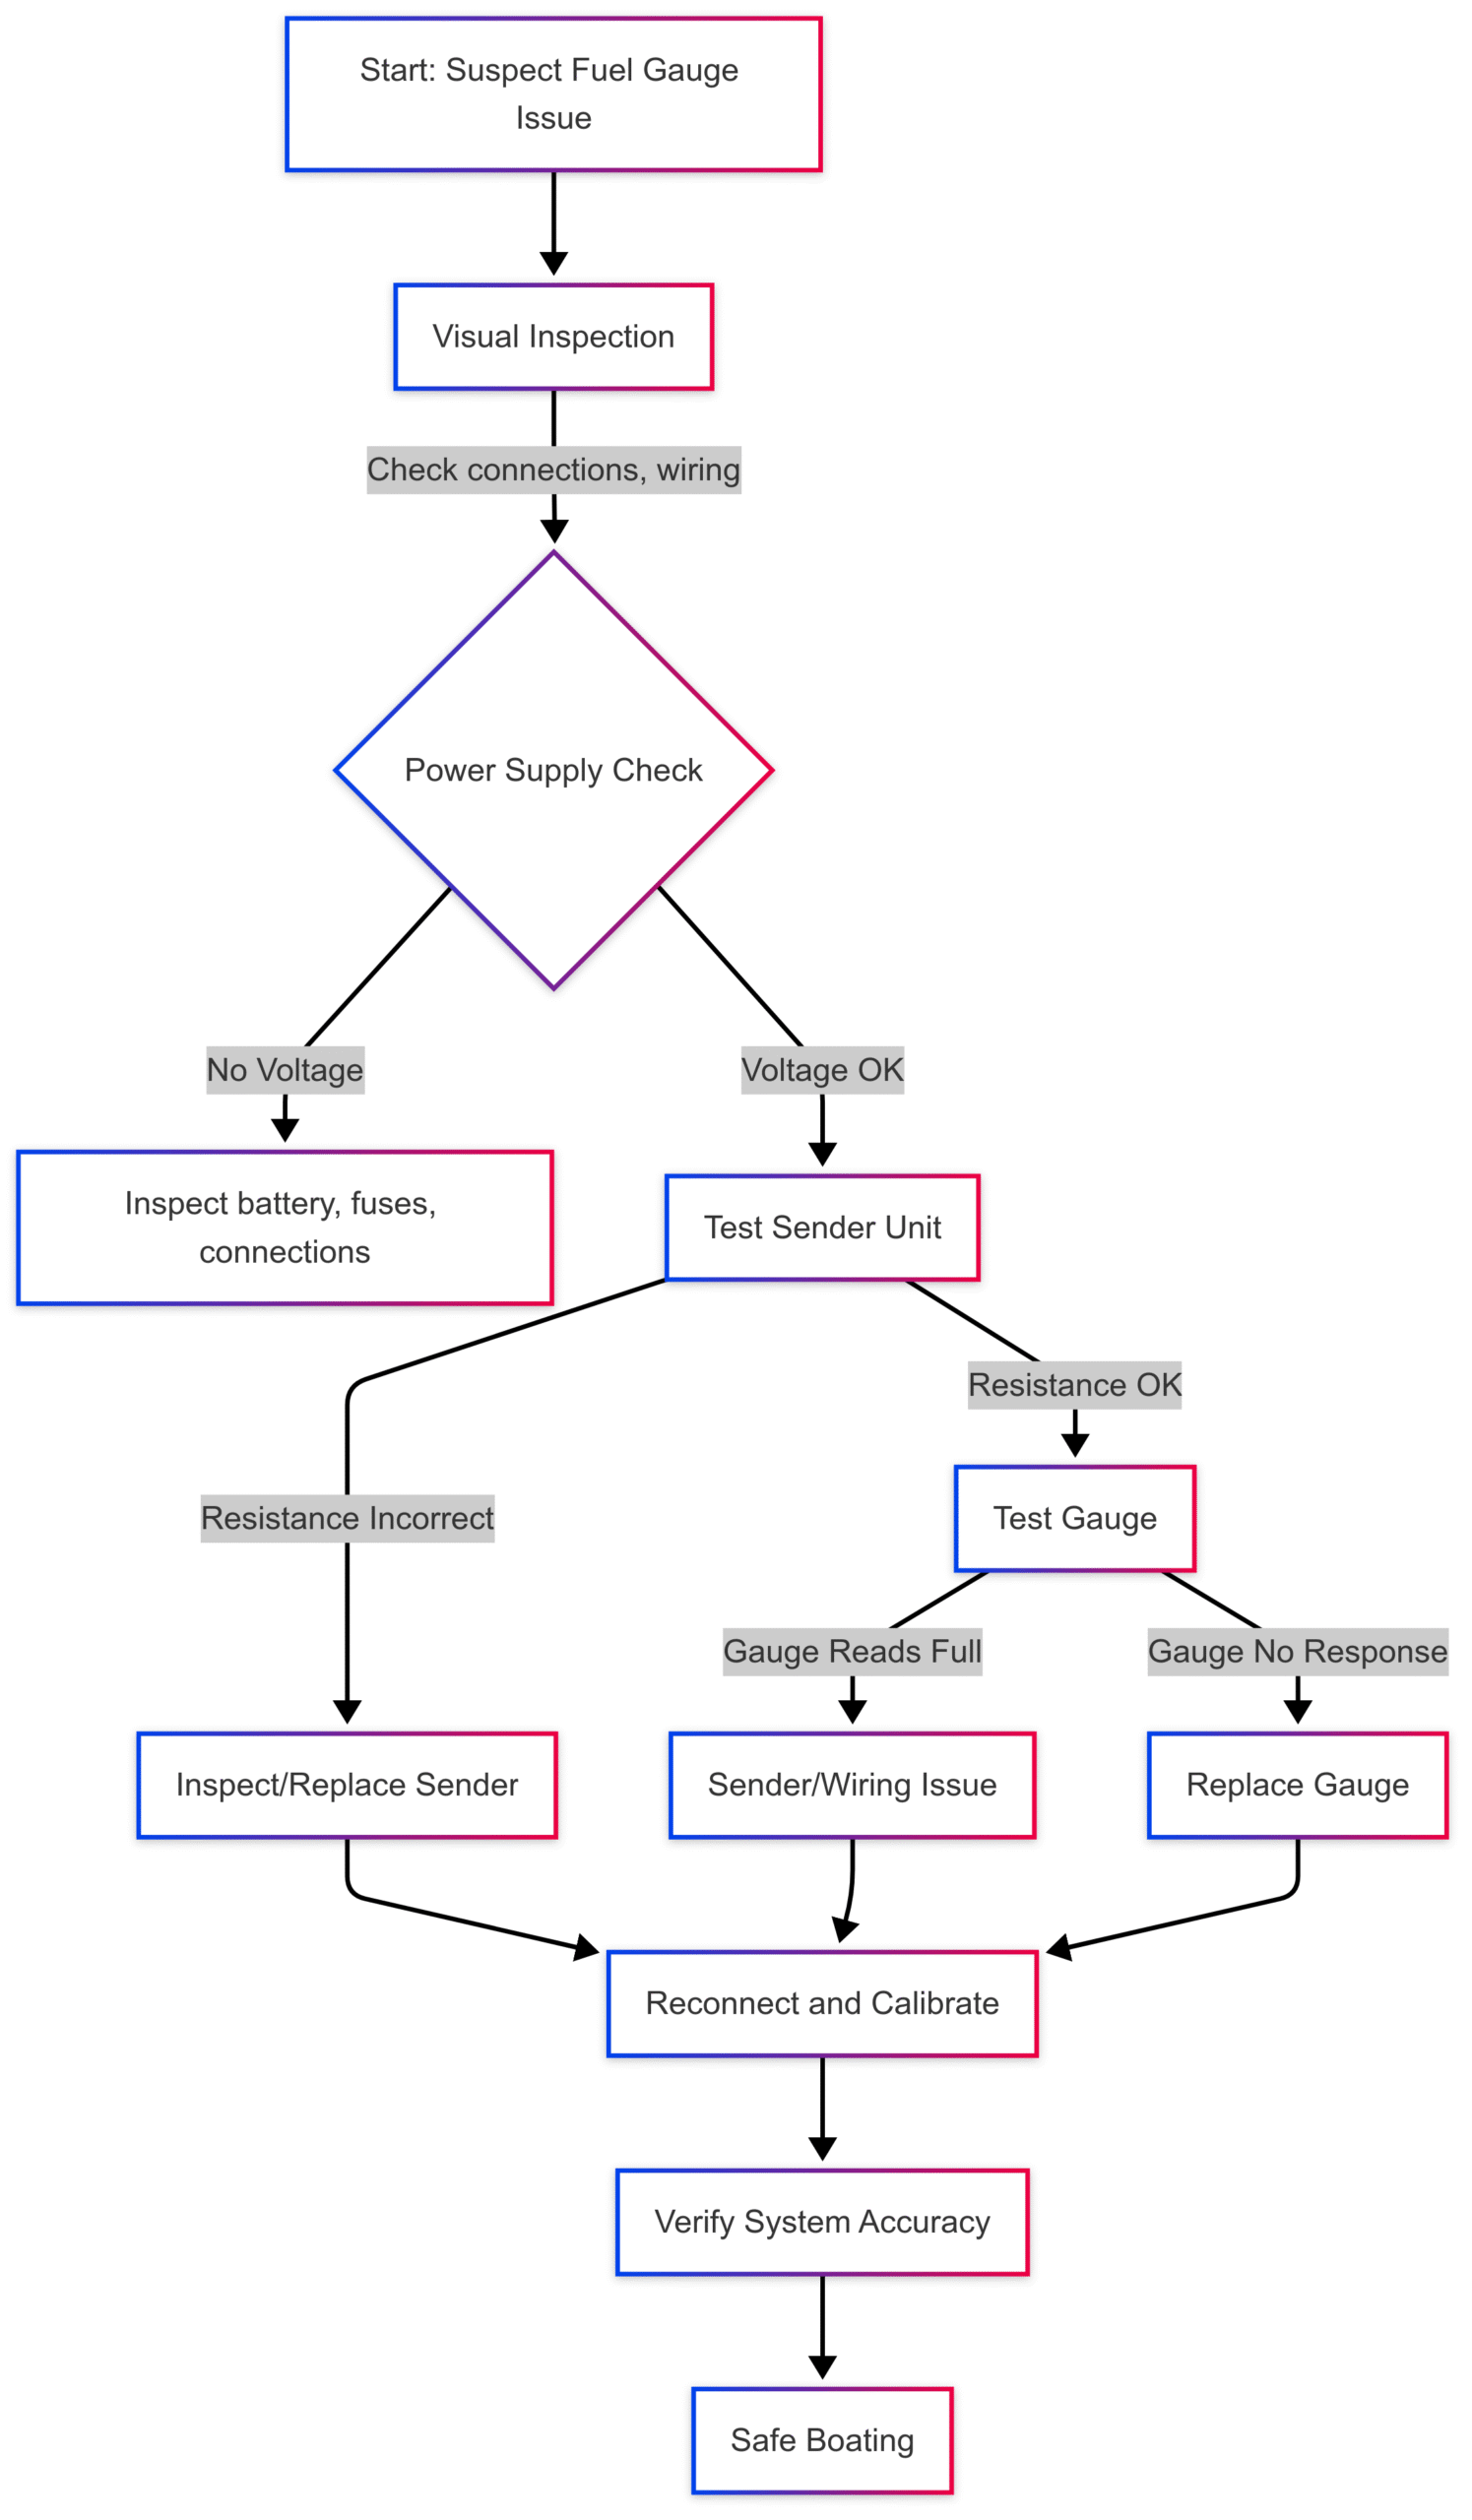
Step-by-Step Guide to Testing a Boat Fuel Gauge
Testing a boat’s fuel gauge involves a systematic approach to diagnose issues in the gauge, sender, or wiring. Follow these steps to ensure your system is functioning correctly.
Step 1: Visual Inspection
Before diving into electrical testing, perform a thorough visual inspection of the fuel gauge system:
- Fuel Lines and Connections: Check for wear, brittleness, or damage. Secure connections prevent signal disruptions.
- Electrical Contacts: Look for corrosion, especially in Florida’s humid, salty environment. Clean corroded push-on connections with fine emery paper to ensure good contact.
- Wiring: Inspect the wiring between the sender and gauge for fraying, cuts, or corrosion. Replace damaged wires and use crimping connectors with heat-shrink covers or liquid electrical tape for waterproofing.
A clean and secure system is the foundation for accurate gauge performance.
Step 2: Check the Power Supply
Verify that the fuel gauge is receiving power:
- Set Up the Multimeter: Configure your multimeter to DC volts.
- Test Voltage at the Gauge: Connect the multimeter’s red lead to the gauge’s “I” (ignition/positive) terminal and the black lead to the “G” (ground) terminal. With the ignition or accessory switch on, you should see approximately 12 volts (or 24 volts for some systems).
- Troubleshoot No Voltage: If no voltage is detected, check the battery condition, fuses, and connections. Ensure battery terminals are corrosion-free and securely connected.
A stable power supply is essential for the gauge to function.
Step 3: Test the Fuel Sender Unit
The sender unit, located in the fuel tank under a deck plate, is a common source of issues. Test it as follows:
- Locate the Sender: Find the sender unit, typically a round plate with two wires (black for ground, pink for sender).
- Disconnect Wires: Safely disconnect the sender wires, ensuring no sparks occur near the fuel tank.
- Measure Resistance: Connect one ohm meter lead to the sender’s center terminal and the other to the metal case or ground terminal. Move the float arm from empty to full and observe the resistance:
- Full Tank: Approximately 10–30 ohms (low resistance).
- Empty Tank: Approximately 150–240 ohms (high resistance).
- Check your boat’s manual for exact specifications, as values vary by manufacturer (e.g., Yamaha, Honda, Suzuki).
- Interpret Results: Smooth resistance changes indicate a functional sender. Erratic or no changes suggest a faulty sender, possibly due to a saturated float, bent arm, or corrosion.
Step 4: Bench Test the Sender (Optional)
For a more thorough diagnosis, bench test the sender:
- Remove the Sender: Ensure the tank is empty or fuel is contained to avoid spills. Remove the sender by unscrewing the deck plate (typically five screws).
- Test Resistance: On a clean work surface, use a multimeter to measure resistance as you move the float arm. Values should range smoothly from 10 ohms (full) to 150–240 ohms (empty).
- Inspect the Sender: Check for corrosion, a bent float arm, or a saturated float. Replace if necessary.
Step 5: Test the Gauge
If the sender and wiring are functional, test the gauge:
- Ground the Sender Wire: With the ignition on, use a jumper wire to connect the sender terminal (pink wire) to the ground terminal (black wire). The gauge should read “full.”
- Interpret Results:
- If the gauge reads full, the gauge is functional, and the issue lies with the sender or wiring.
- If the gauge does not respond, it may be faulty and require replacement.
Step 6: Reconnect and Calibrate
After testing, reconnect and calibrate the system:
- Reconnect Wires: Securely attach the black (ground) and pink (sender) wires using crimping connectors with heat-shrink covers for waterproofing.
- Calibrate the Sender: Adjust the float arm to match the tank’s depth, ensuring accurate readings. Refer to the sender’s manual for instructions.
- Final Voltage Check: Use a multimeter to confirm the gauge receives at least 12 volts.
- Test the System: Fill the tank and verify the gauge reads correctly across the full range.
Chart: Fuel Gauge Testing Workflow
Common Fuel Gauge Problems and Troubleshooting
Fuel gauges in recreational boats often malfunction, typically showing overly optimistic readings (e.g., full when the tank is not). Here are common issues and their solutions:
| Problem | Symptoms | Possible Causes | Solution |
|---|---|---|---|
| Gauge Reads Incorrectly | Shows empty when fuel is present, or fluctuates erratically | Faulty sender, corroded wiring, loose connections | Test sender resistance, inspect wiring, secure connections |
| Gauge Not Working | Needle stuck at empty or no movement | Power supply issues, faulty gauge/sender, blown fuse | Check voltage, test gauge/sender, replace fuse |
| Gauge Shows Full Constantly | Reads full regardless of fuel level | Malfunctioning sender, short circuit | Ground sender wire to test gauge, replace sender if needed |
Troubleshooting Tips
- Corrosion: Florida’s marine environment accelerates corrosion. Use dielectric grease on connections to prevent moisture damage.
- Faulty Sender: A saturated float or bent arm can cause inaccurate readings. Inspect and replace if necessary.
- Wiring Issues: Check for breaks or loose connections. Use waterproof connectors to ensure reliability.
- Gauge Failure: If the gauge is faulty, replace it with a standard 2 1/8-inch analog gauge (approximately $50).
Replacement Costs and Specifications
If testing reveals a faulty component, replacement is straightforward:
- Fuel Sender Unit:
- Cost: $50–$100 for a universal unit.
- Specifications: Adjustable float arm, typically 10–240 ohms resistance range. Ensure compatibility with tank depth.
- Installation: Requires a gasket (included), no sealant needed. Secure with screws, avoiding over-tightening.
- Fuel Gauge:
- Cost: $50–$150, depending on brand (e.g., Faria, Sierra).
- Specifications: Standard 2 1/8-inch diameter, 12-volt DC, analog display.
- Installation: Disconnect wiring, remove the old gauge, install the new one, and reconnect per the wiring diagram.
Wiring Diagram
Preventive Maintenance for Long-Term Reliability
To keep your fuel gauge system reliable:
- Regular Inspections: Check wiring, connections, and the sender unit quarterly, especially in Florida’s corrosive environment.
- Corrosion Prevention: Apply dielectric grease to electrical contacts and use waterproof connectors.
- Fuel Quality: Avoid water contamination in the tank, which can damage the sender. Use a fuel conditioner for long-term storage.
- Monitor Fuel Usage: Supplement the gauge with a fuel flow meter or manual logs to cross-check fuel levels.
- Multiple Tanks: For boats with multiple tanks, consider a multi-tank gauge panel for easier monitoring.
Importance of Accurate Fuel Gauges in Florida
Florida’s extensive waterways, from crowded coastal channels to remote offshore fishing grounds, make an accurate fuel gauge indispensable. Running out of fuel can strand you in dangerous areas, particularly during storms or in heavy traffic. Factors like tank angle, fuel temperature, and composition can affect gauge accuracy, so regular testing and calibration are crucial. An accurate gauge, combined with diligent fuel management, ensures safe and enjoyable boating adventures.
When to Seek Professional Help
While many boaters can test and maintain their fuel gauge systems, professional inspections are recommended annually or if issues persist. Professionals can:
- Ensure compliance with safety regulations.
- Detect subtle issues caused by Florida’s marine environment.
- Verify system integrity after repairs, checking for leaks and proper operation.
Contact services like EzFill for expert fuel system maintenance, complementing your DIY efforts and ensuring reliability.
Conclusion
A reliable fuel gauge is more than a convenience—it’s a critical safety tool for boating in Florida’s dynamic waters. By understanding your fuel gauge system, using the right tools, and following a systematic testing process, you can diagnose and resolve issues before they disrupt your adventures. Regular maintenance, combined with occasional professional inspections, ensures accurate readings and peace of mind. Don’t let a faulty fuel gauge catch you off guard—test and maintain your system today for safe and enjoyable boating.
Frequently Asked Questions
What tools do I need to test my boat’s fuel gauge?
How do I test the fuel tank sending unit?
What if my fuel gauge shows no voltage?
Why is an accurate fuel gauge critical in Florida?
Should I seek professional maintenance?
Happy Boating!
Share How to Test a Boat Fuel Gauge: Simple Steps and Tips with your friends and leave a comment below with your thoughts.
Read Garmin Echomap Vs GPSmap units: Which is better until we meet in the next article.