How to Swap / Install LED trailer lights / upgrade
Learn how to install LED trailer lights for enhanced safety and visibility. Step-by-step guide, tools, and tips for upgrading your boat trailer.
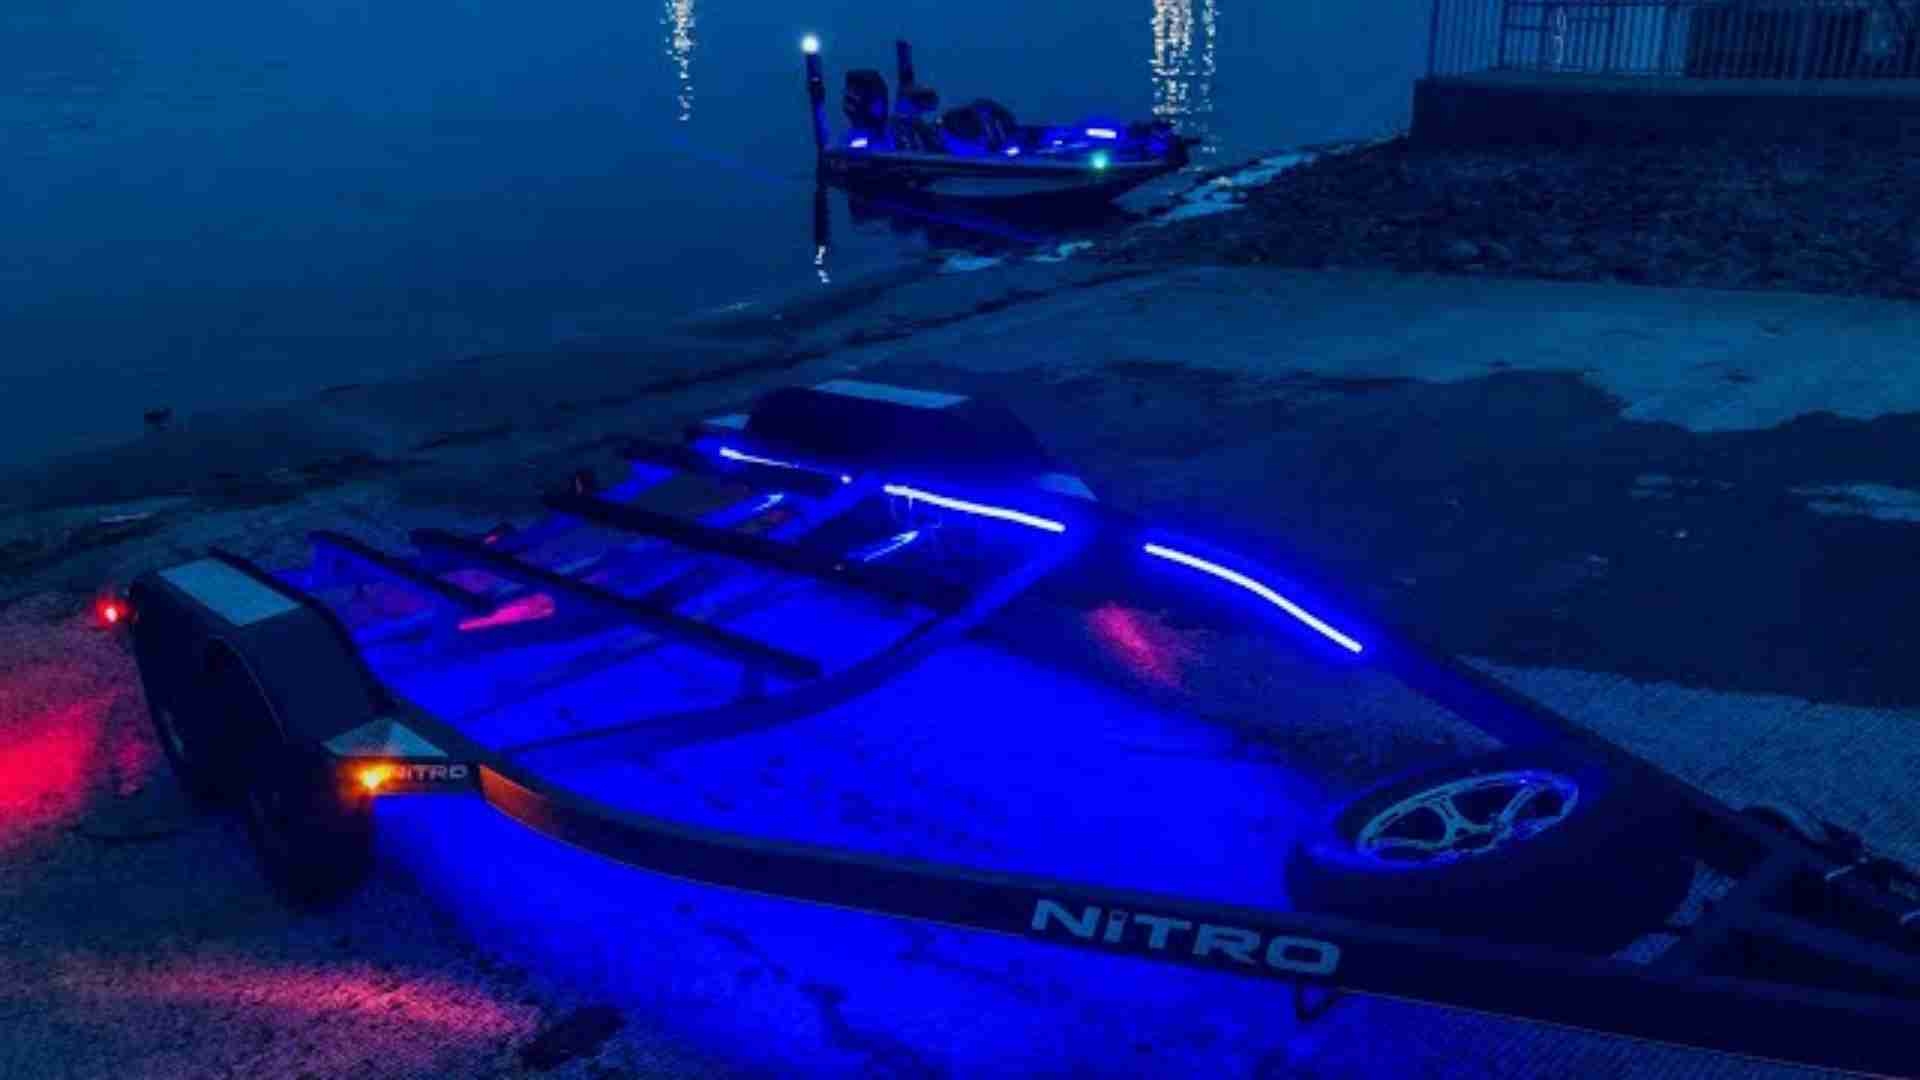
Upgrading your boat trailer with LED lights is a smart move for enhancing safety, visibility, and durability, especially for nighttime towing or launching. LED trailer lights offer superior brightness, energy efficiency, and resistance to harsh marine environments compared to traditional incandescent bulbs. This comprehensive guide, spanning approximately 3,500–4,000 words, will walk you through the process of swapping or installing LED trailer lights, with practical tips, tools, and troubleshooting advice to ensure a successful upgrade. Whether you’re a seasoned boater or a novice, this guide provides everything you need to make your trailer safer and more functional.
Why Upgrade to LED Trailer Lights?
LED trailer lights have become the go-to choice for boat owners due to their numerous advantages over traditional incandescent lights. Understanding these benefits will help you appreciate why this upgrade is worth your time and investment.
Key Benefits of LED Trailer Lights
- Enhanced Visibility: LED lights produce bright, crisp illumination, making your trailer more visible to other drivers, especially in low-light or nighttime conditions. This reduces the risk of accidents on busy roads or at boat ramps.
- Energy Efficiency: LEDs consume significantly less power than incandescent bulbs, reducing the strain on your vehicle’s battery and improving fuel efficiency during towing. This is particularly beneficial for long trips or extended time on the water.
- Durability: Designed to withstand shock, vibrations, and extreme weather, LED lights are ideal for marine environments. They resist corrosion and damage from saltwater, rain, or temperature fluctuations.
- Long Lifespan: LEDs last up to 50,000 hours or more, compared to incandescent bulbs’ 1,000–2,000 hours. This means fewer replacements and less maintenance over time.
- Faster Response Time: LEDs illuminate instantly, providing quicker brake and turn signal responses. This enhances safety by alerting other drivers to your actions without delay.
- Environmental Impact: Lower energy consumption translates to a reduced carbon footprint, making LEDs an eco-friendly choice.
Safety Considerations
Safety is paramount when towing a boat trailer, especially at night or in poor visibility conditions. LED lights improve safety by:
- Increasing Visibility: Their bright output ensures your trailer is easily seen, reducing the risk of rear-end collisions or side-swiping accidents.
- Preventing Blindness at Ramps: Properly angled LED backup lights illuminate the area behind the trailer without blinding other boaters or drivers, unlike high-powered white lights directed toward the water.
- Compliance with Regulations: LEDs can be selected to meet Department of Transportation (DOT) standards, ensuring legal compliance for road use.
Choosing the Right LED Trailer Lights
Selecting the appropriate LED lights for your trailer is critical for performance and compliance. Here are key factors to consider:
Size and Fit
Measure the existing light fixtures or mounting areas on your trailer to ensure compatibility. Common LED trailer light shapes include rectangular, oval, and round, with sizes ranging from 4 to 7 inches in length for tail lights.
Brightness (Lumens)
Choose lights with a lumen output that balances visibility and glare. For boat trailers, 700–1,000 lumens per light is typically sufficient for backup and tail lights without causing discomfort to others. Avoid excessively bright lights (e.g., >1,500 lumens) that could blind other drivers or boaters.
Waterproof Rating
Since boat trailers are frequently submerged in water, opt for lights with an IP67 or higher waterproof rating. These are sealed to prevent water ingress, ensuring reliability in marine environments.
Compliance with Regulations
Ensure the lights meet DOT standards for color (red for stop/tail, amber for clearance/turn signals) and placement. Check local regulations for specific requirements, such as side marker lights or reflective tape.
Recommended Products
Here are some popular LED trailer light options with specifications and approximate prices (based on common retail sources):
| Product | Type | Lumens | Waterproof Rating | Price (USD) |
|---|---|---|---|---|
| Linkitom LED Trailer Light Kit | Tail/Backup | 800 | IP67 | $30–$40 (pair) |
| Wesbar Low Profile LED | Tail/Stop | 700 | IP68 | $15–$20 (single) |
| Optronics LED Brake Light | Brake/Tail | 750 | IP67 | $25–$35 (pair) |
| Pipe Lights LED Kit | Pole Lights | 900 | IP67 | $50–$60 (kit) |
Note: Prices may vary based on retailer and region. Check reputable sources like eTrailer, Amazon, or West Marine for availability.
Tools and Materials Needed
Proper preparation is key to a smooth installation. Gather the following tools and materials before starting:
Tools
- Socket Wrench Set: For removing and securing bolts (various sizes).
- Wire Cutter/Stripper: To cut and strip wires for connections.
- Crimping Tool: For securing wire connectors.
- Screwdriver Set: Flathead and Phillips for screws.
- Heat Gun or Butane Soldering Iron: For shrinking heat shrink tubing and soldering.
- Multimeter: To test electrical continuity and troubleshoot.
- Drill (Optional): For new mounting holes, if needed.
- Oscillating Tool (Optional): For cutting sealed light fixtures, if replacing non-LED units.
Materials
- LED Trailer Light Kit: Tail, stop, and backup lights as needed.
- Heat Shrink Tubing (3:1 or 4:1): For waterproofing connections.
- Solder Seal Wire Connectors: For durable, watertight splices.
- Wago 221 Lever Nut Connectors: For multi-wire connections at the trailer tongue.
- Tinned Copper Wire (10–14 AWG): For reliable, corrosion-resistant wiring.
- Marine-Grade Stainless Steel Bolts: To prevent rust in marine environments.
- Electrical Tape: For additional insulation.
- Dielectric Grease: To protect connections from corrosion.
- DOT Reflective Tape: For added visibility on fenders or guide posts.
- Waterproof Labels (Optional): For labeling wires to simplify troubleshooting.
Pre-Installation Preparation
Before installing LED lights, prepare your trailer to ensure a safe and efficient process.
Safety Measures
- Disconnect Power: Unplug the trailer from the towing vehicle to prevent electrical shocks.
- Stabilize the Trailer: Place the trailer on a level surface, secured with jack stands or blocks.
- Wear Protective Gear: Use gloves and safety glasses to protect against sharp edges or electrical hazards.
- Inspect Wiring Harness: Check for corrosion, fraying, or damage. Replace any compromised sections to ensure reliable connections.
Removing Old Lights
- Locate Fixtures: Identify the existing tail, stop, and backup lights.
- Remove Fasteners: Use a socket wrench or screwdriver to detach the lights from the trailer frame.
- Disconnect Wires: Carefully cut or unplug the wires, noting their connections (e.g., positive and negative).
- Clean Mounting Area: Remove rust, debris, or old sealant to prepare for new lights.
Wiring Diagram
Below is a simplified wiring diagram for a typical 5-pin or 7-pin trailer connector, commonly used for LED trailer lights.
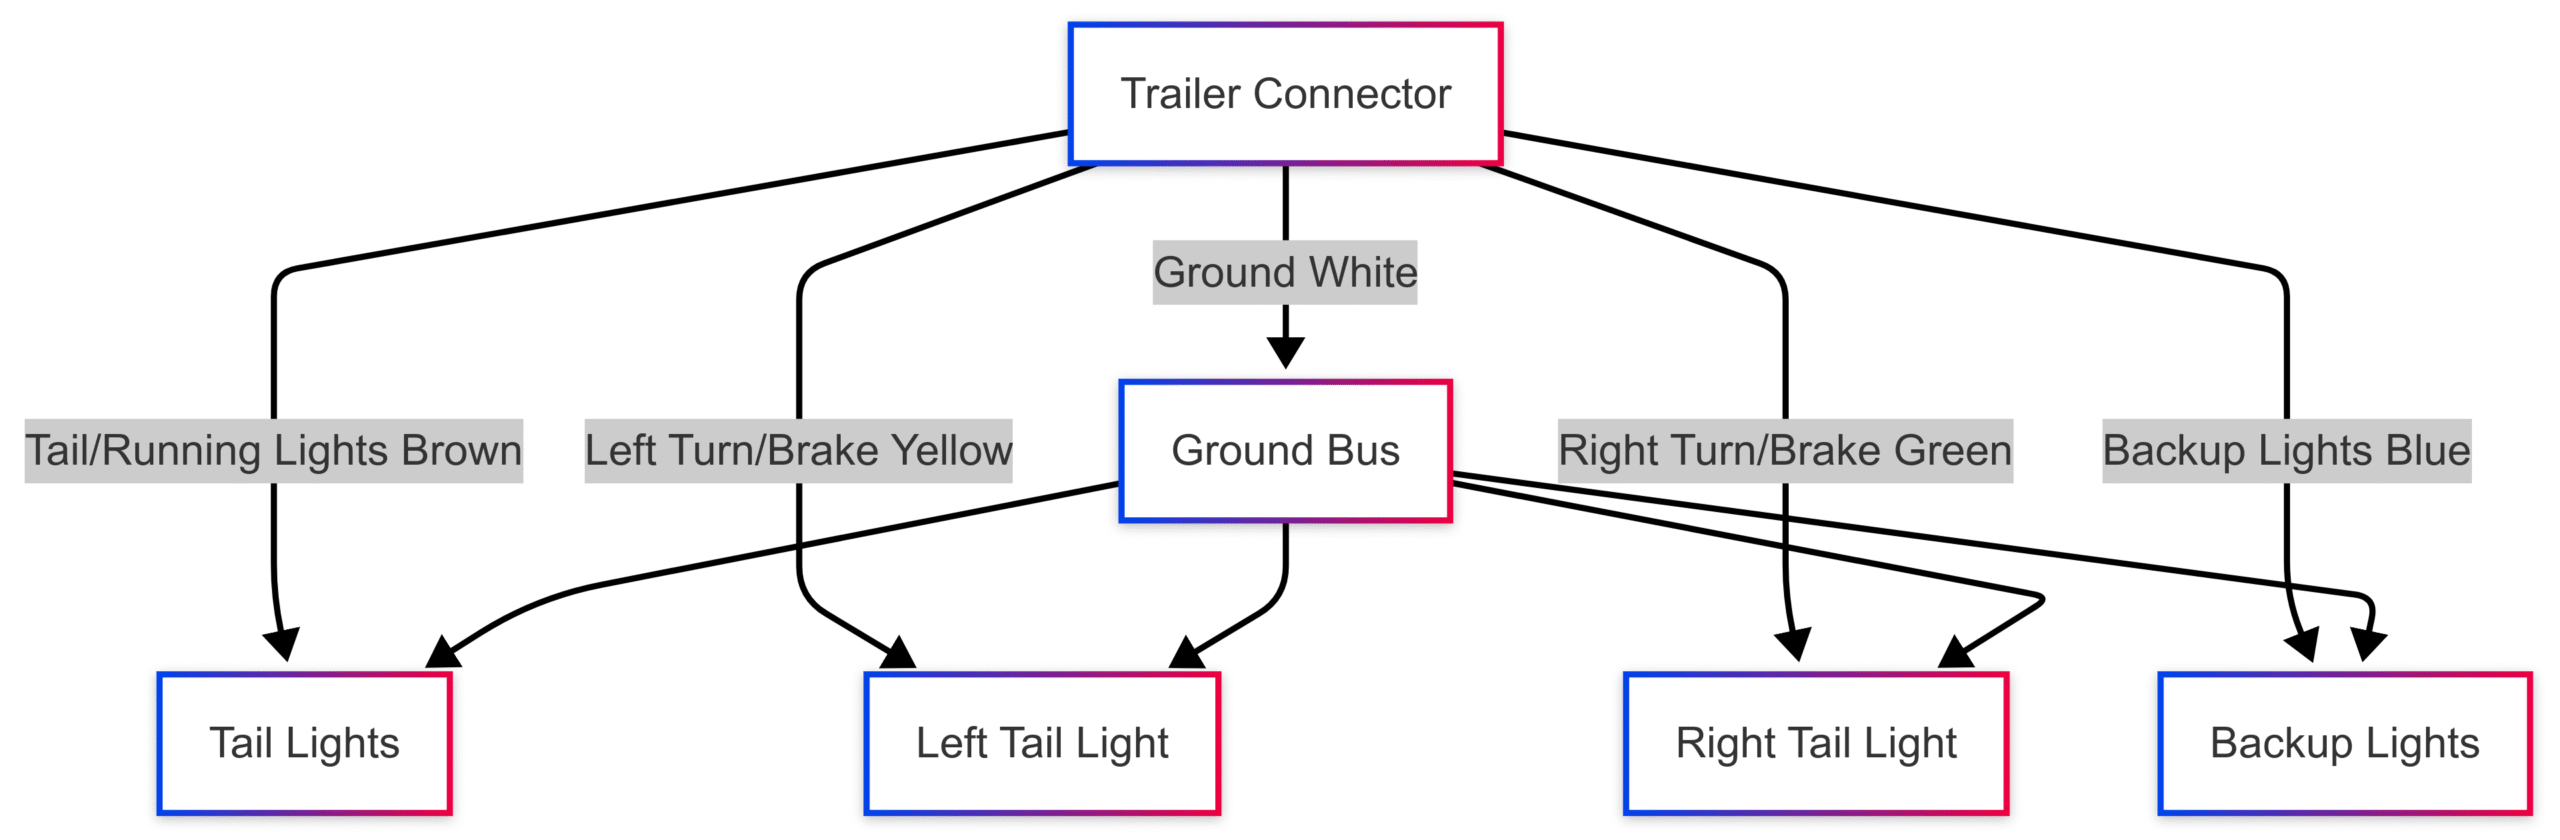
This diagram illustrates the connections for tail, brake, and backup lights, with a dedicated ground wire to prevent corrosion-related issues.
Step-by-Step Installation Guide
Follow these steps to install LED trailer lights, ensuring a reliable and waterproof setup.
Step 1: Plan the Layout
- Determine Light Placement: Position tail lights at the rear, clearance lights on the sides, and backup lights low on the frame or on guide posts. Ensure backup lights are angled downward to avoid blinding others.
- Consider Guide Posts: Adding guide posts with lights can simplify loading the boat at night. Mount lights on posts to keep them above water and prevent submersion damage.
Step 2: Wiring the LED Lights
- Identify the Backup Light Wire: For a 5-pin or 7-pin connector, the backup light wire is typically blue. Use a multimeter to confirm the reverse circuit (12V when the vehicle is in reverse).
- Run Dedicated Wires: Use 10–14 AWG tinned copper wire for power and ground connections. Run individual wires from each light to the trailer tongue to minimize failure points.
- Make Connections:
- Strip 1/4 inch of insulation from the wire ends.
- Tin the wires (optional) by applying a thin layer of solder to ensure better flow during splicing.
- Use solder seal wire connectors for connections near the lights. Insert wires, heat with a heat gun or butane soldering iron until the solder melts and the tubing shrinks.
- For multi-wire connections at the tongue, use Wago 221 lever nut connectors filled with dielectric grease for waterproofing.
- Protect Connections: Cover each splice with 3:1 or 4:1 heat shrink tubing with adhesive for extra waterproofing. Ensure the tubing extends 3–4 inches beyond the splice to prevent water wicking.
- Label Wires: Use waterproof labels (e.g., “Left Rear,” “Right Backup”) to simplify future troubleshooting.
Step 3: Mount the LED Lights
- Position Lights: Align the lights in their designated locations, ensuring proper orientation (e.g., red lenses for tail/brake, amber for clearance).
- Secure Fixtures: Use stainless steel bolts or screws to mount the lights. If drilling new holes, apply marine sealant around the holes to prevent rust.
- Install Guide Post Lights (Optional): Mount LED lights on guide posts using stainless brackets. Ensure the lights are above the waterline to avoid submersion.
Step 4: Test the System
- Reconnect the Trailer: Plug the trailer into the vehicle’s connector.
- Test Each Circuit:
- Tail Lights: Turn on the vehicle’s headlights to check running lights.
- Brake Lights: Press the brake pedal to verify stop lights.
- Turn Signals: Activate left and right signals.
- Backup Lights: Shift into reverse to test backup lights.
- Check for Flickering or Failure: If lights don’t work, use a multimeter to test continuity and inspect connections for looseness or corrosion.
Step 5: Finalize the Installation
- Secure Wiring: Route wires away from moving parts, sharp edges, or heat sources. Use wire looms or zip ties to keep them organized.
- Apply DOT Reflective Tape: Add tape to fenders or guide posts for extra visibility, especially if they remain above water during loading.
- Unplug Before Submersion: Disconnect the trailer plug before backing into water to prevent electrical damage, especially for non-submersible lights.
Troubleshooting Common Issues
Even with careful installation, issues may arise. Here are common problems and solutions:
Wiring Problems
- Lights Not Working: Check for loose or disconnected wires. Verify the ground connection is secure and corrosion-free. Use a multimeter to test for 12V at each light.
- Intermittent Lights: Corrosion at the ground or splices is often the culprit. Replace chassis grounds with dedicated ground wires to the trailer connector. Inspect and reseal splices with heat shrink tubing.
- Blown Fuses: Submerging powered lights can cause shorts. Always unplug the trailer before launching. Check the vehicle’s fuse box and replace blown fuses.
LED Light Malfunctions
- Flickering Lights: Ensure polarity is correct (positive to positive, negative to negative). Check for loose connections or water ingress in the light housing.
- Non-Functional Light: Inspect the light for damage or moisture. Replace faulty units with new ones, ensuring they are IP67 or higher rated.
Community Tips
Forum users emphasize avoiding daisy-chained wiring, as splices in the middle of a run are prone to failure in marine environments. Running dedicated wires to the tongue and using solder seal connectors or Wago lever nuts ensures reliability. Labeling wires and using color-coded heat shrink (e.g., yellow for left, red for right) simplifies troubleshooting.
Maintenance Tips for LED Trailer Lights
To maximize the lifespan of your LED lights:
- Regular Inspections: Check wiring and connections for corrosion or wear before each trip.
- Clean Lenses: Remove dirt or algae from light lenses to maintain brightness.
- Protect from Submersion: Unplug the trailer before launching to prevent electrical damage, even with waterproof lights.
- Use Dielectric Grease: Apply grease to connectors to prevent corrosion in saltwater environments.
- Store Properly: When not in use, store the trailer in a dry, covered area to minimize exposure to moisture.
Additional Enhancements
Guide Posts
Guide posts with mounted LED lights make aligning the boat during loading easier, especially at night. Ensure the lights are submersible or positioned above the waterline. A typical setup includes two 4–6 ft posts with 700–900 lumen LED lights.
Backup Lights
Install low-profile LED backup lights (700–1,000 lumens) angled downward to illuminate the area behind the trailer without blinding others. Wire these to the reverse circuit (blue wire in a 5/7-pin connector).
Reflective Tape
Apply DOT-approved reflective tape to fenders, guide posts, or the trailer frame for added visibility. This is especially useful if lights are submerged during loading.
Cost Breakdown
Here’s an estimated cost for a typical LED trailer light upgrade:
| Item | Quantity | Cost (USD) |
|---|---|---|
| LED Trailer Light Kit (Tail/Backup) | 1 | $30–$60 |
| Solder Seal Connectors (Pack of 50) | 1 | $10–$15 |
| Wago 221 Lever Nut Connectors (Pack of 10) | 1 | $10–$12 |
| Tinned Copper Wire (100 ft, 14 AWG) | 1 | $20–$30 |
| Heat Shrink Tubing (3:1, 10 ft) | 1 | $5–$10 |
| Stainless Steel Bolts (Pack of 10) | 1 | $5–$8 |
| Dielectric Grease (Tube) | 1 | $5–$7 |
| DOT Reflective Tape (10 ft) | 1 | $5–$10 |
| Total | $90–$152 |
Note: Costs vary based on brand, retailer, and trailer size. Shop at marine retailers or online platforms like eTrailer or Amazon for competitive pricing.
Community Insights and Best Practices
Boating and fishing forums highlight several best practices for LED trailer light installation:
- Avoid Blinding Others: High-powered white lights directed toward the water can blind other boaters. Use low-lumen backup lights (700–1,000 lumens) angled downward.
- Turn Off Headlights: Disable vehicle headlights or daytime running lights at the ramp to avoid blinding others. On some vehicles, engaging the parking brake disables daytime running lights.
- Practice Backing Up: Novice boaters should practice reversing in a parking lot to avoid delays and frustration at busy ramps.
- Use Quality Materials: Marine-grade, tinned copper wire and stainless steel fasteners prevent corrosion and ensure longevity.
- Simplify Troubleshooting: Label wires and use color-coded heat shrink for easy identification during repairs.
Conclusion
Upgrading your boat trailer with LED lights is a worthwhile investment that enhances safety, visibility, and durability. By following this step-by-step guide, you can install LED tail, stop, and backup lights with confidence, ensuring compliance with regulations and reliability in marine environments. With the right tools, materials, and techniques—such as dedicated wiring, waterproof connectors, and proper light placement—you’ll enjoy a brighter, safer towing experience. Whether you’re launching at dawn or dusk, LED trailer lights provide peace of mind and make your boating adventures more enjoyable.
Happy Boating!
Share How to Swap / Install LED trailer lights / upgrade with your friends and leave a comment below with your thoughts.
Read Lost at Sea: 8 Tips for Surviving Open Waters until we meet in the next article.