How to Seal Your Boat Deck in 6 Simple Steps
Learn how to seal your boat deck in 6 simple steps for a waterproof, slip-resistant surface. Expert tips and sealant options included.
Sealing a boat deck is a critical maintenance task that protects your vessel from the harsh marine environment, including saltwater, UV rays, and constant moisture exposure. A properly sealed deck ensures longevity, enhances safety with a slip-resistant surface, and reduces maintenance efforts. This comprehensive guide outlines six straightforward steps to seal your boat deck effectively, incorporating expert tips, product recommendations, and insights from boating enthusiasts. Whether you’re a seasoned boater or a first-time boat owner, this article provides all the information you need to achieve a professional-grade finish.
Why Sealing Your Boat Deck Matters
Boat decks are constantly exposed to water, sun, and air, which can degrade materials like plywood, fiberglass, or metal over time. Without proper sealing, decks can suffer from rot, corrosion, or delamination, leading to costly repairs. A sealed deck not only prevents water intrusion but also provides a non-skid surface for safety and improves the aesthetic appeal of your vessel. By following a systematic sealing process, you can extend the life of your deck and reduce the frequency of maintenance tasks like cleaning and repairs.
This guide focuses on a proven six-step process using high-quality marine sealants, such as SANI-TRED® products, and incorporates feedback from boating communities to address common concerns, such as maintaining a clean deck with minimal effort. We’ll also explore different sealant types, their applications, and practical tips to ensure success.
Step-by-Step Guide to Sealing Your Boat Deck
Step 1: Prepare the Deck
Proper preparation is the foundation of a successful sealing project. A clean, dry, and smooth surface ensures that sealants adhere effectively, creating a durable, waterproof barrier. Follow these steps to prepare your deck:
- Clean the Surface: Remove dirt, grime, oil, and any existing sealant using a marine-grade cleaner like Starbrite Non-Skid Deck Cleaner with PTEF or Orpine Soap/Wax. These products are highly rated by boaters for their ability to remove tough stains, such as fish slime, without compromising the surface. For example, a boater on a forum noted, “Starbrite deck cleaner with PTEF gets the grime off and seals in one step, leaving a surface that resists stains.”
- Remove Loose Material: Inspect the deck for loose or damaged areas, such as flaking paint or crumbling plywood. Use a scraper or wire brush to remove any loose material.
- Sand the Surface: Sandblast steel, aluminum, or fiberglass surfaces to create a rough texture that enhances sealant adhesion. If sandblasting isn’t feasible, use coarse sandpaper (60-80 grit) to achieve a similar effect. Sanding removes gloss and creates a surface that bonds well with primers and sealants. Ensure the deck is completely dry before proceeding, as moisture can compromise adhesion.
- Clean Again: After sanding, clean the surface with acetone or mineral spirits to remove dust and residue. This step is crucial for ensuring a clean bonding surface.
Pro Tip: Work in a well-ventilated area and wear protective gear, such as gloves and a mask, when handling cleaning chemicals or sanding dust.
Step 2: Prime the Deck
Priming creates a strong foundation for the sealing process by enhancing adhesion and providing a barrier against moisture. Use a marine-grade primer like PermaFlex, which is designed to penetrate deeply into substrates like plywood, fiberglass, or metal.
- Application: Apply one coat of PermaFlex at a coverage rate of 240 square feet per gallon. Use a roller or brush for even application, focusing on joints, seams, cracks, and rough areas. These areas are prone to water intrusion and require thorough priming.
- Drying Time: Allow the primer to dry according to the manufacturer’s instructions, typically 4-6 hours. Ensure the surface is tack-free before moving to the next step.
Why It Matters: Priming ensures that the subsequent layers of sealant bond securely to the deck, preventing peeling or delamination. Boaters like “DFreedom” from a forum discussion reported that products like Woody Wax, which can act as a primer and sealant, create a slight sheen and bead water effectively, indicating a strong protective layer.
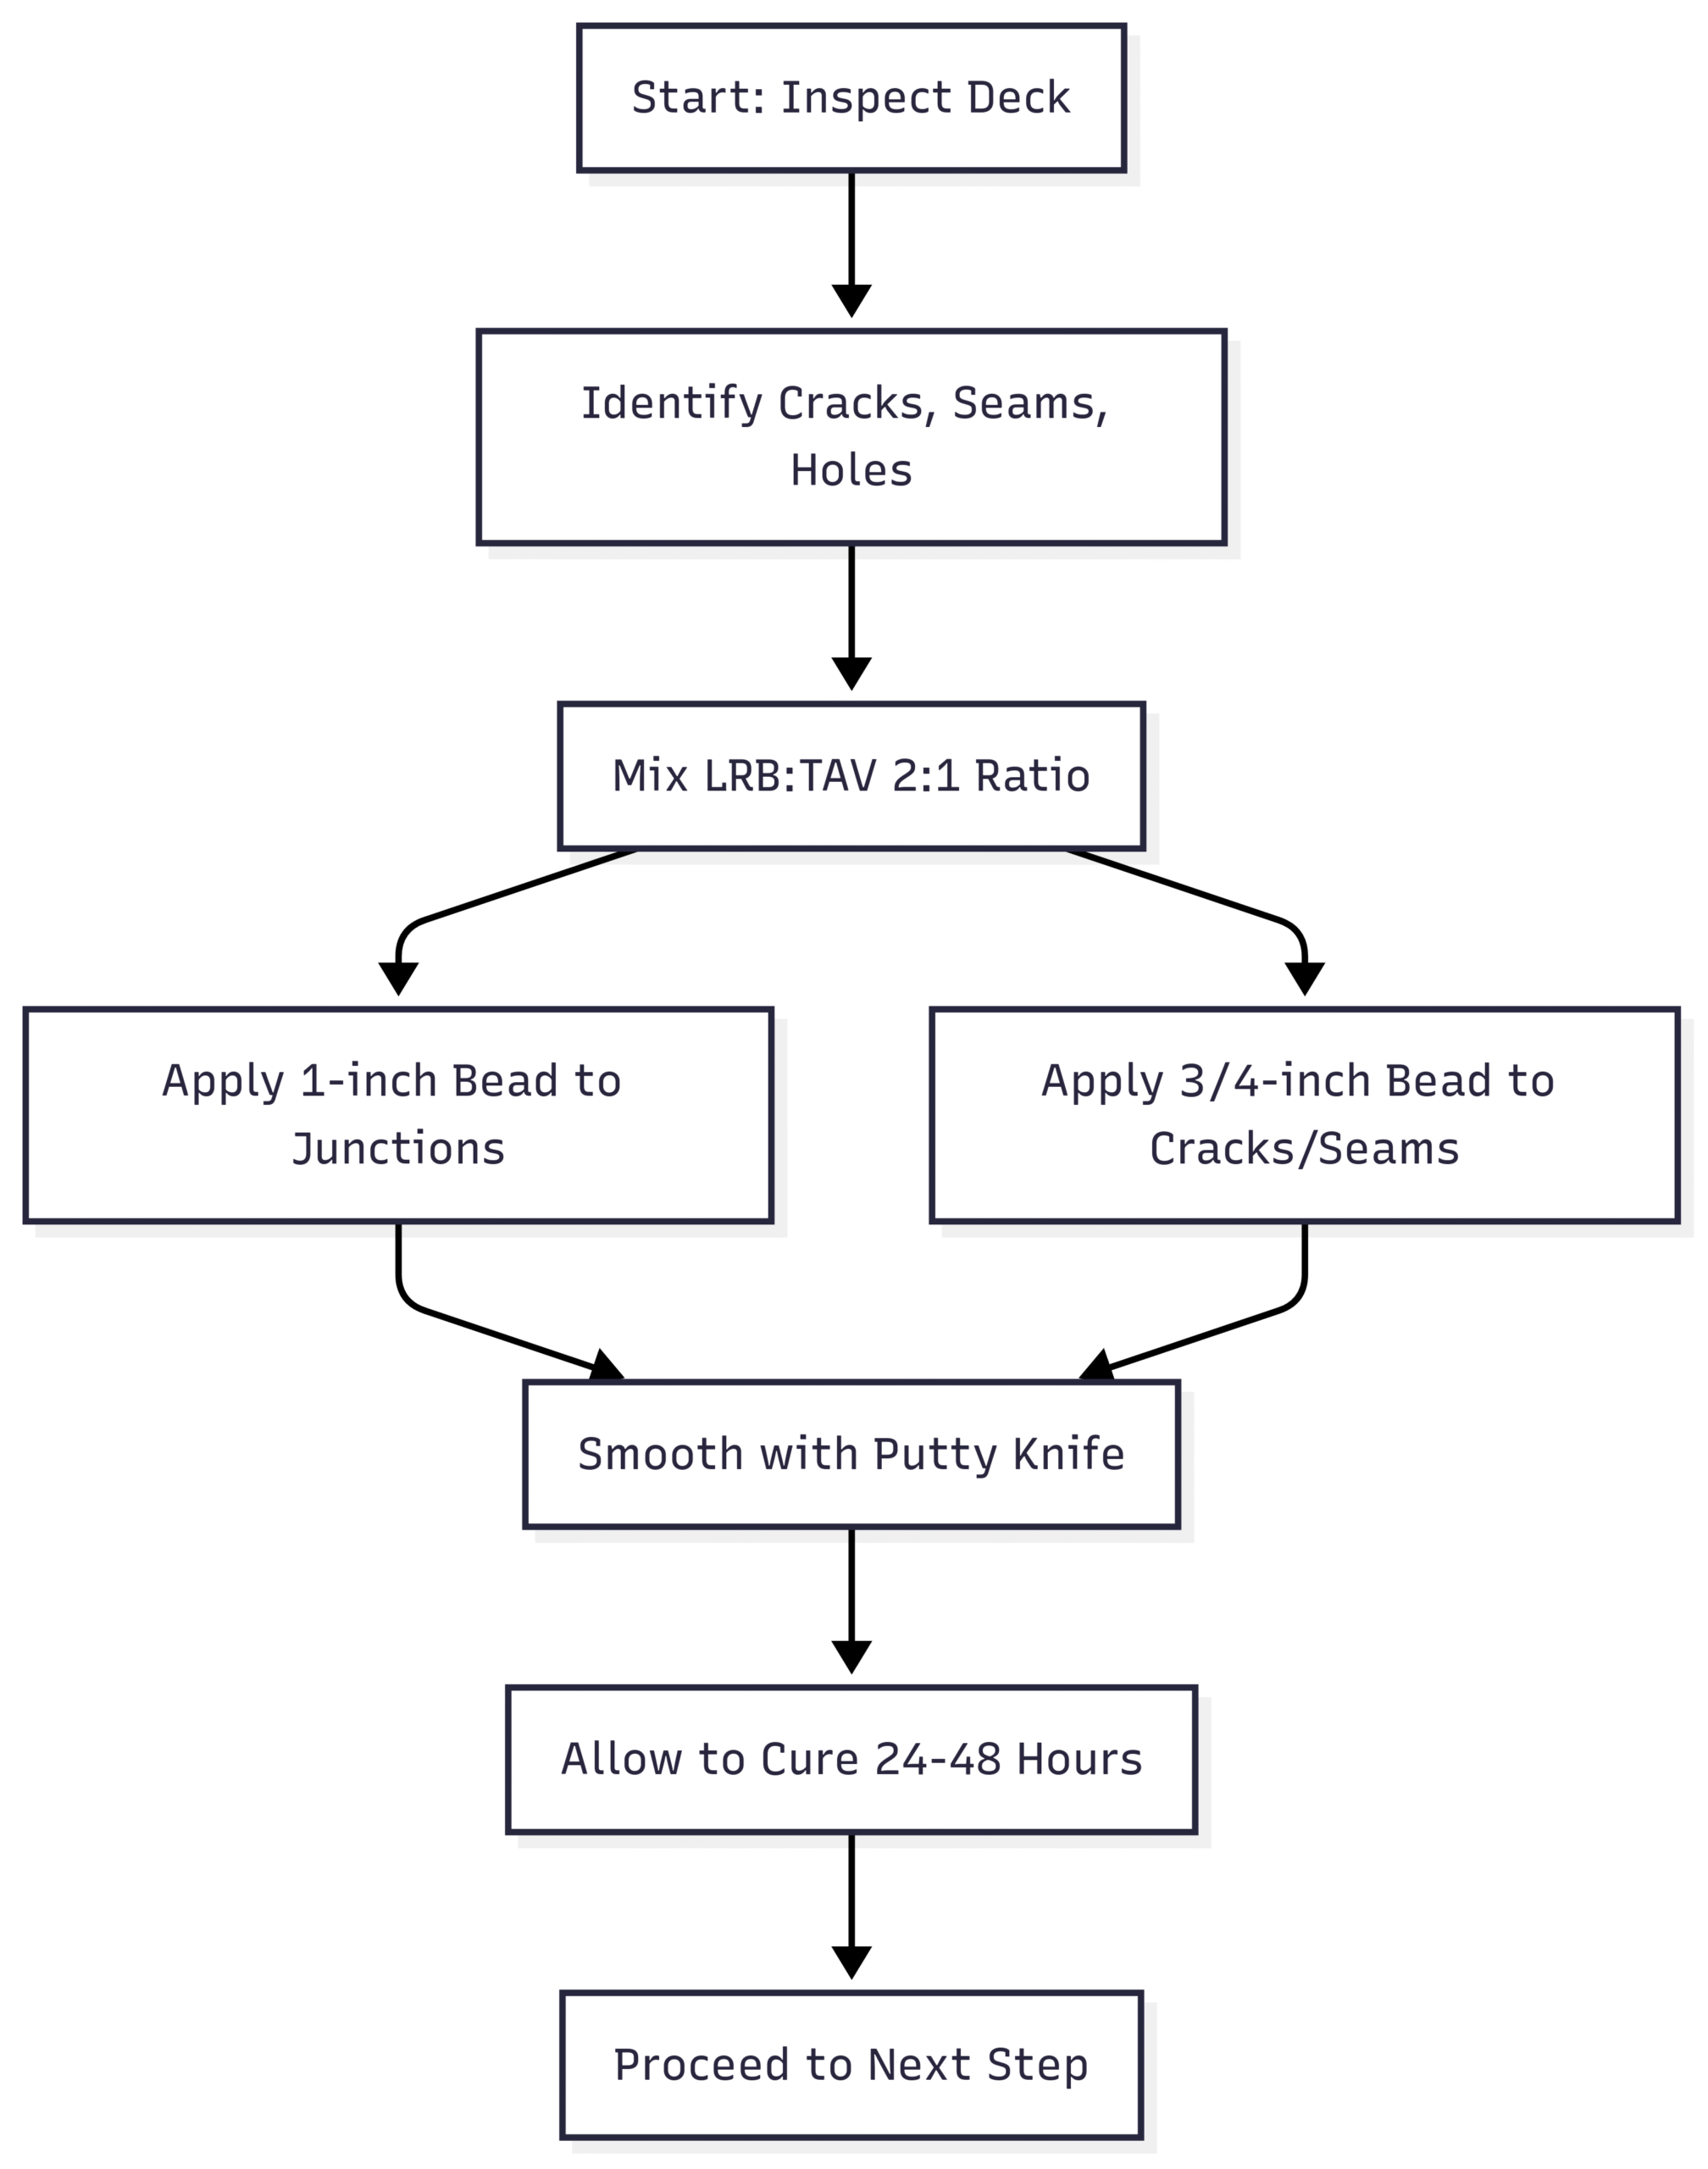
Step 3: Patch Cracks and Imperfections
Cracks, seams, and holes in the deck can compromise the waterproofing and structural integrity of the surface. Patching these imperfections creates a smooth, uniform base for the sealant.
- Prepare the Mixture: Use a combination of Liquid Rubber Base (LRB) and Thickening Activator (TAV) in a 2:1 ratio to create a caulk-like consistency. This mixture, as recommended by SANI-TRED®, bonds molecularly with the primer for a seamless repair.
- Application:
- For wall/floor junctions, apply a 1-inch diameter bead of the LRB/TAV mixture.
- For cracks and seams, use a 3/4-inch diameter bead.
- Smooth the mixture with a putty knife to ensure even coverage and a professional finish.
- Curing: Allow the mixture to cure fully, typically 24-48 hours, depending on temperature and humidity. The LRB can also be used alone to level horizontal surfaces or coat vertical areas, providing versatility for different deck types.
Chart: Below is a visual representation of the patching process using a flowchart:
Pro Tip: Ensure the deck is dry before patching, as moisture can prevent proper curing. As one boater, “AdamKirchman,” advised, “Make sure the wood is good and dry” before applying any sealant or filler.
Step 4: Broadcast Rubber Granules
Creating a non-skid surface is essential for safety on a boat deck, especially when wet. Broadcasting rubber granules onto a wet primer layer adds texture and enhances grip.
- Apply Primer: Apply another coat of PermaFlex at 240 square feet per gallon. Work in small sections to ensure the primer remains wet during granule application.
- Broadcast Granules:
- Use standard rubber granules (1/16 inch) at a rate of 0.175 pounds per square foot or smaller granules at 0.25 pounds per square foot.
- Sprinkle the granules evenly over the wet primer, ensuring complete coverage.
- Curing and Cleaning: Allow the primer to cure (4-6 hours), bonding the granules in place. Remove excess granules by sweeping, blowing, or vacuuming to achieve a clean, uniform surface.
Table: Granule Application Rates
| Granule Size | Application Rate (pounds/sq.ft) | Coverage Area (sq.ft/gallon of PermaFlex) |
|---|---|---|
| Standard (1/16 inch) | 0.175 | 240 |
| Small | 0.25 | 240 |
Why It Matters: The granules create a slip-resistant surface, critical for safety on wet decks. A boater, “flounderpounder225,” praised Starbrite’s non-skid cleaner for leaving a stain-resistant, textured surface, highlighting the importance of texture in deck maintenance.
Step 5: Apply Liquid Rubber Base (LRB)
The Liquid Rubber Base (LRB) forms the primary waterproof layer, encapsulating the granules and providing a durable barrier against water and UV damage.
- Application:
- For standard granules, apply LRB at 60 square feet per gallon.
- For smaller granules, apply at 80 square feet per gallon.
- Use a roller for even coverage, applying more LRB for a smoother finish or less for a more textured surface.
- Curing: Allow the LRB to cure until it’s walkable, typically 24-48 hours, depending on environmental conditions.
Pro Tip: Adjust the LRB application based on your desired texture. Boaters like “KDM” recommend products like Orpine Soap/Wax for their durability and ease of application, suggesting that a well-applied base layer reduces future maintenance.
Step 6: Apply the Topcoat
The final topcoat seals the entire system, protecting it from UV rays, abrasion, and marine conditions. It also enhances the deck’s appearance.
- Application: Apply a final coat of PermaFlex at 240 square feet per gallon using a roller or brush. Ensure even coverage to maximize protection.
- Curing: Allow the topcoat to cure fully, typically 24 hours, before exposing the deck to water or heavy use.
Why It Matters: The topcoat provides UV resistance and durability, extending the life of the sealant. Boaters like “Striper In” noted that products like Starbrite leave a clean, durable finish after hosing, making maintenance easier.
Types of Boat Deck Sealants
Choosing the right sealant is critical for achieving a durable, effective seal. The three primary types of marine sealants are polyurethane, silicone, and polysulfide, each with specific applications and characteristics.
Polyurethane
- Characteristics: Polyurethane is a strong adhesive, ideal for permanent bonding. It’s highly durable but incompatible with most plastics.
- Applications: Use for hull/deck joints, through-hull fittings, and other permanent bonds.
- Price: Approximately $10-$20 per 10 oz tube (e.g., 3M 5200 Marine Adhesive/Sealant).
- Pros: Excellent adhesion, durable in harsh conditions.
- Cons: Not suitable for plastics, difficult to remove.
Silicone
- Characteristics: Easy to apply, highly chemical-resistant, and compatible with plastics. Leaves a residue that’s hard to remove.
- Applications: Ideal for isolating dissimilar metals and bedding plastic fittings.
- Price: Approximately $8-$15 per 10 oz tube (e.g., 3M Marine Grade Silicone Sealant).
- Pros: Flexible, chemical-resistant, plastic-compatible.
- Cons: Weaker adhesion, residue issues.
Polysulfide
- Characteristics: Versatile synthetic rubber sealant available in one- or two-part formulations. Bonds well to most surfaces but not plastics.
- Applications: Suitable for caulking teak decks, bedding wooden parts, and general sealing.
- Price: Approximately $15-$25 per 10 oz tube (e.g., 3M 101 Polysulfide Sealant).
- Pros: Versatile, durable, good adhesion.
- Cons: Longer curing time, not suitable for plastics.
Table: Sealant Comparison
| Sealant Type | Best For | Price (10 oz tube) | Pros | Cons |
|---|---|---|---|---|
| Polyurethane | Permanent bonds | $10-$20 | Strong adhesion, durable | Not plastic-compatible |
| Silicone | Dissimilar metals, plastics | $8-$15 | Easy to apply, chemical-resistant | Weaker adhesion, residue |
| Polysulfide | Teak decks, wood bedding | $15-$25 | Versatile, durable | Long curing time, not for plastics |
Expert Tips for Sealing Boat Decks
- Preparation is Critical: Ensure the deck is clean, dry, and free of old sealant. Use acetone or mineral spirits for thorough cleaning, as recommended by the Discover Boating team.
- Use Liberal Amounts: Apply sealants generously, especially around hardware and joints, to ensure a watertight seal. Follow manufacturer instructions for coverage rates.
- Work in a Ventilated Area: Marine sealants and cleaners emit strong fumes. Work outdoors or in a well-ventilated space to avoid health risks.
- Stock Cleaning Solvents: Keep mineral spirits, acetone, and kerosene on hand to remove excess sealant or spills. These solvents are effective for cleaning up mistakes quickly.
- Seal Regularly: Reapply sealant every 2-3 years to maintain protection. Regular maintenance prevents water intrusion and extends deck life.
- Consider Deck Material: For plywood decks, marine-grade plywood is preferred for its waterproof glue, but exterior plywood can suffice if sealed properly. Boaters like “Kudzupatch” suggest using oil-based paints like Tremclad for breathable protection, as epoxy can trap moisture if compromised.
Addressing Common Concerns: Plywood Decks
For boaters like “ballpythonjosh” rebuilding a 16 ft Sea Nymph, sealing plywood decks raises specific concerns, particularly about rot and condensation. Here are tailored recommendations:
- Marine vs. Exterior Plywood: Marine plywood uses waterproof glue, making it more resistant to moisture. However, it’s expensive ($50-$100 per 4×8 sheet). Exterior plywood ($30-$50 per sheet) can be used if sealed properly but may not last as long. Boaters like “Kudzupatch” caution that American-made Douglas fir plywood has declined in quality, so source high-grade materials.
- Epoxy vs. Paint: Epoxy, like polyester resin thinned with styrene, can deeply penetrate plywood, creating a waterproof barrier. A boater, “HeinzThorvald,” recommends thinning resin 50/50 with styrene, applying it, and adding a layer of 1708 fiberglass cloth for durability. However, epoxy can trap moisture if compromised, as noted by an upholsterer who warned about staple holes drawing water into the wood. Alternatively, oil-based paints like Tremclad ($20-$30 per gallon) allow moisture to escape, reducing rot risk.
- Alternative Approach: For cost-effective sealing, consider the original Sea Nymph method: treated plywood bonded with urethane glue (e.g., Gorilla Glue, $10-$15 per bottle) and covered with breathable AstroTurf ($10-$20 per square yard). This approach, endorsed by “mctaggert,” is durable and hides imperfections.
Table: Plywood Sealing Options
| Method | Materials | Cost Estimate | Pros | Cons |
|---|---|---|---|---|
| Epoxy + Fiberglass | Polyester resin, styrene, 1708 fiberglass | $100-$200 for 16 ft deck | Deep penetration, durable | Traps moisture if compromised |
| Oil-Based Paint | Tremclad or similar | $20-$30/gallon | Breathable, easy to touch up | Less waterproof than epoxy |
| Treated Plywood + AstroTurf | Treated plywood, urethane glue, AstroTurf | $50-$100 | Cost-effective, breathable | Less durable long-term |
Recommended Products and Prices
Based on community feedback and industry standards, here are top products for sealing and cleaning boat decks:
- Starbrite Non-Skid Deck Cleaner with PTEF: $15-$20 per 32 oz. Cleans and seals in one step, highly effective for stain resistance.
- Woody Wax: $25-$30 per 16 oz. Provides a non-slick coating, ideal for splatter-finish decks.
- Orpine Soap/Wax: $60-$70 per gallon (mix 1 oz with 3 gallons water). Long-lasting, versatile for boats and vehicles.
- SANI-TRED PermaFlex: $100-$150 per gallon. Durable primer and topcoat for marine applications.
- SANI-TRED LRB/TAV: $120-$180 per gallon (combined). Waterproof base and patching mixture.
- 3M 5200 Polyurethane Sealant: $10-$20 per 10 oz tube. Ideal for permanent bonds.
- 3M Marine Grade Silicone Sealant: $8-$15 per 10 oz tube. Best for plastics and dissimilar metals.
- 3M 101 Polysulfide Sealant: $15-$25 per 10 oz tube. Versatile for teak and wood.
Conclusion
Sealing your boat deck is a manageable project that significantly enhances your vessel’s durability, safety, and appearance. By following the six-step process—preparing the deck, priming, patching cracks, broadcasting granules, applying a liquid rubber base, and adding a topcoat—you can achieve a professional-grade finish that withstands marine conditions. Choosing the right sealant, whether polyurethane, silicone, or polysulfide, depends on your deck material and specific needs. Regular maintenance, such as cleaning with Starbrite or Orpine and resealing every 2-3 years, keeps your deck in top condition.
For plywood decks, weigh the pros and cons of epoxy versus breathable coatings like paint, and consider cost-effective options like treated plywood with AstroTurf. With the right products and techniques, you can reduce maintenance efforts and enjoy a clean, durable deck for years to come. Start your sealing project today and sail with confidence, knowing your boat is protected by the best sealing practices and products available.
Happy Boating!
Share How to Seal Your Boat Deck in 6 Simple Steps with your friends and leave a comment below with your thoughts.
Read 9 Tips for Keeping Your Baby Safe on a Boat until we meet in the next article.