Q&A: How to Drain Antifreeze from Boat Engine
Learn how to drain antifreeze from a boat engine safely and efficiently. Step-by-step guide with tips, tools, and disposal methods for marine engines.
Properly draining antifreeze from a boat engine is a critical maintenance task, especially for winterizing or performing routine coolant changes. This process ensures the engine remains protected from corrosion, freezing, and overheating, extending its lifespan. Whether you own a vessel with a closed (fresh water) or raw water cooling system, this guide provides a detailed, step-by-step approach to draining antifreeze, flushing the system, and refilling it with fresh coolant. We’ll also cover tools, safety measures, environmental considerations, and expert tips to avoid common pitfalls.
Understanding Boat Engine Cooling Systems
Boat engines typically use one of two cooling systems: raw water cooling or closed (fresh water) cooling.
- Raw Water Cooling: Draws water directly from the surrounding environment (lake, river, or sea) to cool the engine. This system requires antifreeze for winterization to prevent freezing in cold climates.
- Closed Cooling: Uses a heat exchanger to circulate antifreeze within the engine, similar to an automobile. The antifreeze is cooled by raw water passing through the exchanger. This system requires periodic coolant changes to maintain corrosion protection and thermal efficiency.
Understanding your engine’s cooling system is crucial, as it dictates the draining and flushing process. Consult your boat’s manual to confirm the system type, coolant capacity, and specific drain locations. Common engines discussed in forums, such as the Mercruiser 454 or PCM M5, often feature closed cooling systems with specific drain points.
Why Drain Antifreeze?
Draining antifreeze serves several purposes:
- Winterization: In cold climates, draining and replacing antifreeze prevents freezing, which can crack the engine block or damage components.
- Corrosion Protection: Antifreeze contains inhibitors that prevent rust and corrosion. Over time, these inhibitors degrade, necessitating a coolant change.
- System Maintenance: Flushing removes debris, salt, or old coolant, ensuring optimal engine performance.
- Environmental Compliance: Properly draining and disposing of antifreeze prevents environmental harm, as it is toxic to aquatic life.
Manufacturers like PCM recommend changing coolant every two years for standard antifreeze or five years for extended-life coolants like DEX-COOL. Neglecting this can lead to overheating, corrosion, or costly repairs.
Tools and Materials Needed
Before starting, gather the following:
- Tools:
- Screwdriver or wrench (for drain plugs)
- Pliers (for hose clamps)
- Shop vacuum or wet/dry vacuum (for suction)
- Drill-driven pump or syphon pump
- Funnel
- PVC tubing and rubber couplings (for custom drainage)
- Refractometer (to test coolant strength, ~$20-$70)
- Coolant system pressure tester (optional, ~$80)
- Materials:
- Antifreeze (propylene glycol for marine use, e.g., West Marine Engine Antifreeze, $35/gallon)
- Distilled water (for mixing 50/50 coolant)
- Containers (5-gallon buckets or diesel cans for collecting coolant)
- Gloves and safety glasses
- Rags and absorbent pads
- Optional:
- Winterizing kit
- Vent valves (for bleeding air)
Antifreeze Specifications and Pricing
| Brand/Product | Type | Price | Features |
|---|---|---|---|
| West Marine Engine Antifreeze | Propylene Glycol | $35/gallon | Non-toxic, marine-safe, mix 50/50 with distilled water |
| Indmar Antifreeze | Propylene Glycol | $50/gallon | OEM-specified, corrosion inhibitors |
| DEX-COOL (Orange) | Extended-Life | $20-$30/gallon | 5-year change interval, automotive-grade |
| Ford Super Premium | Extended-Life | ~$37/20 liters | 10-year life, not suitable for copper/brass components |
Note: Always use propylene glycol-based antifreeze for marine applications, as ethylene glycol is toxic and harmful to aquatic environments. Check your manual for compatibility.
Step-by-Step Guide to Draining Antifreeze
Step 1: Preparation
- Consult the Manual: Review your engine’s manual for specific drain plug locations, coolant capacity, and recommended antifreeze type. For example, Mercruiser 454 engines have block drains above the oil pan, while PCM M5 engines may use knock sensors as drain points.
- Safety First: Wear gloves and safety glasses. Antifreeze is toxic and can irritate skin or eyes.
- Position the Boat: Elevate the bow to encourage coolant to flow toward rear drain points. This is especially helpful for closed cooling systems.
- Gather Containers: Place 5-gallon buckets or diesel cans under drain points to capture coolant. Use absorbent pads to prevent bilge contamination.
Step 2: Locate and Open Drain Points
Boat engines have multiple components that hold coolant. Common drain points include:
- Engine Block: Drains are typically located just above the oil pan, near the center of the engine. On Mercruiser 454s, look for two block drains. On PCM M5 engines, knock sensors may serve as drain points.
- Exhaust Manifolds: Drains are at the bottom or back of the manifolds. In closed cooling systems, antifreeze may circulate through these, requiring drainage.
- Heat Exchanger: For closed cooling systems, remove the end caps or check for a low drain plug. This is critical to avoid residual coolant.
- Riser Elbows: In some systems, antifreeze flows through riser elbows, which may need draining.
- Calorifier/Water Heater: If connected to the cooling system, check for drain points or flush separately to avoid airlocks.
If drain plugs are inaccessible (common on older engines like the 1988 Chris Craft), consider alternative methods like disconnecting hoses or using a shop vacuum.
Step 3: Drain the System
- Open Drain Plugs: Use a screwdriver or wrench to open plugs. Allow coolant to flow into containers. If plugs are stuck, apply penetrating oil and gently tap to loosen.
- Disconnect Hoses: For hard-to-reach areas, disconnect the lowest hose (e.g., from the heat exchanger to the circulating pump). Manipulate the hose to direct coolant into a container.
- Use a Shop Vacuum: For inaccessible drains, insert a shop vacuum hose into the manifold or heat exchanger to suck out coolant. This method minimizes bilge contamination.
- Custom Drainage: Attach PVC tubing with rubber couplings to direct coolant from the thermostat housing or water pump bypass into buckets, as described by user Mulletwagon.
Step 4: Flush the System (Optional)
Flushing removes salt, debris, or old coolant, especially for raw water systems or when switching antifreeze types.
- Fresh Water Flush:
- Disconnect the hose from the sea strainer to the engine.
- Use a garden hose to flush fresh water through the system until the output runs clear.
- For closed systems, disconnect at the thermostat housing and direct water to the heat exchanger, collecting runoff in buckets.
- Distilled Water Flush:
- Flush with 1-2 gallons of distilled water to remove residual contaminants.
- Blow out excess water using lung pressure or a compressor for raw water systems.
- Antifreeze Flush (Winterization):
- Pour 2 gallons of propylene glycol-based antifreeze into the raw water intake using a funnel.
- Start the engine briefly to circulate antifreeze through the heat exchanger and exhaust, expelling residual water.
Step 5: Refill the System
- Close Drains: Reinstall plugs and reconnect hoses, ensuring tight seals to prevent leaks.
- Add Antifreeze:
- For closed systems, pour half the engine’s coolant capacity (per the manual) in full-strength antifreeze through the heat exchanger or reservoir. Top off with distilled water for a 50/50 mix.
- For raw water systems, introduce antifreeze via the sea strainer or a winterizing kit.
- Bleed the System:
- Run the engine to operating temperature to circulate coolant and expel air.
- Top off the reservoir to the “cold” line with a 50/50 mix. Repeat 2-3 times until the system is full.
- For calorifier circuits, loosen joints or use vent valves to release airlocks.
- Test Coolant Strength: Use a refractometer to verify the antifreeze concentration (target 30-50% for corrosion protection).
Step 6: Dispose of Old Antifreeze
Antifreeze is hazardous and must be disposed of responsibly:
- Local Recycling Centers: Many accept used antifreeze (check https://www.gov.uk/hazardous-waste-disposal for locations).
- Boatyards: Some marinas take used coolant, especially if you purchase fuel or services.
- Avoid Bilge Dumping: Never let antifreeze drain into the bilge or watercourse, as it’s toxic to aquatic life.
- Clean Containers: If reusing diesel cans, flush with water and detergent to remove antifreeze residue before storing fuel.
Common Challenges and Solutions
Inaccessible Drain Plugs
- Solution: Use a shop vacuum to suck coolant from the manifold or heat exchanger. Alternatively, disconnect the lowest hose and direct it into a container. User Mulletwagon successfully used a vacuum tank at the thermostat housing to pull 5 quarts without bilge contamination.
Airlocks
- Solution: Install vent valves at high points (e.g., calorifier feed/return). Run the engine and top off the reservoir multiple times to purge air. Loosen joints sparingly to release trapped air.
Environmental Concerns
- Solution: Use absorbent pads and containers to capture all coolant. If some spills into the bilge, use a drill-driven pump or wet vacuum to remove it. Dispose at certified facilities.
Mixing Old and New Coolant
- Solution: For a partial change, drain the heat exchanger and top off with fresh coolant, as user Nitrousbird does. For a full purge (e.g., switching to DEX-COOL), flush thoroughly with water to avoid dilution.
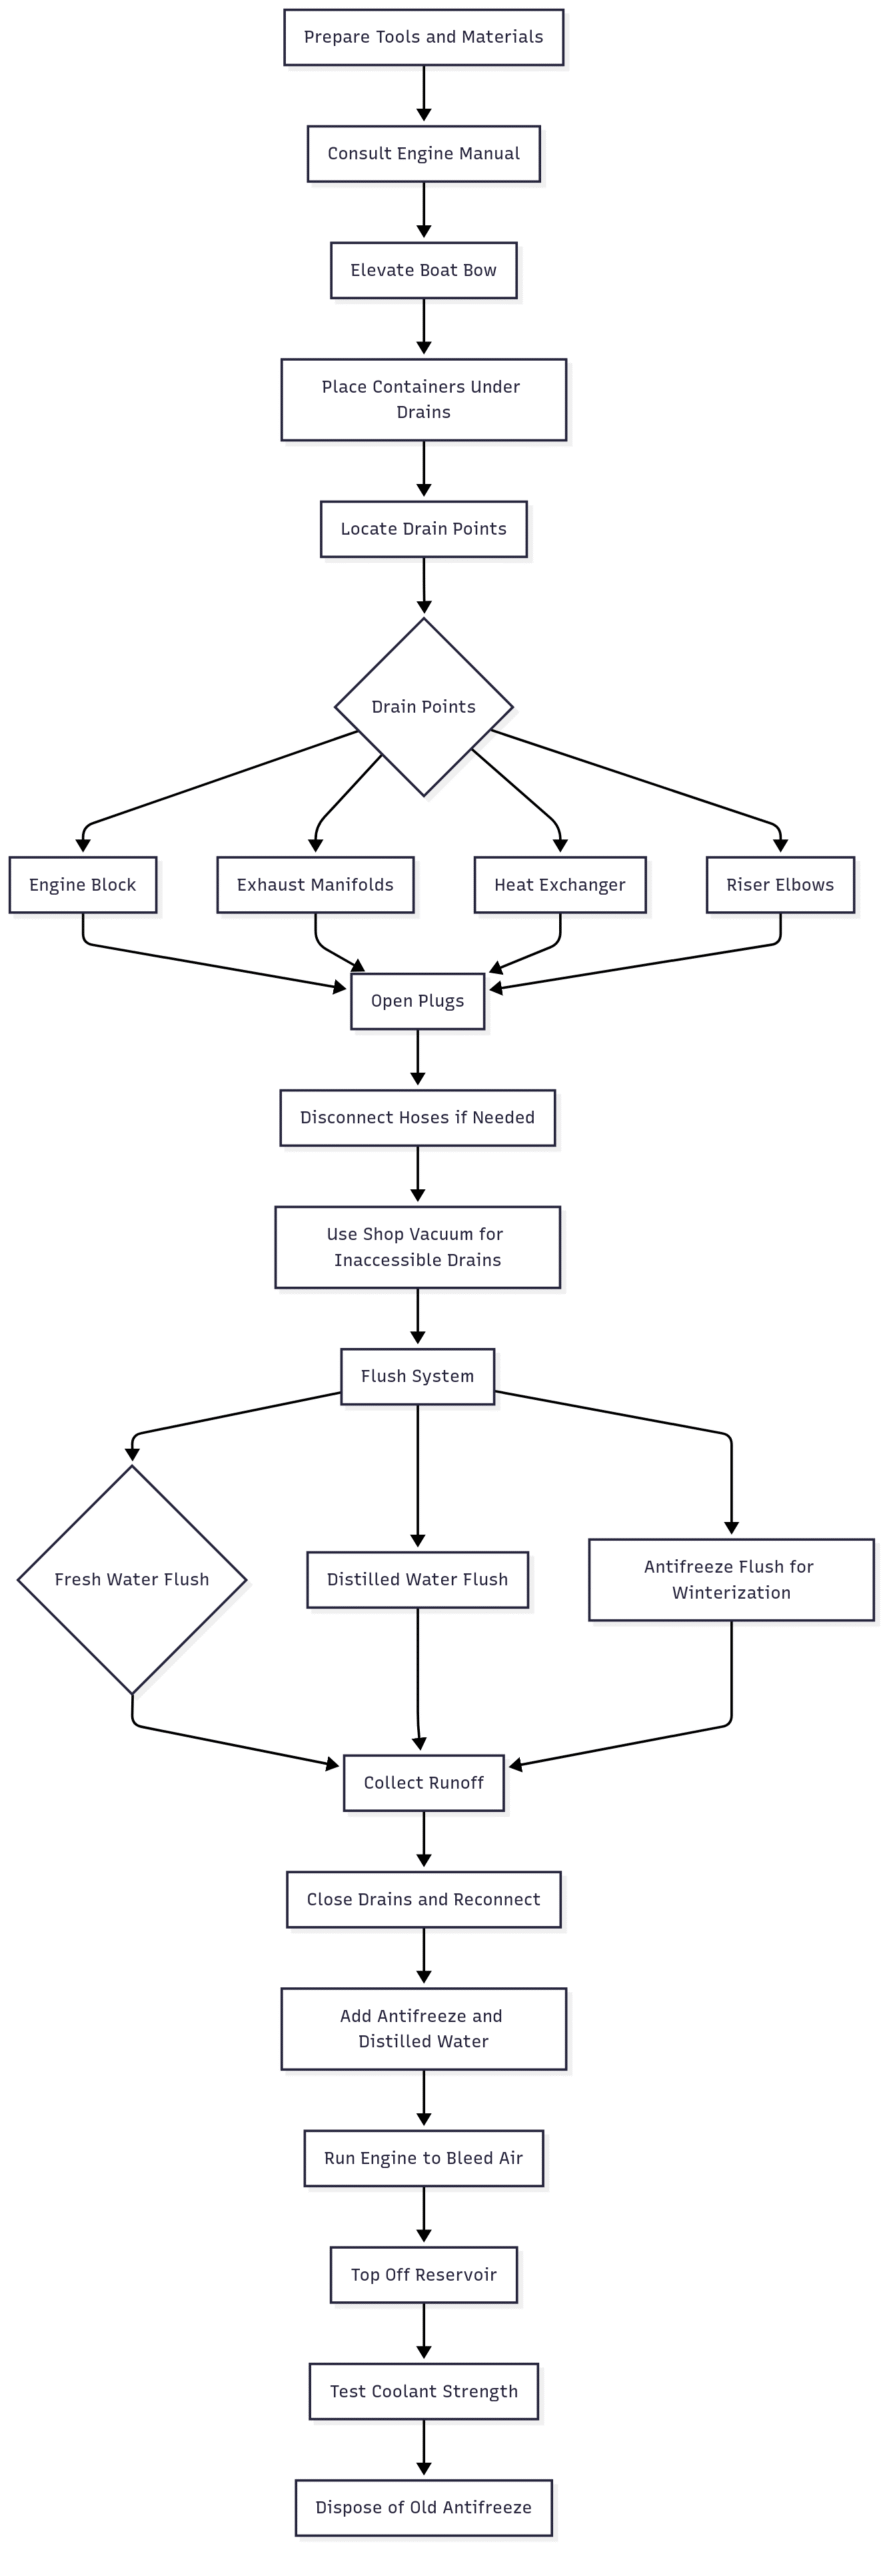
Chart: Coolant Drainage Process

Expert Tips
- Check Coolant Regularly: Use a refractometer ($20-$70 on Amazon) to monitor antifreeze strength, especially in warm climates where corrosion protection is key.
- Use Marine-Grade Antifreeze: Propylene glycol-based products like West Marine’s coolant ($35/gallon) are safer for the environment and compatible with marine engines.
- Avoid Over-Draining Calorifiers: Unless changing antifreeze types, let the calorifier circuit drain naturally to avoid airlocks, as advised by Tony Brooks.
- Invest in a Coolant Pressure Tester: Tools like the one recommended by Nitrousbird (~$80) simplify bleeding and can diagnose leaks early.
- Plan for Dilution: Add half the engine’s coolant capacity in full-strength antifreeze, then top with distilled water to ensure at least a 50/50 mix, accounting for residual water.
Maintenance Schedule
| Task | Frequency | Notes |
|---|---|---|
| Check Coolant Strength | Annually | Use refractometer to ensure 30-50% concentration |
| Drain and Replace Coolant | Every 2 years (standard) or 5 years (DEX-COOL) | Follow manual recommendations |
| Flush System | As needed | Required for winterization or when switching coolant types |
| Inspect for Leaks | Annually | Use pressure tester or visual inspection |
Conclusion
Draining antifreeze from a boat engine is a manageable DIY task with the right tools and knowledge. By following this guide, you can safely drain, flush, and refill your engine’s cooling system while minimizing environmental impact. Whether you’re winterizing a raw water system or maintaining a closed cooling system, attention to detail and proper disposal are key. Always consult your engine’s manual for specific guidance, and don’t hesitate to seek professional help if unsure. With regular maintenance, your boat’s engine will stay protected and perform reliably for years to come.
Happy Boating!
Share Q&A: How to Drain Antifreeze from Boat Engine with your friends and leave a comment below with your thoughts.
Read How to De Winterize an Outboard Motor (2-vs-4-Stroke) until we meet in the next article.


Thanks for sharing. I read many of your blog posts, cool, your blog is very good.