How To Change your Boat’s Lower Unit Oil
Learn how to change your boat’s lower unit oil with our detailed guide. Step-by-step instructions, tools, and tips for outboard maintenance.
Maintaining your boat’s outboard motor is critical for ensuring its longevity and performance on the water. One of the most essential maintenance tasks is changing the lower unit oil, which lubricates the gears and bearings in the lower unit of the outboard motor. Neglecting this task can lead to gear wear, corrosion, and costly repairs. This guide provides a detailed, step-by-step process for changing your boat’s lower unit oil, tailored for both novice and experienced boat owners. We’ll cover the tools and materials needed, the procedure for two-screw and three-screw systems, how to choose the right oil, and additional maintenance tips to keep your outboard in top condition.
Why Changing Lower Unit Oil Matters
The lower unit of an outboard motor houses the gears that transfer power from the engine to the propeller. These gears operate under high pressure and are submerged in water, making proper lubrication essential to prevent wear and corrosion. Over time, the oil in the lower unit can break down, become contaminated with water or metal particles, or lose its viscosity, reducing its effectiveness. Regularly changing the lower unit oil—typically every 100 hours of operation or annually, as recommended by most manufacturers—ensures smooth operation, prevents damage, and extends the life of your outboard motor.
Signs Your Lower Unit Oil Needs Changing
- Milky or Creamy Oil: Indicates water intrusion, which can lead to corrosion.
- Gray or Gritty Oil: Suggests gear or bearing wear, requiring immediate attention.
- Burnt Smell: Indicates overheating or oil breakdown.
- Metal Chunks: Visible metal fragments in the drained oil signal severe internal damage.
If you notice any of these signs, consult a marine mechanic after changing the oil to address underlying issues.
Tools and Materials Needed
Before starting, gather the necessary tools and materials to ensure a smooth process. Using the right equipment minimizes mess and ensures the job is done correctly.
Essential Tools
- Large Flathead Screwdriver: For removing and tightening drain and vent plug screws.
- Lower Unit Oil Pump: Fits standard quart bottles or tubes for filling the lower unit.
- Drain Pan: To catch used oil during draining.
- Clean Rags: For wiping spills and cleaning the lower unit.
- Disposable Gloves: Mechanix Wear or similar for hand protection.
- Container for Used Oil: For transporting used oil to a recycling center.
- Manual Impact Screwdriver (Optional): Useful for removing stuck screws, available for under $10 at hardware stores.
- Heat Gun (Optional): For loosening corroded screws.
Essential Materials
- Lower Unit Oil: Manufacturer-recommended gear lube, such as West Marine Synthetic Blend, Quicksilver, or Sierra. Check your owner’s manual for specifications (e.g., API GL5 SAE 80 or 90 weight).
- Replacement O-Rings/Sealing Washers: For drain and vent plugs to prevent leaks.
- Marine-Grade Anti-Seize Compound: To coat plug screws for easier future removal.
Recommended Lower Unit Oils
| Brand | Type | Compatibility | Approx. Price (Quart) |
|---|---|---|---|
| West Marine Synthetic Blend | Synthetic | Meets all manufacturer specs | $15–$20 |
| Quicksilver High Performance | Synthetic | Mercury, most modern outboards | $18–$25 |
| Sierra Premium | Mineral-based | Universal, budget-friendly | $10–$15 |
| Chevron Premium Type C | Specialty | Older Johnson/Evinrude (1962–72) | $12–$18 |
Note: Always consult your owner’s manual for the exact oil type and viscosity. For example, older Johnson/Evinrude outboards with electric shift require Premium Type C Lube.
Oil Capacity by Outboard Model
The amount of oil needed varies by outboard model. Below is a table for Tohatsu outboards, with approximate fluid ounces required:
| Model | Approx. Fluid Ounces |
|---|---|
| 2.5 & 3.5 (4-stroke) | 6.1 fl oz |
| 5 (2-stroke & 4-stroke) | 6.6 fl oz |
| 9.8 (2-stroke & 4-stroke) | 10.8 fl oz |
| 15 (2-stroke) | 12.5 fl oz |
| 25 (2-stroke) | 14.5 fl oz |
| 40D (3-cylinder, 2-stroke) | 16.9 fl oz |
| 70C (3-cylinder, 2-stroke) | 30.4 fl oz |
| BFT115 & BFT150 (4-stroke) | 33.0 fl oz |
| BFT200 & BFT225 (4-stroke) | 39.7 fl oz |
For other brands like Mercury, Yamaha, or Suzuki, refer to the owner’s manual or manufacturer’s website for exact capacities.
Step-by-Step Guide to Changing Lower Unit Oil
The process for changing lower unit oil is straightforward but requires attention to detail. Below, we outline the steps for both two-screw and three-screw lower unit systems, as some outboards (e.g., 2005 Mercury 125hp 2-stroke) have an additional oil level screw.
Preparation
- Position the Boat: Ensure the boat is on a level surface, either on a trailer or in the water. Tilt the outboard to the down (vertical) position to allow proper draining.
- Locate the Plugs: Identify the drain plug (bottom of the lower unit), vent plug (higher up, often above the cavitation plate), and, if applicable, the oil level plug (midway on the lower unit for three-screw systems).
- Gather Supplies: Arrange all tools and materials within reach to avoid interruptions.
Draining the Old Oil
- Remove the Vent Plug: Use a flathead screwdriver to remove the upper vent plug first. This allows air to enter, facilitating oil flow. For three-screw systems, also remove the oil level plug.
- Remove the Drain Plug: Place a drain pan under the lower unit. Carefully loosen the drain plug with a screwdriver, keeping pressure on it to prevent it from falling into the pan. Remove the plug and let the oil drain completely (5–10 minutes).
- Inspect the Oil: Check the drained oil for signs of contamination:
- Milky/Creamy: Water intrusion, likely from a damaged seal.
- Gray/Gritty: Gear or bearing wear.
- Metal Chunks: Severe damage; consult a mechanic.
Fine metal filings on the drain plug’s magnetic tip are normal, but clean them off.
Filling with New Oil
- Install the Oil Pump: Screw the oil pump adapter into the lower drain hole. Attach the pump to a quart bottle or tube of manufacturer-recommended gear lube.
- Pump New Oil: Slowly pump oil into the lower unit until it flows out of the vent plug hole (for two-screw systems) or the oil level plug hole (for three-screw systems), indicating the unit is full. Ensure the oil is free of air bubbles.
- Replace the Plugs:
- For two-screw systems: Install a new O-ring on the vent plug, coat it with anti-seize compound, and screw it into the vent hole while oil is still flowing. Remove the pump adapter and quickly install the drain plug with a new O-ring.
- For three-screw systems: Install the vent and oil level plugs first, then remove the pump and install the drain plug. This minimizes oil loss by creating a slight vacuum.
- Clean Up: Wipe any spilled oil from the lower unit with clean rags to prevent environmental contamination.
Final Steps
- Check Oil Level: For three-screw systems, verify the oil level by removing the oil level plug and inserting a wire 1 inch into the hole. If oil is present on the wire, the level is correct. If not, top off by repeating the filling process.
- Dispose of Used Oil: Transfer the used oil to a sealed container and take it to a recycling center or auto shop. Most quick-lube stations accept used oil for a small fee.
- Additional Maintenance:
- Grease zerk fittings on the motor mount pivot points.
- Inspect anodes (zinc for saltwater, aluminum for brackish, magnesium for freshwater) and replace if more than 50% dissolved.
- Remove the propeller to check for fishing line, clean the shaft, and apply fresh grease before reinstalling.
- Touch up nicks or worn paint with engine enamel or antifouling paint.
Chart: Lower Unit Oil Change Process
Below is a flowchart illustrating the oil change process for both two-screw and three-screw systems.
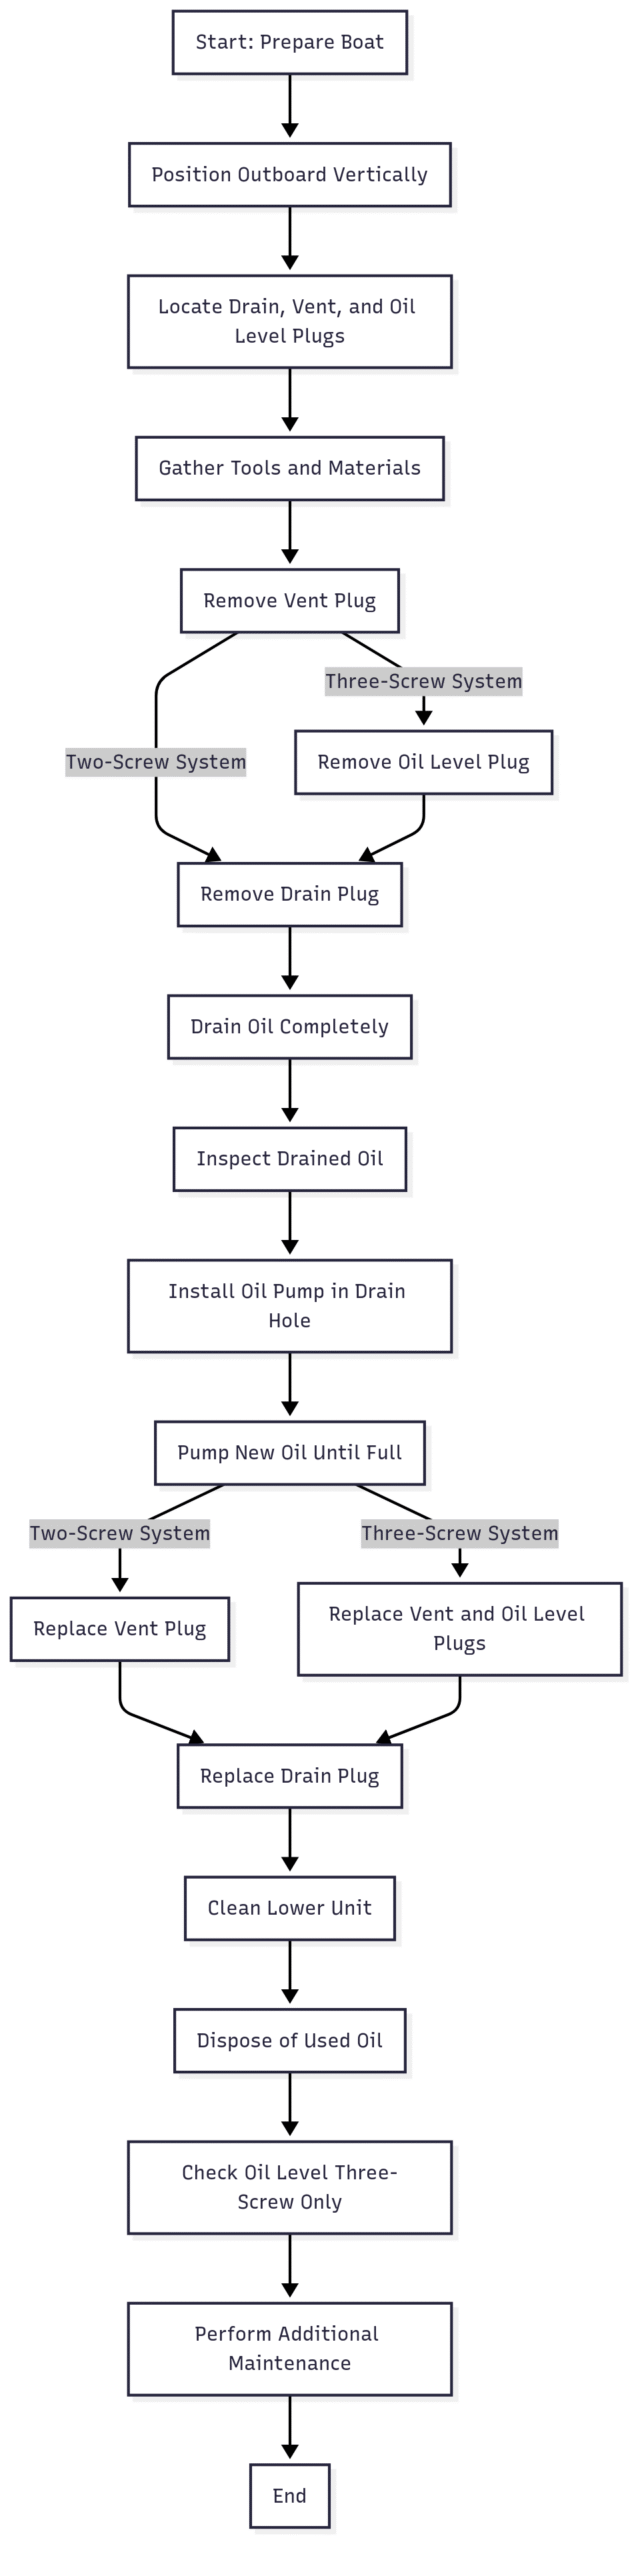
Two-Screw vs. Three-Screw Systems
Most outboards use a two-screw system (drain and vent plugs), but some, like the 2005 Mercury 125hp 2-stroke, feature a three-screw system with an additional oil level plug. The oil level plug serves as a marker for the correct oil fill level, while the vent plug allows air to escape during filling. The process for three-screw systems is similar, but you must remove both the vent and oil level plugs during draining and filling, and fill until oil flows from the oil level plug hole.
Common Challenges with Three-Screw Systems
- Confusion with Plug Roles: The vent plug is not for top-filling; always fill from the bottom drain hole.
- Airlock Prevention: Replace the vent and oil level plugs before removing the pump to minimize oil loss.
- Lack of Manual: If you don’t have a manual, search online for your specific model (e.g., “2005 Mercury 125hp lower unit oil change”) or check manufacturer websites.
Troubleshooting Common Issues
Stuck Drain Plug
Steel screws in aluminum housings can seize due to galvanic corrosion. Try these solutions:
- Apply penetrating oil (e.g., WD-40) and let it soak overnight.
- Use a manual impact screwdriver to loosen the screw with hammer strikes.
- Apply heat with a heat gun to expand the aluminum housing, but avoid overheating.
Avoid stripping the screw head, as drilling it out is time-consuming and complex.
Oil Contamination
If the drained oil is contaminated, take these steps:
- Milky Oil: Replace seals and pressure-test the lower unit to identify leaks.
- Gray or Metal Chunks: Have a mechanic inspect gears and bearings for damage.
- Low Oil Level: Check for leaks around seals or plugs and address before refilling.
Incorrect Oil Level
For three-screw systems, always verify the oil level after filling. If the level is low, top off by removing the bottom plug, adding oil, and rechecking.
Choosing the Right Lower Unit Oil
Selecting the correct oil is critical to avoid damaging your outboard. Always follow the manufacturer’s recommendations, typically found in the owner’s manual. Most modern outboards require API GL5 SAE 80 or 90 weight gear lube, but older models may need specialty oils like Premium Type C for Johnson/Evinrude electric shift models (1962–72).
Synthetic vs. Mineral-Based Oils
- Synthetic: Offers better performance under extreme conditions, longer lifespan, and improved corrosion resistance. Ideal for high-performance or frequently used outboards.
- Mineral-Based: More affordable, suitable for casual boaters with less frequent use.
Brand Recommendations
- Manufacturer’s Proprietary Lube: Always a safe choice, ensuring warranty compliance.
- West Marine/Pure Oceans: Meets all manufacturer specs, cost-effective.
- Sierra/Quicksilver: Widely available, reliable for most outboards.
Avoid mixing different oil brands or weights, as this can reduce lubrication effectiveness.
Environmental Considerations
Proper disposal of used oil is essential to protect the environment. Never pour used oil into the ground, water, or trash. Instead:
- Store used oil in a sealed container.
- Take it to a recycling center, auto shop, or quick-lube station.
- Check local regulations for hazardous waste disposal.
When cleaning the lower unit, use rags to wipe up spills and dispose of oil-soaked rags properly to prevent contamination.
Additional Maintenance Tips
While changing the lower unit oil, take the opportunity to perform these related tasks:
- Inspect Anodes: Replace if more than 50% dissolved to prevent corrosion.
- Check Propeller: Remove to inspect for fishing line, which can damage seals. Re-grease the shaft before reinstalling.
- Lubricate Pivot Points: Apply marine grease to zerk fittings for smooth operation.
- Touch Up Paint: Protect exposed metal with engine enamel or antifouling paint to prevent corrosion.
Conclusion
Changing your boat’s lower unit oil is a critical maintenance task that any boat owner can perform with the right tools and knowledge. By following this comprehensive guide, you can ensure your outboard motor remains in peak condition, avoiding costly repairs and extending its lifespan. Whether your outboard has a two-screw or three-screw system, the process is straightforward when approached methodically. Regular maintenance, including oil changes, anode checks, and propeller inspections, will keep your boat running smoothly for years to come.
For further assistance, consult your outboard’s owner’s manual or contact a marine mechanic for complex issues.
Share How To Change your Boat’s Lower Unit Oil with your friends and Leave a comment below with your thoughts.
Read How to Protect Boat Gelcoat from Fading and Oxidation? until we meet in the next article.