How to Change the Oil in Your Boat’s Engine
Learn how to change your boat’s engine oil with our step-by-step guide. Save money with DIY tips, costs, and essential supplies.
Maintaining your boat’s engine is critical to ensuring its longevity, performance, and reliability on the water. One of the most essential maintenance tasks is changing the engine oil, which lubricates moving parts, reduces friction, and prevents corrosion. Whether you’re a seasoned boater or a first-time owner, learning how to change your boat’s engine oil can save you money and keep your vessel in top condition. This guide provides a detailed, step-by-step process for performing an oil change, compares professional and DIY costs, and offers insights into best practices to keep your boat’s engine running smoothly.
Why Changing Your Boat’s Engine Oil Matters
Engine oil plays a vital role in maintaining the health of your boat’s engine, whether it’s an outboard, inboard, or inboard/outboard (I/O) model. Over time, oil degrades, collecting contaminants like dirt, metal particles, and water, which can harm internal components. Dirty oil left in an idle engine can also lead to corrosion, especially in marine environments where moisture is prevalent. Regular oil changes prevent engine wear, improve fuel efficiency, and reduce the risk of costly repairs.
Most boat manufacturers recommend changing the oil every 50 to 100 operating hours, though new boats may require more frequent changes, such as every 20 hours during the break-in period. Boats used infrequently need oil changes at least annually to prevent sludge buildup. By staying proactive, you protect your investment and ensure your boat is ready for every adventure.
Professional vs. DIY Oil Change: Cost and Considerations
When deciding whether to change your boat’s engine oil yourself or hire a professional, cost is a significant factor. Below, we break down the expenses and considerations for both options.
Professional Oil Change
Hiring a professional marine mechanic to change your boat’s engine oil typically costs between $160 and $300, depending on the boat type, engine size, and location. Some owners report higher costs, with services for larger engines or in high-cost areas like Seattle reaching up to $700 for a comprehensive 100-hour service that includes oil, filters, and gear lube.
Cost Breakdown:
- Labor: Marine mechanics charge $100 to $200 per hour, with an oil change typically requiring 1-2 hours.
- Parts: Oil and filters cost $50 to $100, depending on the engine type (e.g., a Yamaha 300 outboard requires about $175 in parts, while a Mercury 150 costs around $150).
- Additional Factors: Costs vary by region, shop rates, and whether the service includes extras like gear oil changes or impeller replacement. For example, a 300-hour service on a 250HP Mercury outboard can cost up to $2,700.
Pros:
- Expertise ensures the job is done correctly.
- Convenient for busy owners or those unfamiliar with engine maintenance.
- Shops often handle oil disposal, adhering to environmental regulations.
Cons:
- Significantly more expensive than a DIY oil change.
- Costs can escalate if additional services are recommended.
DIY Oil Change
Changing the oil yourself can save you $100 or more, with total costs ranging from $50 to $75 for supplies. The process takes about 1-2 hours, depending on your experience and engine accessibility.
Cost Breakdown:
- Oil: $30-$50, depending on the type (marine-grade synthetic or conventional) and quantity (4-8 quarts for most engines).
- Oil Filter: $10-$25, specific to your engine model.
- Additional Supplies: Absorbent pads, funnels, and an extractor pump (if needed) cost $10-$50, though many are reusable.
Pros:
- Significant cost savings.
- Greater control over the process and materials used.
- Builds familiarity with your boat’s engine.
Cons:
- Requires time, tools, and basic mechanical knowledge.
- Proper oil disposal is your responsibility.
- Risk of errors if not done correctly.
Table 1: Cost Comparison of Professional vs. DIY Oil Change
| Option | Cost Range | Time Required | Key Considerations |
|---|---|---|---|
| Professional | $160-$300 | 1-2 hours | Expertise, convenience, proper disposal |
| DIY | $50-$75 | 1-2 hours | Cost savings, requires tools and knowledge |
Is $300 a Fair Price for a Professional Oil Change?
For a new boat owner quoted $300 for an oil change, filter replacement, and gear oil service (as mentioned in a boating forum), the price is reasonable, if not a bargain, compared to industry norms. Feedback from experienced boaters suggests that $300 is on the lower end, especially for an outboard engine like a Mercury 150HP. Comprehensive services, particularly for larger engines or in high-cost regions, often exceed $500. However, costs can vary based on:
- Location: Urban areas or regions with limited marine services (e.g., small towns with a single shop) may have higher rates.
- Engine Type: Outboards are generally cheaper to service than inboards due to easier access.
- Additional Services: Gear oil changes or impeller replacements increase the bill.
If you’re pressed for time, $300 is a fair price for professional service, but learning to do it yourself can save money in the long run.
Essential Supplies for a DIY Oil Change
Before starting, gather the following supplies to ensure a smooth and environmentally responsible oil change:
- Manufacturer-Recommended Oil: Use marine-grade oil specified in your owner’s manual (e.g., 10W-30 or 25W-40 for most outboards). Expect to need 4-8 quarts.
- Oil Filter: Match the filter to your engine model for proper fit and performance.
- Oil Filter Wrench: Facilitates easy filter removal.
- Absorbent Pads: Prevents spills from contaminating the environment.
- Extractor Pump: Necessary for most boats, as space below the engine is often limited.
- Funnel: Ensures clean oil refilling.
- Container for Used Oil: A sealed container to collect and transport old oil for recycling.
- Gloves and Rags: For safety and cleanup.
Note: Always check your owner’s manual for specific oil types, quantities, and filter specifications to avoid damaging your engine.
Step-by-Step Guide to Changing Your Boat’s Engine Oil
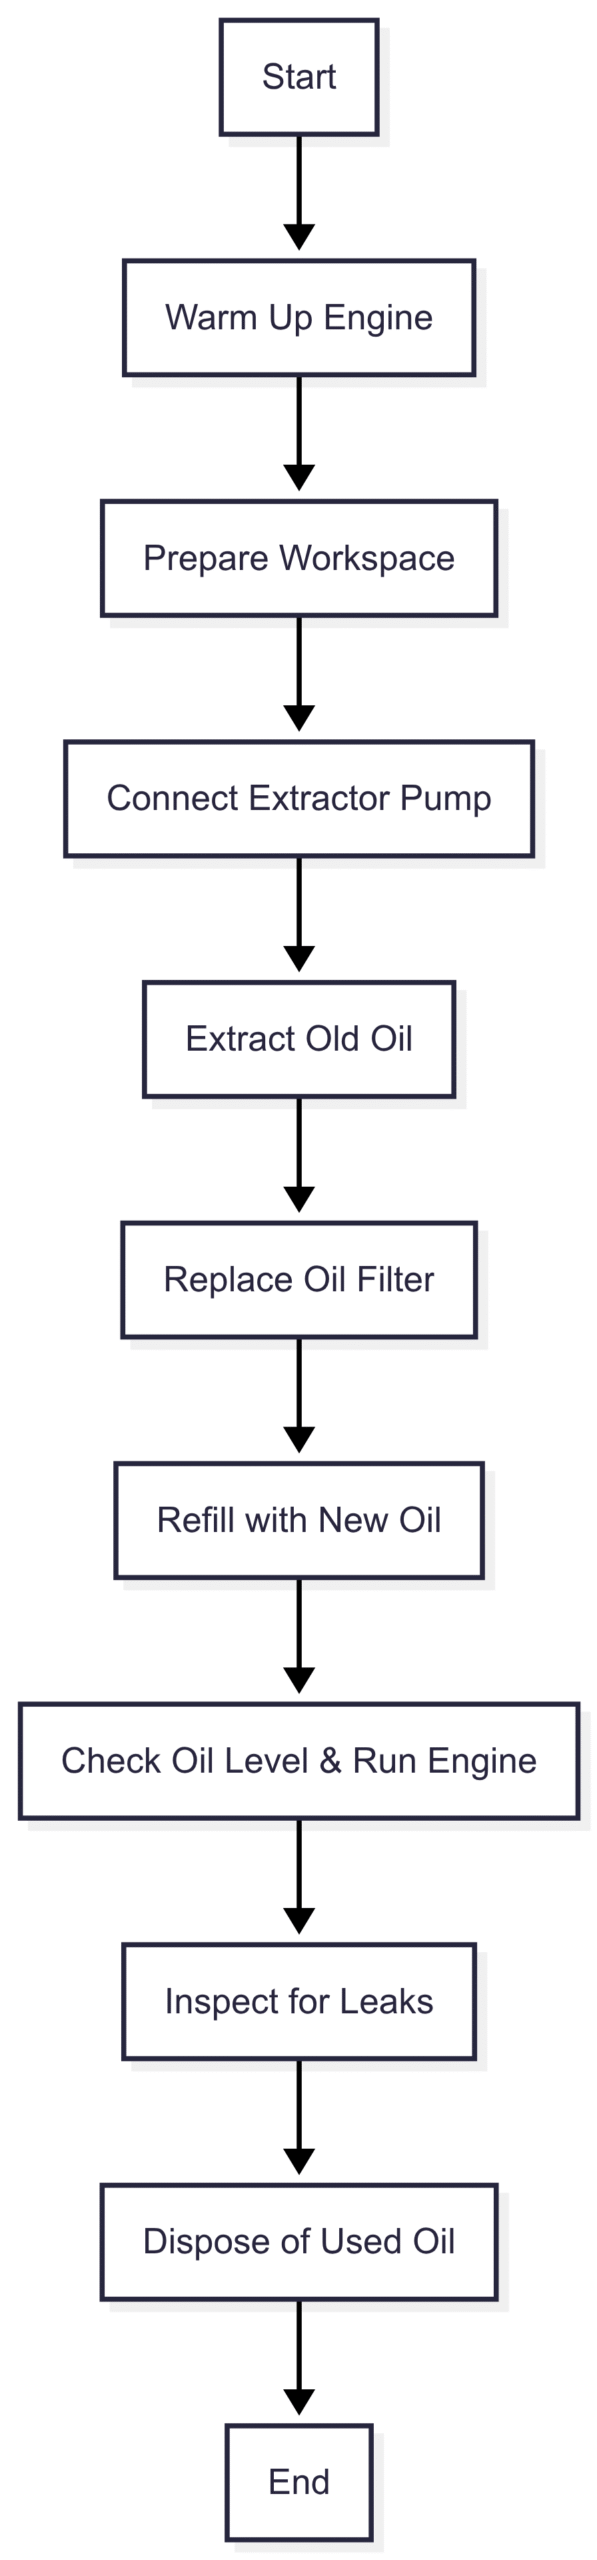
This guide focuses on the most common method for changing oil in a boat’s engine: using an extractor pump through the dipstick tube. This approach is cleaner and more practical for most boats, as accessing the drain plug is often challenging due to tight engine compartments. Follow these steps carefully, and always consult your owner’s manual for model-specific instructions.
Step 1: Warm Up the Engine
Run the engine for 5-10 minutes to warm the oil. Warm oil has lower viscosity, allowing it to flow more easily and carry contaminants like dirt and metal particles out of the engine. Be cautious not to overheat the engine, as hot oil can cause burns.
Step 2: Prepare the Workspace
Perform the oil change on land to prevent environmental contamination. Place absorbent pads under the engine to catch drips or spills. Remove the oil fill cap to equalize pressure, making it easier to pump out the oil. Ensure all supplies are within reach to streamline the process.
Step 3: Connect the Extractor Pump
Insert the extractor pump’s tube into the dipstick tube until it reaches the bottom of the oil reservoir. For inboard engines, the dipstick tube may have threads to secure the pump. Ensure a tight connection to prevent leaks during extraction.
Step 4: Extract the Oil
Begin pumping the oil into a sealed container. Continue until you hear a gurgling sound, indicating most of the oil has been removed. Gently move the tube to extract any remaining oil. Dispose of used oil responsibly by taking it to a marina, auto shop, or hazardous waste facility that accepts used oil for recycling.
Step 5: Replace the Oil Filter
Use an oil filter wrench to loosen the old filter. Place an inside-out plastic bag over your hand to catch the filter and minimize spills. Ensure the old filter’s gasket is removed. Rub a thin layer of new oil on the new filter’s gasket to create a tight seal, then screw it on hand-tight. Write the installation date on the filter for future reference.
Step 6: Refill with New Oil
Check your owner’s manual for the correct oil type and quantity. Insert a funnel into the oil fill hole and pour in the new oil. After filling, check the dipstick to confirm the oil level is within the recommended range. Run the engine for 1-2 minutes to circulate the oil, then check for leaks and reverify the oil level.
Chart: Oil Change Process Flow
Best Practices for Boat Engine Maintenance
To maximize engine performance and longevity, follow these additional tips:
- Follow Manufacturer Guidelines: Always adhere to the recommended oil change intervals and oil specifications.
- Monitor Engine Hours: Use a logbook or digital hour meter to track operating hours accurately.
- Inspect Other Components: During an oil change, check the impeller, spark plugs, and fuel filters, as these are critical to engine health.
- Store Properly: If your boat is idle for long periods, change the oil before storage to prevent corrosion.
- Environmental Responsibility: Never dispose of oil in waterways or storm drains. Use certified recycling facilities.
Common Engine Types and Oil Change Considerations
Different engine types have unique maintenance needs. Below is a summary of considerations for common boat engines:
Table 2: Oil Change Considerations by Engine Type
| Engine Type | Ease of Access | Typical Oil Capacity | Cost of Parts | Notes |
|---|---|---|---|---|
| Outboard | High | 4-6 quarts | $50-$150 | Easiest to service; dipstick extraction common |
| Inboard | Moderate | 6-8 quarts | $75-$175 | Limited access may require pump |
| Inboard/Outboard | Low | 5-7 quarts | $75-$200 | Complex access; professional service often preferred |
FAQs About Boat Engine Oil Changes
Most manufacturers recommend every 50-100 hours or annually, whichever comes first. New boats may require changes every 20 hours during the break-in period.
No. Marine engines require specific oils designed to handle high humidity, saltwater exposure, and constant high RPMs.
Yes, if you have the time and tools. DIY oil changes save $100-$200 per service and build familiarity with your engine.
Take it to a marina, auto shop, or hazardous waste facility for recycling. Never dispose of oil in waterways or regular trash.
Conclusion
Changing your boat’s engine oil is a critical maintenance task that ensures performance, longevity, and reliability. While professional services costing $160-$300 offer convenience and expertise, a DIY oil change can save significant money, with parts costing just $50-$75. By following the six-step process outlined above—warming the engine, preparing the workspace, extracting old oil, replacing the filter, refilling with new oil, and checking for leaks—you can perform this task efficiently and responsibly. Always consult your owner’s manual for specific requirements, dispose of used oil properly, and consider additional maintenance like impeller or gear oil checks to keep your boat in top shape. With these skills, you’ll not only save money but also gain confidence in maintaining your vessel for years of enjoyable boating.
Happy Boating!
Share How to Change the Oil in Your Boat’s Engine with your friends and leave a comment below with your thoughts.
Read How Much Does a Bimini Top Cost? (3 Examples) until we meet in the next article.