How to Catch More Fish with Side-Imaging Technology
Discover how side-imaging fish finders revolutionize fishing. Learn setup, usage tips, and top models to boost your catch rate in this guide.
Fishing has evolved from a simple pastime into a high-tech pursuit, with side-imaging fish finders leading the charge. These advanced sonar systems provide anglers with a detailed view of the underwater world, revealing structures, vegetation, and fish schools with unprecedented clarity. Whether you’re a weekend angler or a tournament pro, side-imaging technology can significantly enhance your fishing success. This comprehensive guide explores how side-imaging works, its benefits, setup and usage tips, and how to choose the right unit, with a focus on catching more fish in diverse environments like the Northeast’s coastal waters.
Understanding Side-Imaging Fish Finders
Side-imaging fish finders use advanced sonar to scan wide areas on either side of your boat, unlike traditional sonar, which only covers a cone-shaped area directly beneath. This technology emits sonar waves from a transducer, capturing detailed images of the underwater environment, including structures, vegetation, and fish. The result is a near-photographic representation displayed on a screen, allowing anglers to identify key fishing spots with precision.
How Side-Imaging Works
Side-imaging sonar sends out fan-shaped sonar beams to the port and starboard sides of the boat, covering a range typically between 50 and 200 feet on each side, depending on the unit and settings. These beams reflect off objects and return to the transducer, which processes the data to create a detailed image. Unlike down-imaging, which focuses on the area directly below, or forward-facing sonar, which tracks moving fish in real time, side-imaging excels at mapping large areas of the bottom and water column, making it ideal for locating structure and fish-holding areas.
Key Features of Side-Imaging Fish Finders
- High-Definition Imaging: Displays detailed visuals of underwater structures, vegetation, and fish, often in real-time.
- Wide Coverage: Scans up to 400 feet (200 feet per side) in some models, allowing anglers to cover vast areas without moving directly over them.
- GPS Integration: Many units include GPS for marking waypoints, creating maps, and navigating back to productive spots.
- Customizable Settings: Adjust range, sensitivity, and color palettes to suit specific water conditions and fishing styles.
- Fish ID Technology: Some models differentiate fish from other objects, aiding in targeting specific species.
Benefits of Side-Imaging Technology
Side-imaging fish finders offer transformative advantages for anglers, enhancing both the fishing experience and catch rates.
Enhanced Underwater Visibility
Side-imaging provides a clear view of the underwater landscape, revealing submerged trees, rock piles, drop-offs, and weed beds. This visibility allows anglers to understand bottom composition and identify fish-holding structures without needing to cast blindly. For example, in the Northeast, where striped bass and bluefish often congregate around rocky outcrops or bait schools, side-imaging can pinpoint these hotspots with precision.
Increased Catch Rates
By identifying fish schools and individual fish, side-imaging enables anglers to focus their efforts on high-probability areas. For instance, a school of menhaden surrounded by bass, as seen in social media posts by Northeast guides, can be targeted directly, reducing time spent fishing in unproductive waters. The ability to see fish in the water column, even in shallow waters of 5-25 feet, is particularly valuable for species like tarpon, snook, and striped bass.
Improved Navigation and Safety
Side-imaging also aids navigation by highlighting underwater hazards like rocks or wrecks, which is crucial in unfamiliar waters. GPS features allow anglers to save waypoints for productive spots, ensuring they can return to them easily.
Time Efficiency
Side-imaging eliminates “dead water” by quickly scanning large areas, allowing anglers to focus on productive zones. As veteran pro Clark Reehm notes, “The goal of technology is to eliminate dead water. Side-imaging helps you find the haystack.”
Setting Up Your Side-Imaging Fish Finder
Proper setup is critical to maximizing the performance of your side-imaging fish finder. Here’s how to get started:
Transducer Installation
The transducer is the heart of the system, and its placement directly affects image quality. Mount it according to the manufacturer’s instructions, typically on the transom or through-hull, ensuring it has a clear view of the water without obstructions like propellers or hull fittings. For example, Humminbird pro Keith Combs recommends mounting the transducer on a centerline bracket to avoid damage from stumps or debris.
- Tips for Installation:
- Ensure the transducer is level to prevent skewed images.
- Use heavy-gauge wiring (e.g., 10 AWG) to provide clean power, as inadequate wiring can degrade image quality.
- Consider a dedicated battery for electronics to minimize interference.
Calibration and Settings
Calibrate the unit based on water depth, temperature, and conditions. Key settings include:
- Range: Set the side-imaging range to 100-150 feet in most conditions. In shallow water (less than 15 feet), pros like Reehm use 120-140 feet, while in deeper water (15-20 feet), they adjust to 100 feet.
- Frequency: Higher frequencies (e.g., 800 kHz or 1.2 MHz MEGA Imaging) offer sharper images but less range, ideal for shallow waters. Lower frequencies (e.g., 455 kHz) provide greater range for deeper waters.
- Sensitivity and Contrast: Adjust these to balance clarity and noise. Combs emphasizes tweaking these settings throughout the day to optimize visibility.
Boat Speed
Maintain a steady speed of 2-5 mph for optimal imaging. Faster speeds (above 10 mph) can introduce noise from bubbles or engine disturbance, while inconsistent speeds in kayaks or small boats may distort returns. Pedal-drive kayaks, like the Old Town Sportsman 106 PDL, provide stable platforms for consistent imaging.
Interpreting Side-Imaging Data
Understanding what you see on the screen is crucial for effective use. Here’s how to interpret side-imaging data:
Identifying Structures
- Bottom Composition: Look for textures like clay pits, rock piles, or weed beds. Hard bottoms (e.g., rock or gravel) appear brighter, while soft bottoms (e.g., mud) are darker.
- Structures: Brush piles, submerged trees, and wrecks appear as distinct shapes. For example, a brush pile might look like a cluster of irregular lines, while a wreck shows a defined outline.
- Shadows: Shadows cast by objects indicate height and position. A tall structure casts a longer shadow, helping you gauge its size.
Spotting Fish
- Fish Appearance: Fish appear as white lines or bright spots on side-imaging. Larger fish produce longer, brighter lines, while baitfish schools look like clouds or clusters of small specks.
- Water Column Imaging: To focus on fish rather than structure, set the range to the water depth (e.g., 25 feet in 25-foot water) to scan the water column, as suggested by user DoubleDose on a fishing forum.
- Species Identification: With experience, you can differentiate species. For instance, striped bass in the Northeast often appear as large, distinct lines near baitfish schools.
Practice and Reference
Spend time scanning known structures to build a frame of reference. For example, idle over a familiar dock or rock pile to see how it appears on your unit, then apply that knowledge to new areas. Pros like Reehm emphasize this practice to distinguish fish from debris or vegetation.
Tips for Maximizing Side-Imaging Performance
To get the most out of your side-imaging fish finder, follow these best practices and avoid common pitfalls:
Best Practices
- Scout Without Fishing: Dedicate time to graphing without casting, as Combs did during his 1,100-mile trip to Michigan, focusing solely on mapping structure.
- Adjust Settings Dynamically: Tweak sensitivity, contrast, and range based on water clarity, depth, and conditions. Humminbird’s amber and blue palettes or Lowrance’s grayscale enhance visibility.
- Use GPS Waypoints: Mark productive spots to return to them later, especially in large bodies of water like Lake Texoma or the Northeast coast.
- Combine with Other Sonar: Use side-imaging to find structures, down-imaging to pinpoint fish, and traditional 2D sonar to confirm depth and bottom composition.
Common Mistakes to Avoid
- Ignoring Software Updates: Regularly update your unit’s firmware to improve performance and fix bugs.
- Overcomplicating Settings: Stick to default settings initially, as Reehm suggests, and adjust only range unless you’re experienced.
- Poor Transducer Placement: Incorrect mounting can distort images. Ensure the transducer is secure and unobstructed.
- Fishing While Scanning: Avoid casting while scouting, as it distracts from interpreting data.
Choosing the Right Side-Imaging Fish Finder
Selecting the right unit depends on your fishing style, budget, and target species. Here’s what to consider and a comparison of top models.
Factors to Consider
- Display Size and Resolution: Larger screens (7-12 inches) with high resolution (e.g., 1024×600) improve visibility, especially for kayaks or small boats.
- Sonar Frequency and Power: Higher frequencies (e.g., Humminbird MEGA Imaging at 1.2 MHz) offer sharper images in shallow water, while lower frequencies (455 kHz) work better in deeper water.
- GPS and Mapping: Look for units with built-in GPS and compatibility with mapping cards like Navionics or C-MAP.
- Durability: Ensure the unit is rugged enough for saltwater or rough conditions, as encountered in the Northeast.
- Budget: Prices range from $500 for entry-level models to $2,500 for high-end units with advanced features.
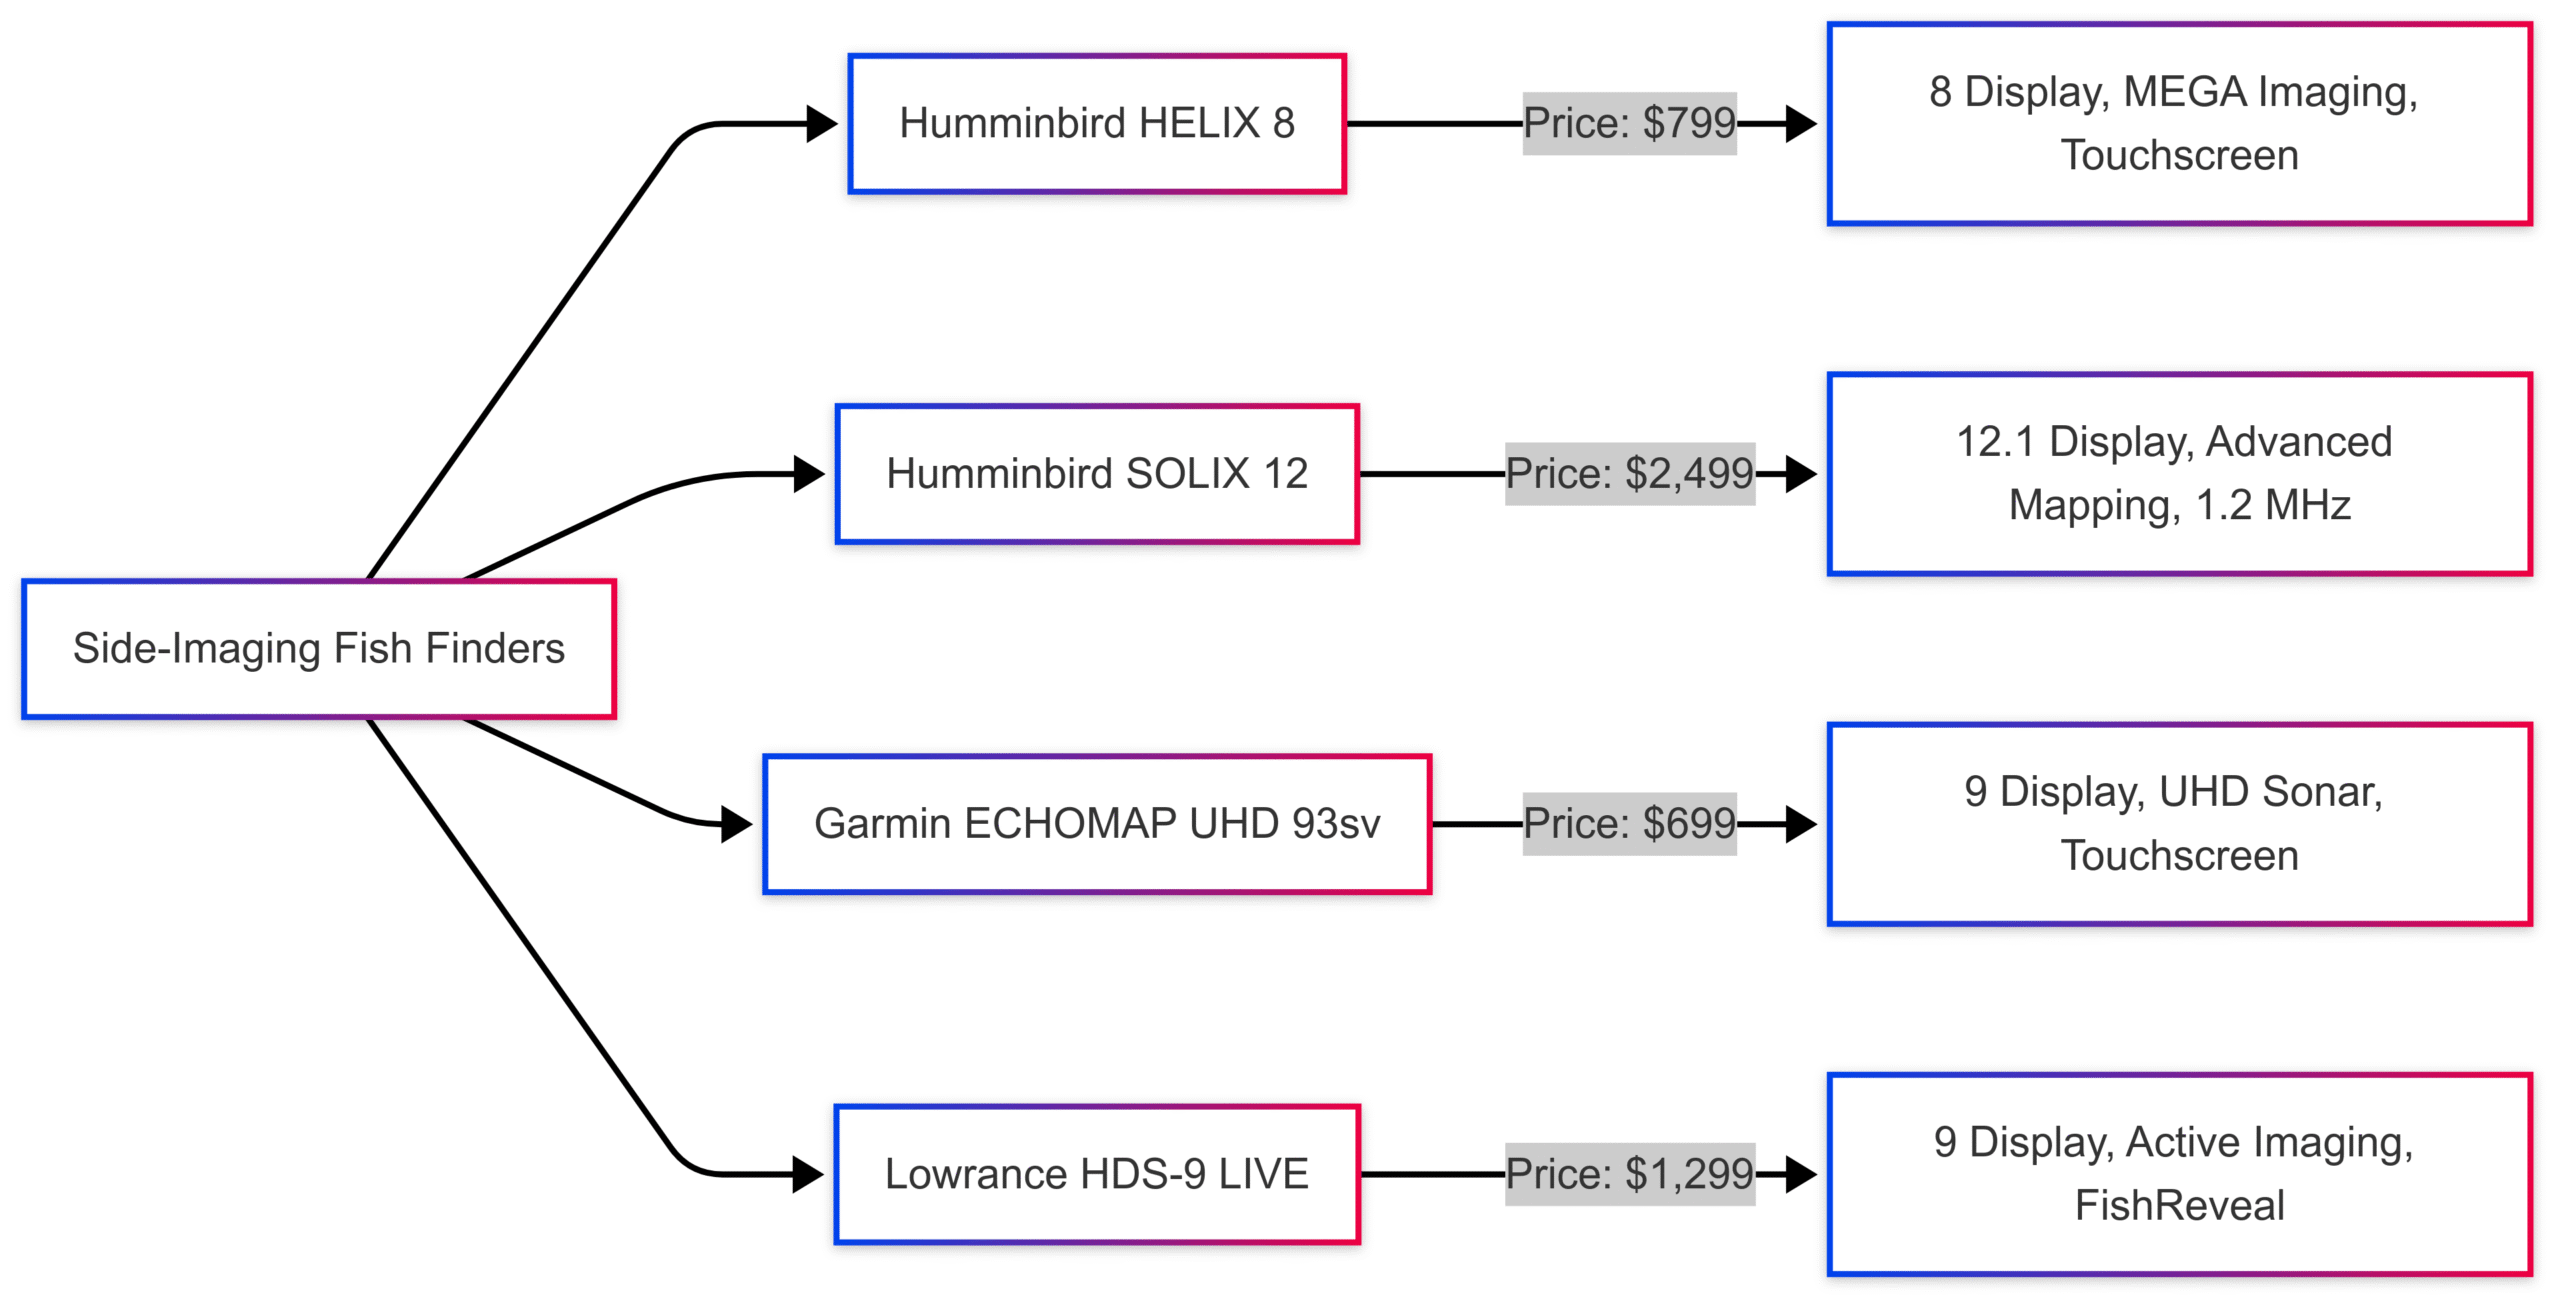
Top Side-Imaging Fish Finders
| Brand/Model | Display Size | Key Features | Price (USD) | Best For |
|---|---|---|---|---|
| Humminbird HELIX 8 CHIRP MEGA SI+ G4N | 8″ | MEGA Imaging, GPS, 800/455 kHz, touchscreen | $799 | Beginners and pros |
| Humminbird SOLIX 12 CHIRP MEGA SI+ G3 | 12.1″ | MEGA Imaging, advanced mapping, 1.2 MHz | $2,499 | Tournament anglers |
| Garmin ECHOMAP UHD 93sv | 9″ | Ultra High-Definition, GT54 transducer, touchscreen | $699 | Kayak and small-boat anglers |
| Lowrance HDS-9 LIVE | 9″ | Active Imaging, FishReveal, 800/455 kHz | $1,299 | Versatile fishing environments |
Chart: Side-Imaging Fish Finder Comparison
Brand Comparison: Humminbird vs. Garmin vs. Lowrance
- Humminbird: Known for superior image clarity, especially with MEGA Imaging, which operates at 1.2 MHz for shallow-water detail. Social media posts from Northeast guides highlight Humminbird’s ability to spot tarpon, snook, and striped bass clearly. However, its user interface can be less intuitive for beginners.
- Garmin: Excels in structure imaging and touchscreen usability. Users like jmacari report comparable fish-finding performance to Humminbird in shallow Northeast waters (5-25 feet). Garmin’s GT54 transducer supports multiple frequencies (455/800/1070 kHz).
- Lowrance: Offers strong structure imaging and FishReveal technology, which highlights fish on sonar returns. While some users find its side-imaging less sharp than Humminbird’s, it’s a solid choice for versatile fishing.
For a 20’ Jones Brothers targeting stripers, blues, and false albacore in the Northeast, the Garmin ECHOMAP UHD 93sv ($699) is a cost-effective choice for kayak or small-boat anglers, offering robust structure and fish imaging. However, if budget allows, the Humminbird HELIX 8 ($799) provides superior fish-finding clarity, especially for spotting bait schools and predators.
Real-World Applications: Side-Imaging in the Northeast
In the Northeast, side-imaging shines for targeting striped bass, bluefish, and false albacore in coastal waters from New Hampshire to Montauk. Social media posts, like those from jerseygeorge1 and roy50, show Humminbird units capturing schools of menhaden with bass in 25-foot harbors or tarpon near docks. Key applications include:
- Locating Bait Schools: Side-imaging reveals baitfish clouds, often surrounded by predators, allowing precise casting.
- Finding Structure: Rocky outcrops, wrecks, and weed beds are easily identified, critical for striped bass holding in shallow waters.
- Shallow-Water Fishing: At 5-25 feet, side-imaging excels at spotting fish and structure without interference from vegetation.
For example, user nsvencer’s Garmin 8616XSV captured a bass among menhaden in 25 feet, proving Garmin’s fish-finding capability, though Humminbird’s clarity is often preferred for such scenarios.
Does Side-Imaging Level the Playing Field?
For tournament anglers or beginners like the Reddit user struggling with local bass tournaments, side-imaging can be a game-changer. It helps locate offshore brush piles and isolated structures, which are often missed with traditional sonar. As user love_that_fishing notes, side-imaging is “just as useful for finding brush piles” as for spotting fish, making it ideal for bass fishing. However, success requires time to learn the unit, as saintr0main emphasizes: “You have to learn to dial it in.”
Conclusion
Side-imaging fish finders are a powerful tool for anglers seeking to catch more fish. By providing detailed underwater images, they eliminate guesswork, enhance efficiency, and boost catch rates. Whether you’re navigating the Northeast’s coastal waters or targeting bass in local lakes, mastering side-imaging involves proper setup, data interpretation, and strategic use. With top models like the Humminbird HELIX 8 or Garmin ECHOMAP UHD 93sv, anglers can unlock the underwater world’s secrets and reel in more fish than ever before.
Happy Boating!
Share How to Catch More Fish with Side-Imaging Technology with your friends and leave a comment below with your thoughts.
Read Underwater Lights on Boat: Let Your Boat Shine until we meet in the next article.