The Ultimate Guide to Git Rot Epoxy: Everything to Know
Discover the ultimate guide to Git Rot Epoxy: composition, benefits, application, and user reviews for woodworking and boat repair.
Git Rot Epoxy has emerged as a go-to solution for professionals and DIY enthusiasts tackling wood rot in woodworking and marine repair projects. Its ability to penetrate and restore damaged wood makes it a versatile tool for preserving structures like boat transoms, decks, and RV components. This comprehensive guide dives deep into Git Rot Epoxy, covering its composition, benefits, application techniques, maintenance, and user experiences, ensuring you have all the information needed to use it effectively.
What is Git Rot Epoxy?
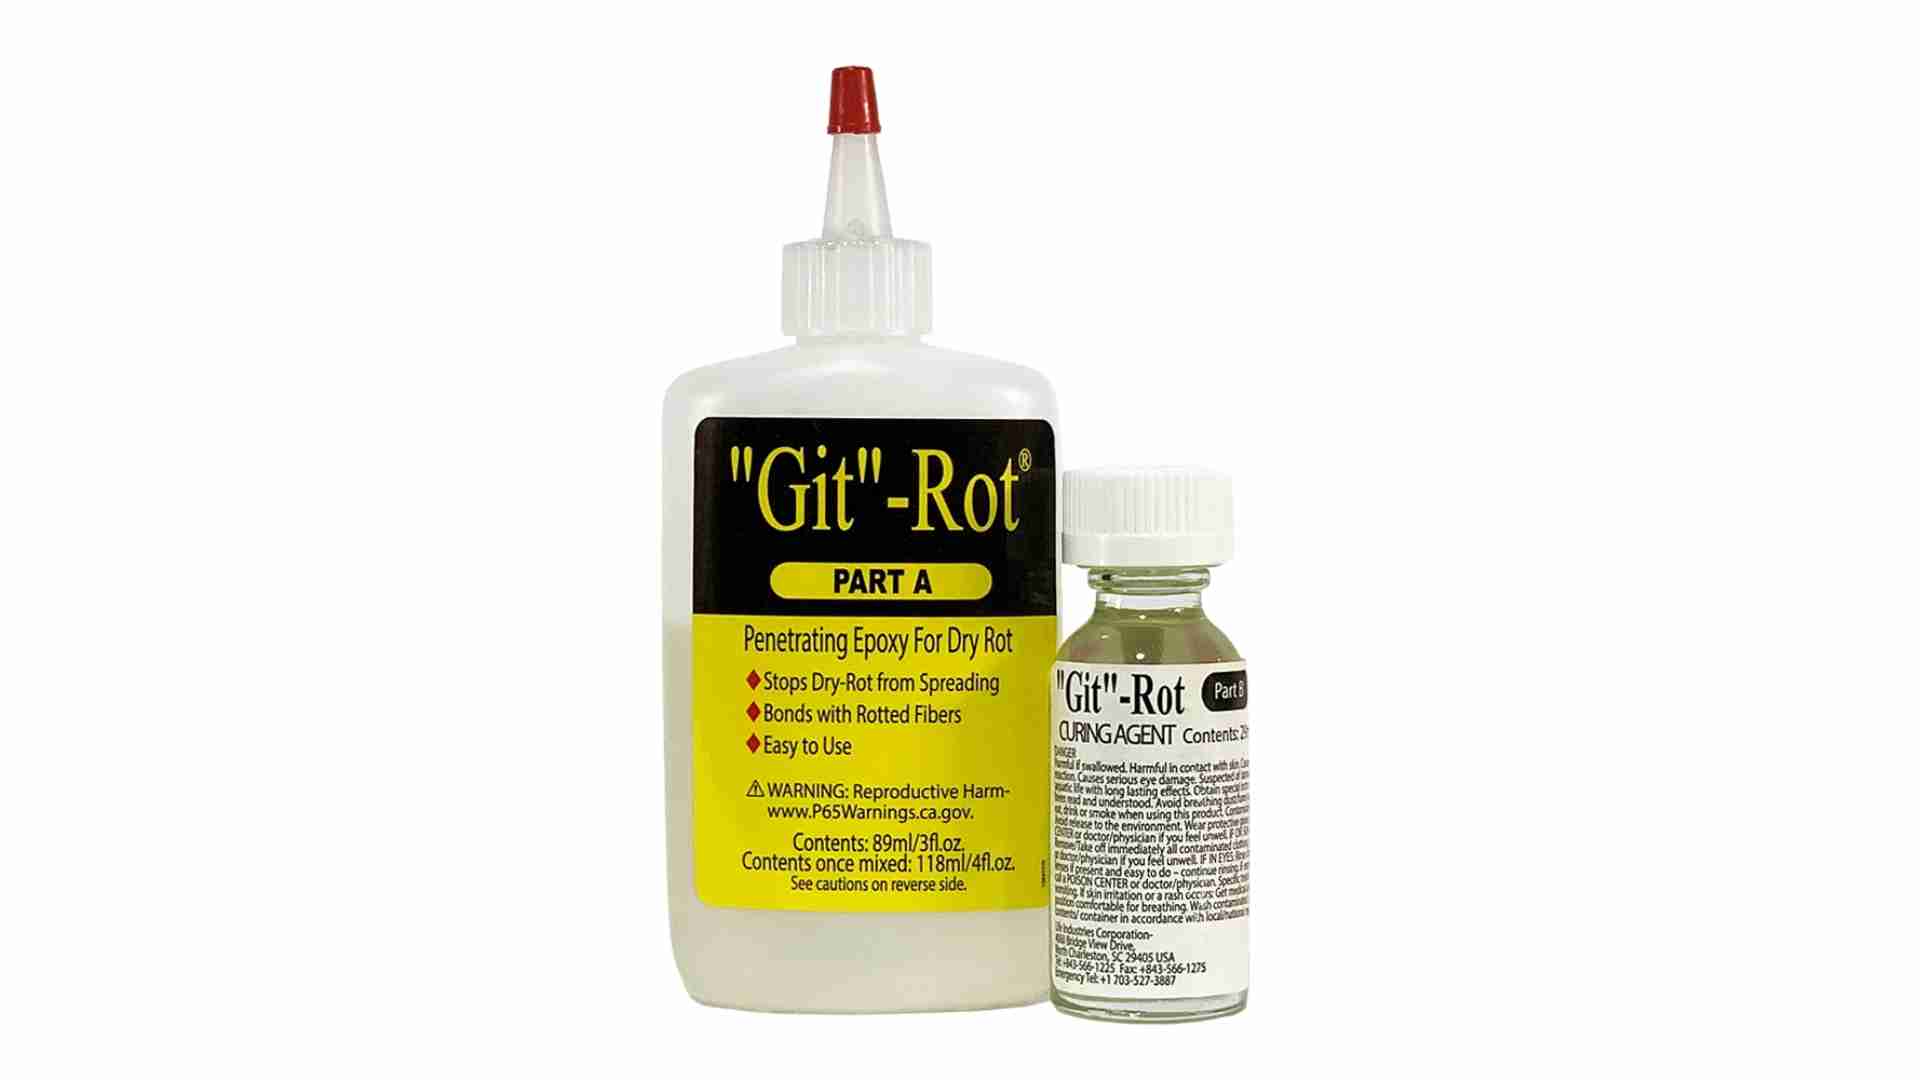
Git Rot Epoxy, produced by Life Industries under the BoatLife brand, is a two-part epoxy system designed to repair and strengthen wood affected by dry rot or decay. Unlike traditional epoxies, Git Rot is formulated to penetrate deep into wood fibers, bonding with them to restore structural integrity. It’s particularly effective in environments where wood is exposed to moisture, such as boats, RVs, and outdoor structures. The product is mixed in a 3:1 ratio (Part A resin to Part B hardener) and is applied to dry, rotted wood to stabilize and reinforce it.
The epoxy’s low viscosity allows it to seep into the wood’s porous structure, displacing residual moisture and creating a durable, moisture-resistant barrier. This makes it ideal for repairing boat transoms, stringers, plywood cores, and other wooden components prone to rot. Available in sizes like 4 oz, 16 oz, and 32 oz, Git Rot caters to projects of varying scales, from small fixes to extensive restorations.
The Science Behind Git Rot Epoxy
Git Rot Epoxy’s effectiveness stems from its unique chemical composition. The resin and hardener combine to form a polymer that bonds with cellulose fibers in the wood, creating a composite material stronger than the original decayed wood. The epoxy’s solvent-based formula enhances its penetration, allowing it to reach deep into the wood’s grain, where it solidifies to form a tough, resilient mass.
A key feature is its ability to displace moisture within the wood, which is critical in preventing further rot. However, Git Rot is designed for dry rot—wood that’s decayed but not waterlogged. Applying it to wet wood can trap moisture, leading to incomplete curing and reduced effectiveness. The curing process, which takes about 36 hours to become touch-dry and up to a week for full strength, is influenced by temperature, with an optimal range of 50–70°F (10–21°C).
How It Works: A Simplified Process Flow

Why Git Rot Epoxy Matters
Wood rot is a pervasive issue in marine and outdoor environments, compromising the safety and longevity of structures. Replacing rotted wood is often costly and labor-intensive, especially in complex assemblies like boat transoms or RV floors. Git Rot Epoxy offers a cost-effective alternative by allowing targeted repairs that preserve existing wood while preventing further decay.
Benefits of Git Rot Epoxy
- Cost-Effective Repairs: Instead of replacing entire sections of wood, Git Rot enables precise restoration, saving time and materials.
- Deep Penetration: Its low-viscosity formula reaches deep into wood fibers, stabilizing even severely decayed areas.
- Versatility: Suitable for hardwood, softwood, plywood, and balsa cores, making it applicable to diverse projects.
- Moisture Resistance: Creates a barrier that protects against future rot, ideal for marine and outdoor applications.
- Ease of Use: Comes with clear mixing instructions and can be applied with simple tools like brushes or syringes.
Risks of Ignoring Wood Rot
Failing to address wood rot can lead to catastrophic consequences. Untreated rot weakens structural components, potentially causing failures in critical areas like boat transoms or RV floors. It can also spread, necessitating more extensive repairs. For example, a small patch of rot in a boat’s stringer can compromise the entire hull’s integrity if left unchecked. Git Rot Epoxy mitigates these risks by stabilizing damage early, extending the lifespan of the wood.
Choosing the Right Git Rot Epoxy
Selecting the appropriate Git Rot Epoxy involves evaluating the project’s needs and environmental conditions. Here are key factors to consider:
- Extent of Damage: For minor surface rot, a smaller 4 oz kit may suffice. Larger projects, like transom repairs, may require 16 oz or 32 oz kits.
- Wood Type: Git Rot works on most wood types, but compatibility with exotic or dense hardwoods should be verified.
- Curing Time: Git Rot typically becomes touch-dry in 36 hours but requires a week for full strength. Plan projects accordingly, especially in humid or cold conditions.
- Environmental Exposure: Ensure the repaired area will be protected from excessive moisture post-application to maintain the epoxy’s effectiveness.
Top Brands and Alternatives
While Git Rot by BoatLife is a leading choice, other penetrating epoxies offer similar functionality. Here’s a comparison of popular options:
| Brand | Product | Viscosity | Curing Time | Price (16 oz) | Key Feature |
|---|---|---|---|---|---|
| BoatLife | Git Rot Epoxy | Low | 36 hours | $35–$45 | Deep penetration, easy mixing |
| Smith’s | CPES | Very Low | 24–48 hours | $50–$60 | Ultra-thin, ideal for end-grain |
| West System | 105 Epoxy + Thinner | Medium | 24–72 hours | $40–$55 | Customizable with slow hardeners |
| Rot Doctor | CPES | Very Low | 24–48 hours | $45–$55 | Comprehensive application guides |
Note: Prices are approximate and may vary by retailer. Smith’s CPES is often praised for its thinner consistency, but Git Rot is more readily available in local chandlers.
Step-by-Step Guide to Using Git Rot Epoxy
Proper application is critical to achieving lasting repairs. Follow these steps for optimal results:
1. Identify and Prepare the Surface
- Locate Rot: Tap the wood with a hard object (e.g., hammer) to detect hollow sounds indicating rot. Use an ice pick or knife to confirm.
- Remove Damaged Wood: Use a chisel, wire brush, or putty knife to clear loose or decayed material. For deep rot, drill ¼” holes, 2” apart, angled downward to create reservoirs for the epoxy.
- Dry the Area: Ensure the wood is dry using a heat gun or hair dryer on low. Acetone can be applied to absorb residual moisture but must fully evaporate before epoxy application.
- Clean the Surface: Remove dust, dirt, and debris. Lightly sand for better adhesion.
2. Mix and Apply Git Rot Epoxy
- Mixing: Combine Part A (resin) and Part B (hardener) in a 3:1 ratio. Mix small batches (up to 4 oz) for 1 minute to avoid rapid curing. Use the provided mixing bottle for accuracy.
- Application: Apply with a brush, syringe, or squeeze bottle, starting at the end grain if possible. Fill drilled holes and cavities until the surface is shiny, indicating full penetration.
- Curing: Allow 36 hours for the epoxy to become touch-dry at 50–70°F. Full curing takes up to a week.
3. Post-Application
- Filling Large Voids: For large holes, mix Git Rot with sawdust or use a dedicated epoxy filler (e.g., West System 406 Colloidal Silica) after the initial application is touch-dry.
- Sanding and Finishing: Sand the cured surface smooth and apply paint, varnish, or marine enamel for protection.
Tip: Work in a well-ventilated area and wear gloves, safety glasses, and a respirator to avoid inhaling fumes.
Applying Epoxy Filler After Git Rot
A common question, as seen in user forums, is when to apply epoxy filler after Git Rot. Git Rot becomes touch-dry in about 36 hours, but applying filler earlier—when the surface is no longer sticky—can enhance bonding. Users report success applying fillers like West System self-mixing epoxy tubes within 12–24 hours, provided the surface is tack-free. However, sanding or solvent cleaning (e.g., with alcohol or lacquer thinner) may be needed to remove amine blush—a waxy byproduct that can hinder adhesion. Since sanding irregular, rotted surfaces is challenging, applying filler before full curing is often preferred.
Maintenance and Troubleshooting
Maintenance Tips
- Regular Inspections: Check treated areas annually for signs of new rot or delamination. Tap with a hammer to detect hollow spots.
- Moisture Protection: Seal repaired areas with paint or varnish to prevent water ingress. Avoid prolonged exposure to standing water.
- Reapplication: If new rot appears, remove affected epoxy and reapply Git Rot promptly.
Common Issues and Solutions
| Issue | Cause | Solution |
|---|---|---|
| Incomplete Penetration | Wet wood or insufficient mixing | Ensure wood is dry; mix thoroughly for 1 minute. |
| Sticky Surface | High humidity or improper mixing | Apply in optimal temperature (50–70°F); verify 3:1 ratio. |
| Poor Filler Adhesion | Amine blush on cured surface | Wipe with alcohol or lacquer thinner before applying filler; avoid sanding. |
| Cracking or Delamination | Trapped moisture or inadequate drying | Dry wood thoroughly with heat gun before application; reapply if needed. |
Pro Tip: Warming the epoxy slightly with a heat gun (low setting) before application can reduce viscosity, improving penetration.
User Reviews: Pros and Cons
Based on forum discussions and user feedback, here’s a summary of experiences with Git Rot Epoxy:
Pros
- Effective for Small Repairs: Users like Brad1 report success using Git Rot for non-structural repairs, such as door frames, when paired with extensive drilling for saturation. The repaired wood held up well after priming and painting.
- Ease of Application: JackB praised the straightforward mixing process and the ability to clean uncured epoxy with vinegar, noting its effectiveness when applied to dry wood.
- Saves Time and Money: A user repairing a Taswell 45 dodger found Git Rot reduced the need for extensive plywood removal, preserving the original structure.
- Versatile for Marine Use: Many users, including those on RVbyLIFE, appreciate its ability to stabilize rotted plywood in boats and RVs, extending component life.
Cons
- Not for Wet Wood: Capttater and others warn that applying Git Rot to wet wood can trap moisture, leading to incomplete curing and persistent rot.
- Limited Structural Strength: Woodonglass and Friscoboater advise against using Git Rot for critical structural components like transoms or stringers, as drilling holes for penetration may compromise strength.
- Viscosity Concerns: JackB noted Git Rot’s viscosity was thicker than expected, potentially limiting penetration compared to thinner alternatives like Smith’s CPES.
- Toxicity Risks: Canoeyawl reported skin sensitivity to Smith’s CPES, and similar concerns apply to Git Rot’s solvents, necessitating proper ventilation and PPE.
User Quote
“I used Git Rot on a rotted bulkhead, drilling holes for penetration. It worked wonderfully, saving me from replacing the entire piece. The video I made of the process is still our most viewed!” – Brad1
Comparing Git Rot to Alternatives
Git Rot is often compared to Smith’s CPES and West System epoxy. Here’s a breakdown:
- Git Rot vs. Smith’s CPES: CPES is thinner, allowing deeper penetration, but it’s more expensive and less widely available. Git Rot is easier to find locally and sufficient for most small to medium repairs.
- Git Rot vs. West System: West System, when thinned with solvents or heated, offers similar penetration but retains greater strength and moisture resistance. However, it requires more preparation and expertise.
Comparison Chart

Practical Applications and Case Studies
Case Study 1: Boat Transom Repair
A user (pugman) considered Git Rot for a rotted transom and stringers. While Git Rot stabilized the wood after thorough drying and drilling, experts recommended replacing structural components for safety. The repair held for non-critical areas but required follow-up with epoxy filler.
Case Study 2: RV Floor Restoration
RVbyLIFE’s guide highlights Git Rot’s use in RV floors and sidewalls. By drilling holes and applying the epoxy, users restored rotted plywood, preventing further deterioration and avoiding costly replacements.
Case Study 3: Dodger Repair
A Taswell 45 owner used Git Rot to repair a rotted plywood core in a dodger. After drying the wood and applying the epoxy, the structure was stabilized, and fairing compounds restored the surface, saving significant time and effort.
Conclusion
Git Rot Epoxy is a powerful tool for repairing dry rot in woodworking and marine applications. Its ability to penetrate and strengthen wood makes it a cost-effective alternative to replacement, particularly for non-structural repairs. By following proper preparation and application techniques, users can achieve durable, long-lasting results. However, it’s not a cure-all—wet wood, structural components, and improper application can limit its effectiveness. Compared to alternatives like Smith’s CPES or West System, Git Rot strikes a balance of accessibility, ease of use, and performance.
Whether you’re a boat owner, RV enthusiast, or DIY woodworker, Git Rot Epoxy can extend the life of your projects when used correctly. Always prioritize drying the wood, follow manufacturer instructions, and protect repaired areas to ensure success. With this guide, you’re equipped to tackle wood rot confidently and keep your structures strong for years to come.
Happy Boating!
Share The Ultimate Guide to Git Rot Epoxy: Everything to Know with your friends and leave a comment below with your thoughts.
Read Collinite Boat Wax, The Best Wax on the Water until we meet in the next article.