Expert Guide to Know if a Trailer Axle is Damaged
Learn to identify a damaged trailer axle with our expert guide. Discover signs, diagnostic steps, and how to replace a bent axle for safe towing.
Trailer axles are the unsung heroes of towing, bearing the weight of your load and ensuring smooth, safe transport. A damaged axle, however, can turn a routine trip into a hazardous ordeal, risking tire blowouts, component failure, or even accidents. Recognizing the signs of a damaged trailer axle and knowing how to address it can save you time, money, and stress. This comprehensive guide dives into the symptoms of a damaged axle, diagnostic techniques, and step-by-step instructions for replacement, ensuring your trailer remains roadworthy.
Understanding Trailer Axles and Their Importance
A trailer axle is a central shaft that connects and rotates the wheels, supporting the trailer’s weight and load. Whether it’s a boat trailer, utility trailer, or teardrop camper, the axle’s integrity is critical for safe operation. Damage, such as bends or cracks, compromises alignment, stability, and load distribution, leading to issues like uneven tire wear or wobbly wheels. Left unaddressed, a damaged axle can cause catastrophic failure, such as a tire detaching at high speed.
This guide covers the key indicators of axle damage, how to diagnose it, and practical steps for replacement. We’ll also address common causes of axle damage, such as overloading, potholes, or corrosion, and provide insights into choosing the right replacement axle based on load capacity and trailer specifications.
Signs and Symptoms of a Damaged Trailer Axle
Identifying a damaged axle early can prevent further harm to your trailer and ensure safety on the road. Below are the primary signs to watch for:
1. Rumbling or Grinding Noises
A bent axle can cause wheels to rub against the trailer frame or other components, producing rumbling, grinding, or clinking noises. These sounds often intensify after hitting a pothole or curb. For example, a damaged CV boot leaking grease can allow dirt to accumulate, exacerbating axle wear and creating grinding sounds. If you hear unusual noises from under the trailer, inspect the axle immediately to avoid further damage.
2. Wobbly Wheels
Wobbly or vibrating wheels, especially at low speeds, are a hallmark of a bent axle. The misalignment causes the wheel to oscillate, which may feel like a shimmy in the tow vehicle. However, wobbly wheels can also result from a bent wheel or spindle, so a thorough inspection is necessary to pinpoint the cause.
3. Uneven Tire Wear
A bent axle disrupts wheel alignment, causing one side of the tire to wear faster than the other. For instance, if the inner tread of a tire wears excessively, it suggests the axle is forcing the tire to roll at an improper angle. Regularly check your tires for uneven wear patterns, as this can indicate axle misalignment or damage.
4. Tires Rolling at an Angle
When tires roll at an angle on a smooth surface, it’s a strong indicator of axle damage or misalignment. This can be observed by watching the trailer’s tires from behind while towing. Misaligned tires may cause the trailer to “dog track” (traveling at an angle rather than straight), making it difficult to steer or back up.
5. Increased Roughness of the Ride
A bent axle often results in a stiffer, rougher ride, particularly when the trailer is lightly loaded. The lack of flexibility in a damaged axle transfers more shock to the trailer frame, leading to discomfort and potential damage to other components like bearings or suspension parts.
6. Malfunctioning Brakes or Acceleration Issues
A severely damaged axle can affect brake performance or cause sluggish acceleration. Misalignment may strain brake components, reducing their effectiveness. If you notice difficulty braking or accelerating, especially after hitting an obstacle, the axle could be the culprit.
7. Sluggish Steering
A bent axle can make steering the tow vehicle feel sluggish or unresponsive, as misaligned wheels resist straight-line tracking. This forces the driver to exert extra effort to keep the trailer on course, increasing fatigue and reducing control.
Diagnosing a Damaged Trailer Axle
Diagnosing axle damage requires a combination of visual inspection and precise measurements. Here’s how to confirm whether your axle is bent or otherwise compromised:
Visual Inspection
Crawl under the trailer with a flashlight to examine the axle for visible bends, cracks, or corrosion. Pay close attention to the axle beam, spindles, and welds. Look for signs of grease leakage, which could indicate a damaged CV boot or bearing failure. If the trailer has been in an accident or hit a curb, focus on areas near the impact point.
Straightedge Test
Use a straightedge (e.g., an 8-foot-long 2×4, steel pipe, or angle iron) to check for axle misalignment. Place the straightedge against the tire’s sidewall bulge and measure the gap between the straightedge and the tire on both sides of the axle. Consistent gaps indicate proper alignment, while significant differences (e.g., more than 1/8 inch) suggest a bent axle or spindle.
Check Spindle and Hub Alignment
Using a square, verify that the spindle and hub are properly welded to the axle beam. Misaligned welds can mimic the symptoms of a bent axle. Measure the angle between the spindle and axle to ensure it’s 90 degrees.
Wheel Alignment Check
For single-axle trailers, measure the distance from the straightedge to the trailer frame in front of and behind the wheel. Both measurements should be equal, indicating the axle is parallel to the frame. For multi-axle trailers, ensure all tires’ bulges touch the straightedge or are within 1/8 inch, confirming axle alignment.
Chart: Axle Diagnosis Process
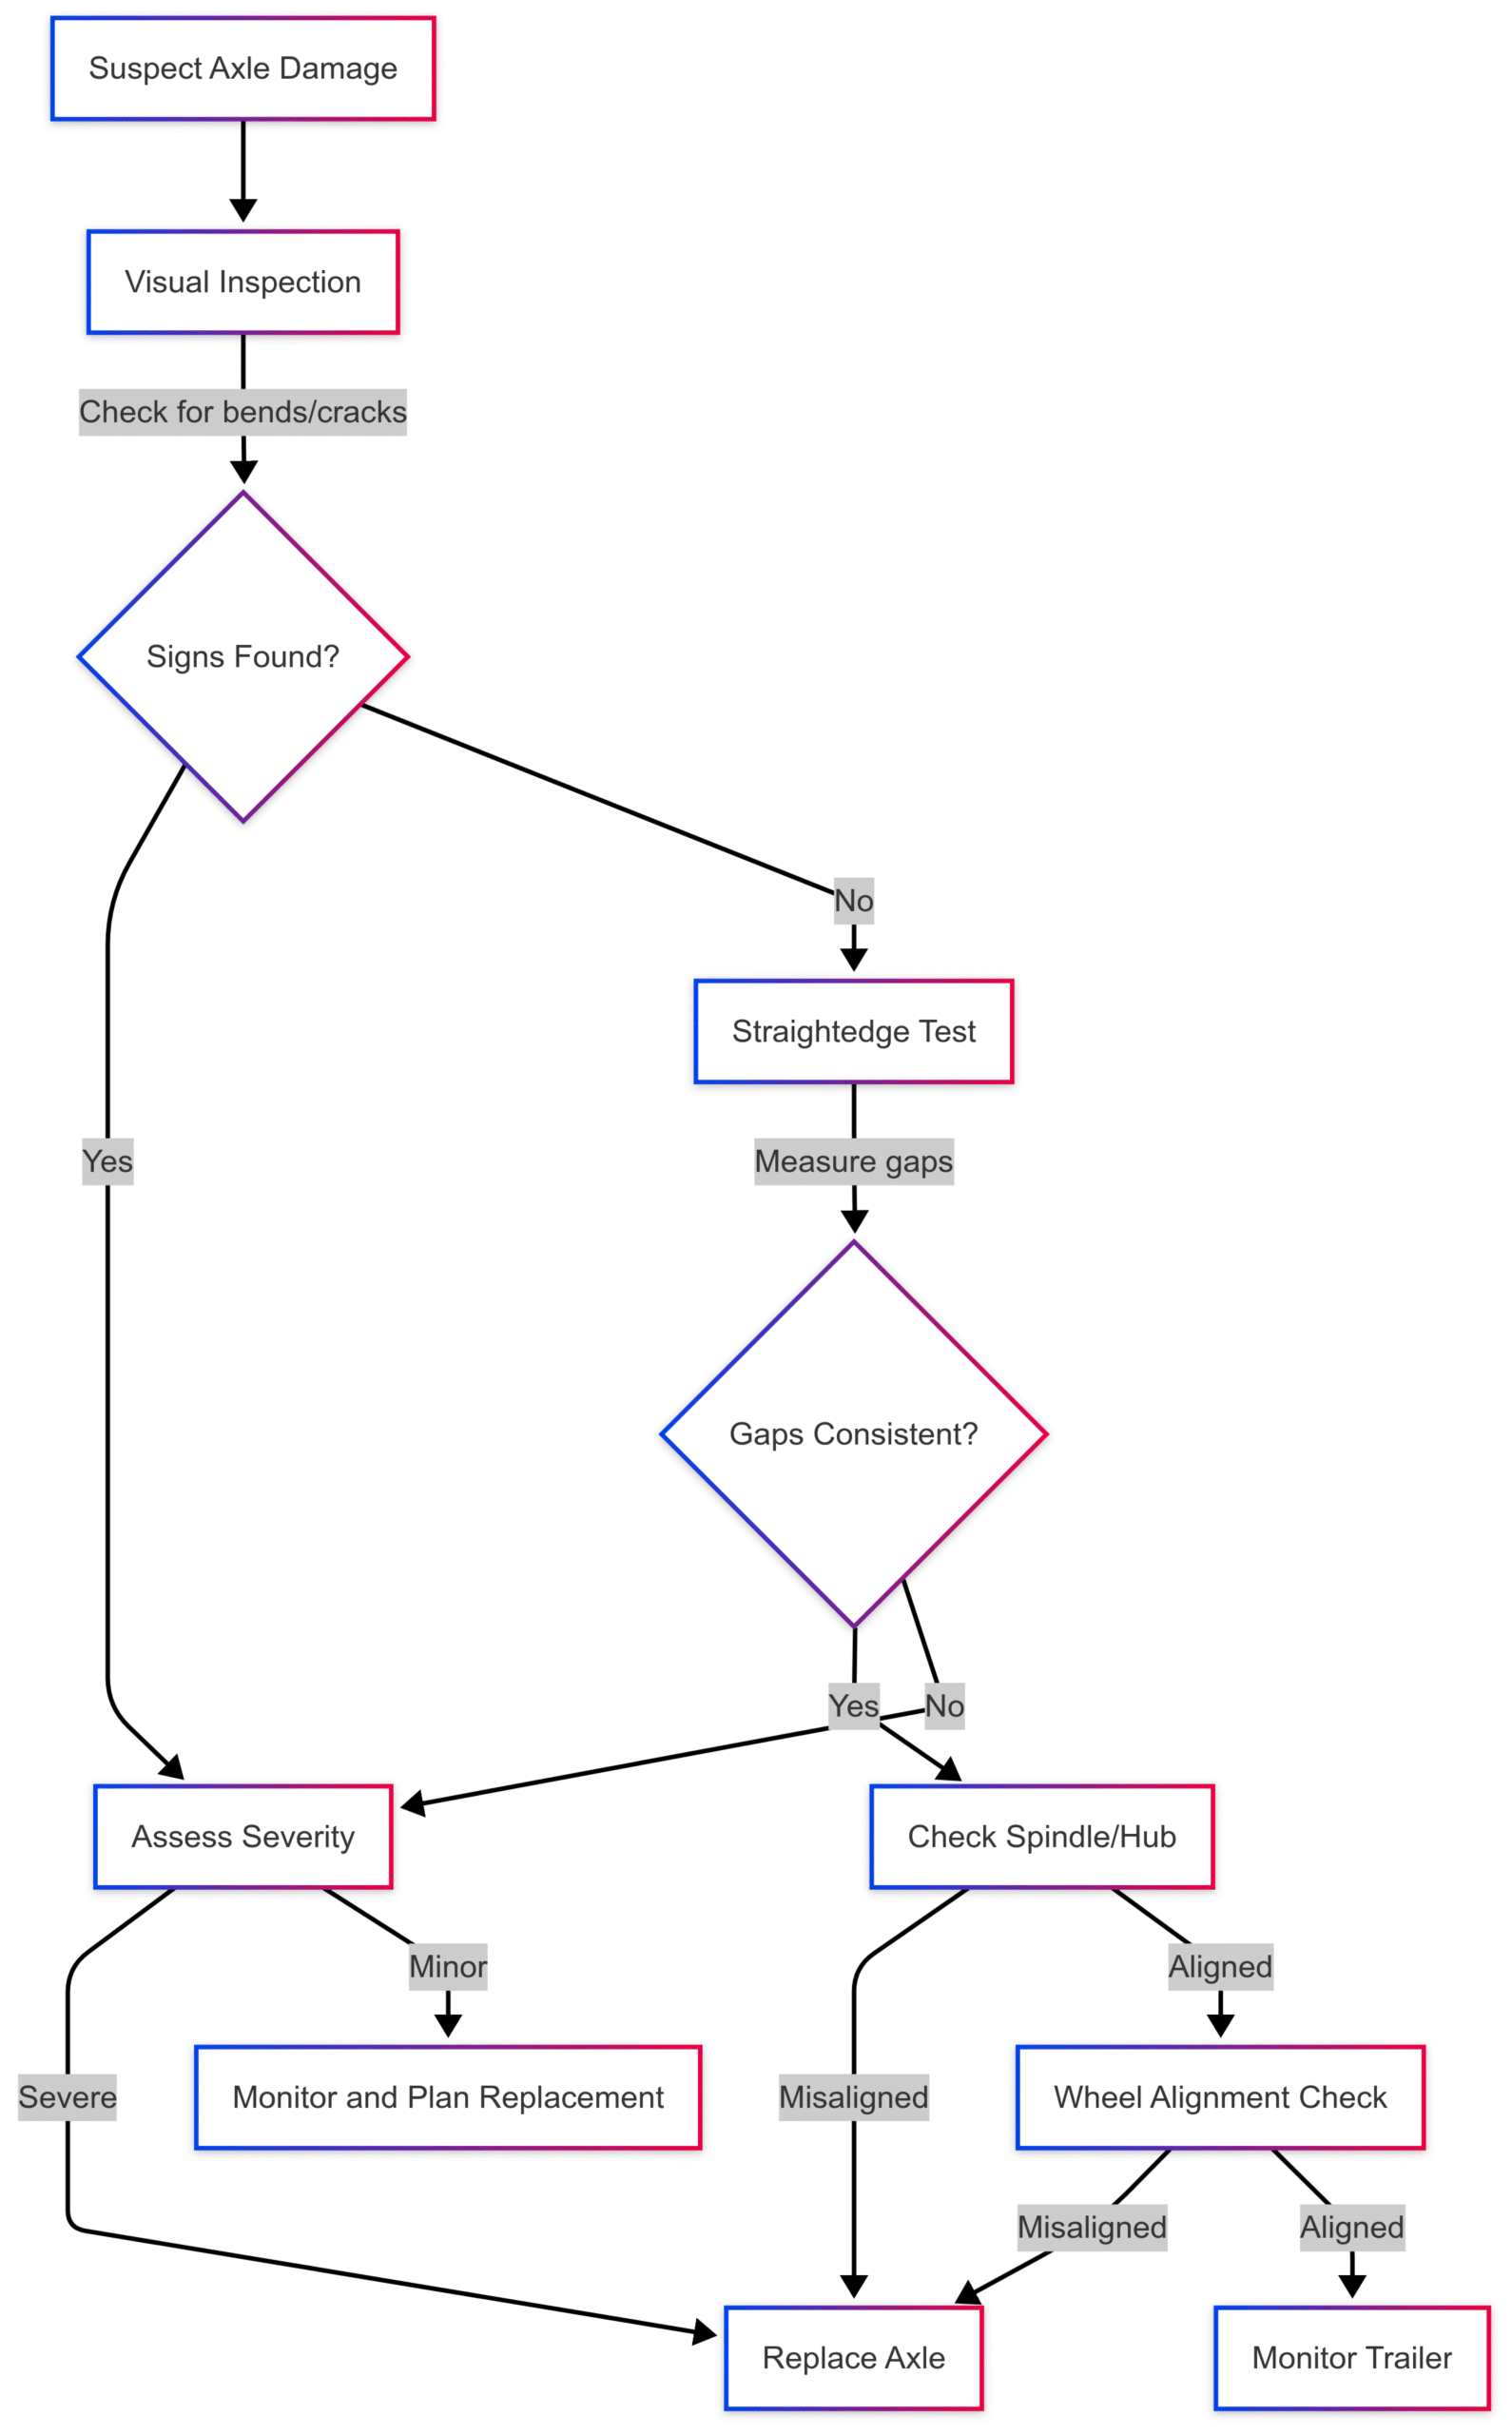
When to Replace a Trailer Axle
Deciding whether to replace a damaged axle depends on the severity of the damage:
- Severe Bends: If the axle is visibly bent or has significant gaps in the straightedge test, replace it immediately. Driving with a severely bent axle risks tire blowouts, bearing failure, or loss of control.
- Cracks or Structural Damage: Cracks in the axle beam or spindle compromise structural integrity, necessitating replacement. Welding or patching is not a safe long-term solution.
- Excessive Tire Wear: If uneven tire wear persists despite alignment attempts, the axle is likely too damaged to salvage.
- Persistent Symptoms: Ongoing vibrations, wobbly wheels, or rough rides after minor repairs indicate the axle should be replaced.
Choosing the Right Replacement Axle
Selecting a replacement axle requires matching its specifications to your trailer’s needs. Key factors include:
- Load Capacity: Check the trailer’s identification tag for the Gross Vehicle Weight Rating (GVWR). Choose an axle with a capacity equal to or exceeding the GVWR. For example, a 3,500-lb axle is suitable for trailers with a GVWR up to 3,500 lbs.
- Spring Centers: Measure the distance between the centers of the leaf springs to ensure the new axle fits the trailer’s suspension.
- Track Length: Measure the distance between the tire centers to match the trailer’s width.
- Overall Length: Ensure the axle’s total length accommodates the trailer frame and hubs.
- Type: Choose between spring axles (common for utility trailers) or torsion axles (smoother ride, often used for boat trailers).
Table: Common Trailer Axle Specifications
| Axle Type | Load Capacity (lbs) | Track Length (inches) | Spring Center (inches) | Price Range (USD) |
|---|---|---|---|---|
| Spring Axle | 2,000 | 60-74 | 48-62 | $150-$300 |
| Spring Axle | 3,500 | 74-89 | 60-74 | $200-$400 |
| Torsion Axle | 3,500 | 74-89 | N/A (torsion suspension) | $300-$500 |
| Spring Axle | 5,200 | 89-95 | 74-80 | $350-$600 |
Note: Prices vary based on manufacturer, customization, and shipping. Check with suppliers like BlueSwift Axles for custom options.
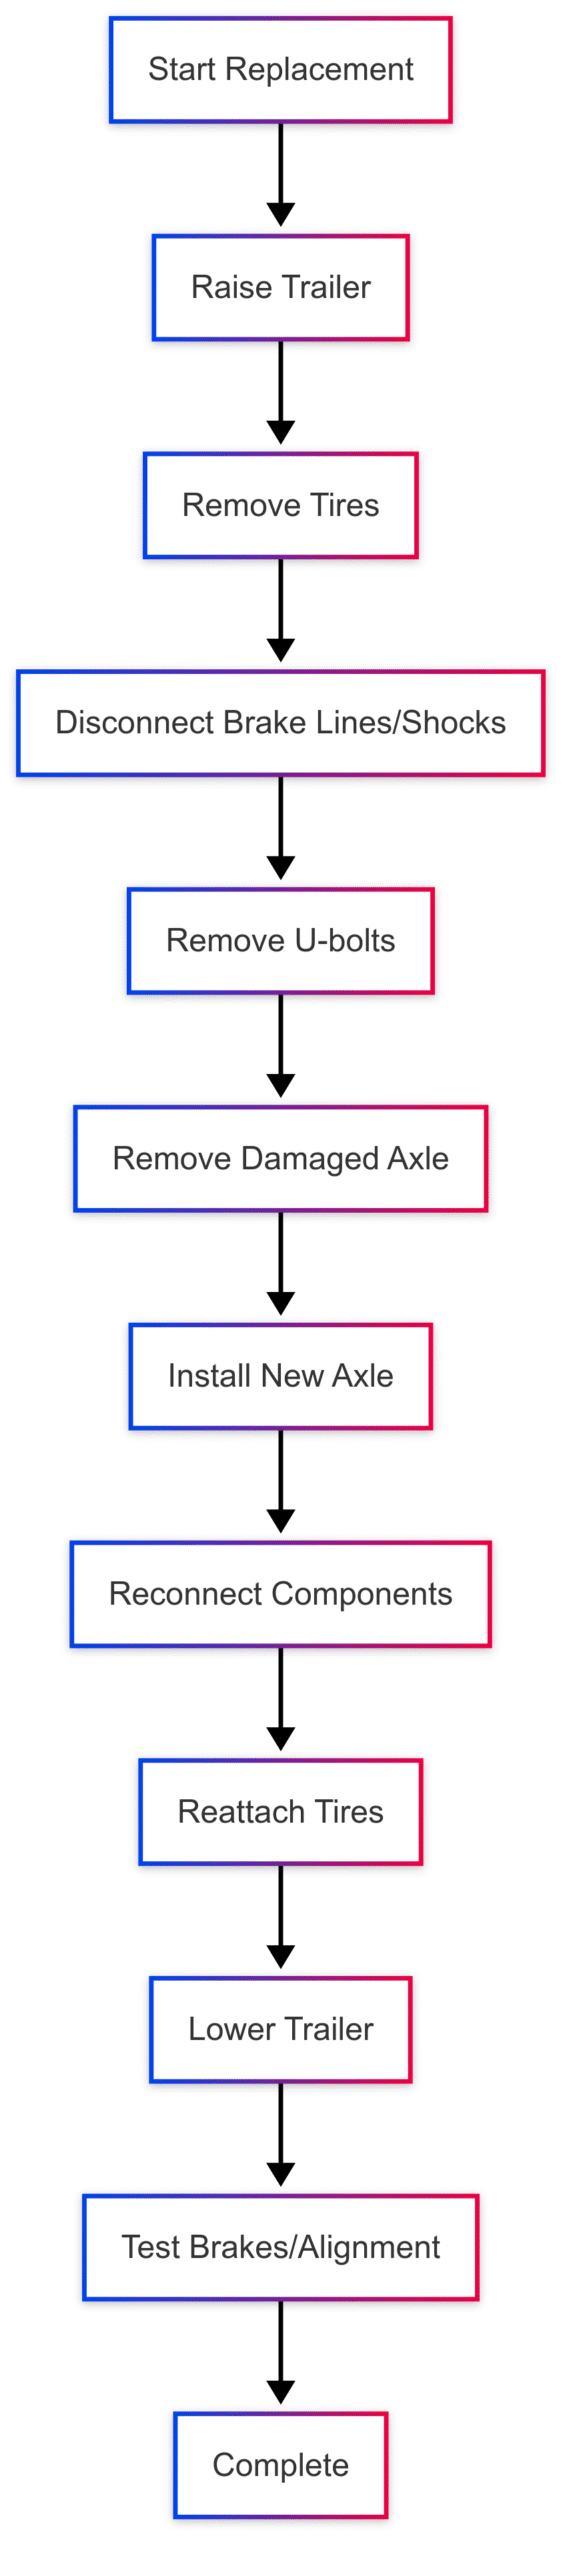
How to Replace a Trailer Axle
Replacing a trailer axle is a manageable task with the right tools and precautions. Below is a step-by-step guide to ensure a successful replacement.
Tools Needed
- Trailer jack and jack stands
- Tire iron
- Line wrench (for brake-equipped trailers)
- 1/2-inch ratchet and socket set
- Straightedge and tape measure
- Replacement axle and compatible springs (if needed)
Step-by-Step Replacement Process
Step 1: Raise the Trailer
- Park the trailer on a flat surface and chock the front wheels.
- Use a tire iron to loosen the lug nuts on the rear tires, but do not remove them yet.
- Raise the trailer with a jack and secure it with jack stands, ensuring stability.
- Remove the lug nuts and rear tires, setting them aside.
Step 2: Disconnect Components
- If the trailer has brakes, use a line wrench to gently disconnect the brake lines.
- For trailers with shocks, remove the lower shock mount from the axle and inspect for leaks or worn grommets.
- Disconnect the wheel bearing hubs and set them aside.
- Use a 1/2-inch ratchet and socket set to remove the U-bolts securing the leaf springs to the axle.
- Keep all components in a safe place for reinstallation.
Step 3: Remove the Damaged Axle
- Place jack stands under the center of the axle to support its weight.
- Carefully slide the axle out from under the trailer, ensuring it clears the leaf springs.
Step 4: Install the New Axle
- Position the new axle where the old one was removed, aligning the spring seats with the leaf springs.
- Secure the axle with U-bolts, tightening them snugly but not excessively to allow slight movement.
- Reinstall the shock absorbers, brake lines, wheel hubs, and brake assembly, ensuring all bolts are tightened appropriately.
Step 5: Final Checks
- Reattach the tires and tighten the lug nuts.
- Lower the trailer from the jack stands.
- Test the brakes and ensure the wheels spin freely.
- Perform a wheel alignment check using the straightedge method to confirm proper installation.
Chart: Axle Replacement Process
Common Causes of Axle Damage
Understanding what causes axle damage can help you prevent future issues:
- Overloading: Exceeding the axle’s load capacity stresses the beam, leading to bends or cracks.
- Potholes and Curbs: Sudden impacts from road hazards can bend the axle or spindle.
- Corrosion: Exposure to water, especially in boat trailers, can weaken the axle over time.
- Poor Maintenance: Neglecting bearing lubrication or ignoring early signs of wear accelerates damage.
Case Study: Lightweight Teardrop Trailer with a 3,500-lb Axle
Consider a scenario where a teardrop trailer owner plans to widen their trailer from 4’9” to 6’ wide, using a 3,500-lb axle from a boat trailer. The original 2,000-lb axle was insufficient for the desired width, and the new axle matches the target dimensions. However, concerns arise about the axle’s suitability due to reported inner tire wear, suggesting a potential bend.
Analysis
- Load Capacity: A teardrop trailer with a queen bed, bunks, and a window AC unit is unlikely to exceed 2,000 lbs, well within the 3,500-lb axle’s capacity. However, the heavier axle may result in a stiffer ride if paired with mismatched springs.
- Springs: The stiffness of a trailer’s ride is primarily determined by the springs, not the axle. Using the existing 2,000-lb springs with a 3,500-lb axle should provide adequate flexibility for a lightweight load.
- Tire Wear: Inner tire wear suggests a bent axle or spindle. A straightedge test is essential to confirm the axle’s condition before installation.
- Recommendation: Inspect the axle for bends using a straightedge and square. Repack the bearings, as boat trailer axles are prone to corrosion. If the axle is undamaged, it’s a cost-effective solution for the wider frame.
Safety Considerations
Driving with a damaged axle is risky. A severely bent axle can cause:
- Tire blowouts from uneven wear.
- Bearing or hub failure due to excessive stress.
- Loss of control, especially at high speeds.
If you suspect axle damage, stop driving and inspect the trailer immediately. For minor bends, monitor the trailer closely and plan for replacement. For severe damage, replace the axle before towing again.
Where to Buy Replacement Axles
Reputable suppliers like BlueSwift Axles offer custom-built spring and torsion axles, manufactured in the USA. Prices range from $150-$600, depending on specifications, with free shipping on orders over $100. Always verify the axle’s load capacity, track length, and spring centers before ordering.
Conclusion
A damaged trailer axle is a serious issue that demands prompt attention. By recognizing signs like rumbling noises, wobbly wheels, or uneven tire wear, you can diagnose problems early. Using simple tools like a straightedge and tape measure, you can confirm axle damage and decide whether replacement is necessary. Replacing an axle is a straightforward process with the right preparation, ensuring your trailer remains safe and reliable.
By following the steps outlined in this guide, you can confidently maintain your trailer’s axle, reducing the risk of accidents and extending the life of your tires and components. Regular inspections and proactive maintenance are key to safe towing, whether you’re hauling a boat, camper, or utility load. Take action today to keep your trailer in top condition.
Happy and safe boating!
Share Expert Guide to Know if a Trailer Axle is Damaged? with your friends and leave a comment below with your thoughts.
Read 5 Most Common Problems with Mercury 25 HP 4 Stroke until we meet in the next article.