What do you typically do to de-winterize an outboard?
Discover the step-by-step guide to de-winterizing your outboard motor, ensuring peak performance and safety for boating season.
De-winterizing an outboard motor is a critical maintenance task that reverses the protective measures taken during winter storage, preparing the engine for reliable operation on the water. This process involves inspecting, cleaning, replacing worn parts, and testing systems to prevent failures that could lead to costly repairs or safety issues. Whether you own a 2-stroke like a Yamaha 225 or a 4-stroke model, following a systematic approach ensures your motor starts smoothly and runs efficiently. In this comprehensive guide, we’ll cover the essential steps, tools needed, potential costs, and best practices drawn from expert advice and real-world experiences.
Understanding De-Winterization: Why It’s Essential
De-winterizing isn’t just about starting the engine after months of inactivity; it’s about safeguarding against corrosion, fluid degradation, and mechanical wear that can occur during storage. Outboard motors, exposed to harsh marine environments, are particularly vulnerable. During winterization, steps like fogging cylinders, draining coolant, and stabilizing fuel protect against freezing and rust. De-winterizing undoes these while verifying everything functions.
For instance, if your outboard sat unused for 5 months in a mild climate like Texas, as one boat owner described with their 2000 Yamaha 225 2-stroke, skipping proper prep could lead to rust in cylinders or clogged fuel lines. Experts emphasize that even in regions without severe winters, extended downtime requires attention to prevent issues like phase separation in fuel or impeller failure.
The payoff is clear: a well-maintained outboard reduces breakdown risks, extends engine life, and ensures compliance with safety standards. Neglecting it might void warranties or lead to emergencies, such as an overheating engine miles offshore.
Timing Your De-Winterization
Timing is key to avoid undoing winterization protections too early, which could expose the engine to late freezes, or too late, shortening your boating season. Monitor local weather forecasts for the last expected freeze—typically when temperatures consistently stay above 32°F. Use resources like NOAA data for regional averages, but prioritize real-time updates.
In preparation, handle non-engine tasks on warmer early spring days: remove covers, inspect hulls, and check trailers. Reserve engine-related steps—draining antifreeze, starting the motor, or flushing systems—until freeze risks pass. This balanced approach maximizes time on the water while minimizing damage.
Step-by-Step Guide to De-Winterizing an Outboard Motor
De-winterizing typically takes a weekend, depending on your motor’s type and condition. Gather tools like wrenches, screwdrivers, a multimeter, oil extractor, fuel stabilizer, and protective gear. Always consult your owner’s manual for model-specific specs, such as oil types or torque settings.
Step 1: Remove Covers and Inspect for Damage
Begin by carefully removing any shrink wrap, tarp, or canvas cover. Inspect the cover for tears—if reusable, repair it; otherwise, replace for next winter. Costs for a basic tarp range from $50-$200, while custom canvas covers can hit $500+.
Check the outboard and boat for pests: look for nests, droppings, or gnaw marks on wiring. Rodents can damage electrical systems, costing $100-$300 to repair. Clean the exterior with mild soap and water, then wax the cowling to protect against UV damage. Polish metal parts and apply anti-corrosion spray like Corrosion-X ($15-$25 per can).
For the hull, inspect for cracks, blisters, or distortion. Sand if needed and apply antifouling paint ($50-$150 per gallon) to prevent biofouling. This step is crucial for outboards, as hull integrity affects motor performance.
Step 2: Battery Inspection and Reconnection
Batteries often weaken in storage. If trickle-charged over winter, disconnect the charger. Test voltage (should be 12.6V+ for a healthy battery) and specific gravity using a hydrometer. Clean terminals with a baking soda solution to remove corrosion.
If the battery won’t hold a charge, replace it—marine batteries cost $100-$250. Top off cells with distilled water. Reconnect cables securely, ensuring positive first, then negative. Test by cranking the engine briefly (without starting) to check amps.
For dual-battery setups common in larger outboards, verify the selector switch functions. A faulty battery can prevent starting, stranding you at the dock.
Step 3: Fuel System Check and Refresh
Fuel degradation is a top issue post-storage. Inspect the tank, lines, pump, filter, and vents for leaks, cracks, or softening—rubber components degrade in cold. Replace hoses if swollen ($10-$30 each).
If fuel wasn’t stabilized, drain the tank to remove stale gas, which can gum up injectors or carbs. Refill with fresh, non-ethanol fuel and add stabilizer like Sta-Bil ($10-$20 bottle). For 2-strokes, mix oil at 50:1 initially if injection system needs verification.
Change the water-separating fuel filter ($20-$50) and any in-line filters. Run the engine on muffs (earmuff-style flushers, $15-$30) to circulate new fuel. For Yamaha models, check the sight glass on the motor’s filter—if dirty, replace the internal one ($30-$60).
One expert tip: Run the engine briefly with the old filter to capture any winter condensation, then swap to a new one.
Step 4: Oil and Lubrication Maintenance
Change the engine oil and filter to remove contaminants. For 2-strokes like the Yamaha 225, use TC-W3 oil; 4-strokes require marine-grade 10W-30 or per manual specs ($20-$40 per quart). Extract old oil via dipstick tube, replace filter ($10-$20), and refill.
Check lower unit gear oil—drain and inspect for milky appearance indicating water intrusion. Refill with appropriate lube ($15-$25 quart). Grease fittings on steering, tilt/trim, and prop shaft using marine grease ($10 tube).
Inspect belts and hoses for cracks or wear. Replace serpentine belts if slack ($20-$50). Tighten prop nut to spec (e.g., 55 ft-lbs for many Yamahas) and check sacrificial anodes—replace if 50% eroded ($10-$30 each).
Step 5: Cooling System Flush and Inspection
Outboards rely on impellers for cooling—failure causes overheating. Inspect hoses for cracks; replace if needed ($10-$20 each). Empty the raw water strainer and clean debris.
Flush the system if not done pre-storage: run fresh water through on muffs to clear salt or antifreeze. Refill closed systems with 50/50 coolant/distilled water ($10-$20 gallon).
Replace the impeller every 200 hours or annually ($30-$80 kit). For outboards, this involves removing the lower unit—follow a service manual or video. Check the thermostat: test in hot water to ensure it opens at spec temp (e.g., 140°F for many models). Replace if faulty ($20-$40).
Step 6: Engine Fogging Reversal and Spark Plug Check
If fogged during winterization, clear excess oil by removing spark plugs and cranking the engine. Inspect plugs for fouling—replace annually ($5-$15 each). For 2-strokes, fogging protects cylinders from rust; 4-strokes benefit too, despite having crankcase oil.
Reinstall plugs gapped to spec (e.g., 0.030″ for Yamaha 225). Wipe down the powerhead with anti-corrosion spray.
Experts note that while lawnmowers (4-strokes) often skip fogging, outboards warrant it due to marine exposure and higher costs—engines run $5,000-$20,000.
Step 7: Electrical and Control Systems Test
With the battery connected, test electronics: lights, GPS, depth finder, and bilge pump. For the bilge, float the switch in water to verify activation. Clean distributor cap if corroded, applying dielectric grease ($5 tube).
Operate throttle and shift levers for smoothness—lubricate cables if stiff ($10-$20). Check power trim/tilt fluid and top off ($10 quart).
Inspect wiring for rodent damage or corrosion—repair with marine-grade connectors ($5-$15 pack).
Step 8: Safety Gear and Documentation Review
Verify safety equipment: life jackets (one per person, $20-$50 each), flares (replace if expired, $30-$60 kit), fire extinguisher ($20-$40), horn, and first aid kit. Check throwable devices and MOB gear.
Update registrations, insurance, and trailer tags. Log all maintenance in a book for records.
Step 9: Trailer and Through-Hull Inspection
Inspect trailer tires for rot or low pressure (inflate to spec, e.g., 50 PSI). Grease wheel bearings ($10 kit) and check lights/brakes. Replace surge brake fluid if low ($5-$10).
Examine through-hull fittings and seacocks for leaks—exercise them open/closed.
Step 10: Final Run-Up and Test
Attach muffs, start the engine, and monitor for leaks, unusual noises, or overheating. Run at idle, then vary RPMs. Check exhaust for proper water flow.
If issues arise, consult a mechanic—de-winterization services cost $150-$500, depending on boat size.
Costs Breakdown: What to Expect
De-winterizing can be DIY to save money, but factor in parts. Here’s a table of typical expenses:
| Item | Approximate Cost | Notes |
|---|---|---|
| Oil Change (oil + filter) | $30-$60 | Per engine; more for synthetics |
| Fuel Filter Replacement | $20-$50 | Includes water-separating type |
| Impeller Kit | $30-$80 | Yamaha-specific around $50 |
| Spark Plugs (set) | $20-$60 | 4-6 plugs for most outboards |
| Antifouling Paint | $50-$150/gallon | Covers average hull |
| Battery Replacement | $100-$250 | Marine deep-cycle |
| Professional Service | $150-$500 | Full de-winterize package |
| Miscellaneous (grease, stabilizer) | $20-$50 | Essentials kit |
Total DIY cost: $200-$500. Hiring out: add labor at $100-$150/hour.
Visualizing the Process: A Flowchart
To streamline de-winterizing, follow this Mermaid flowchart:
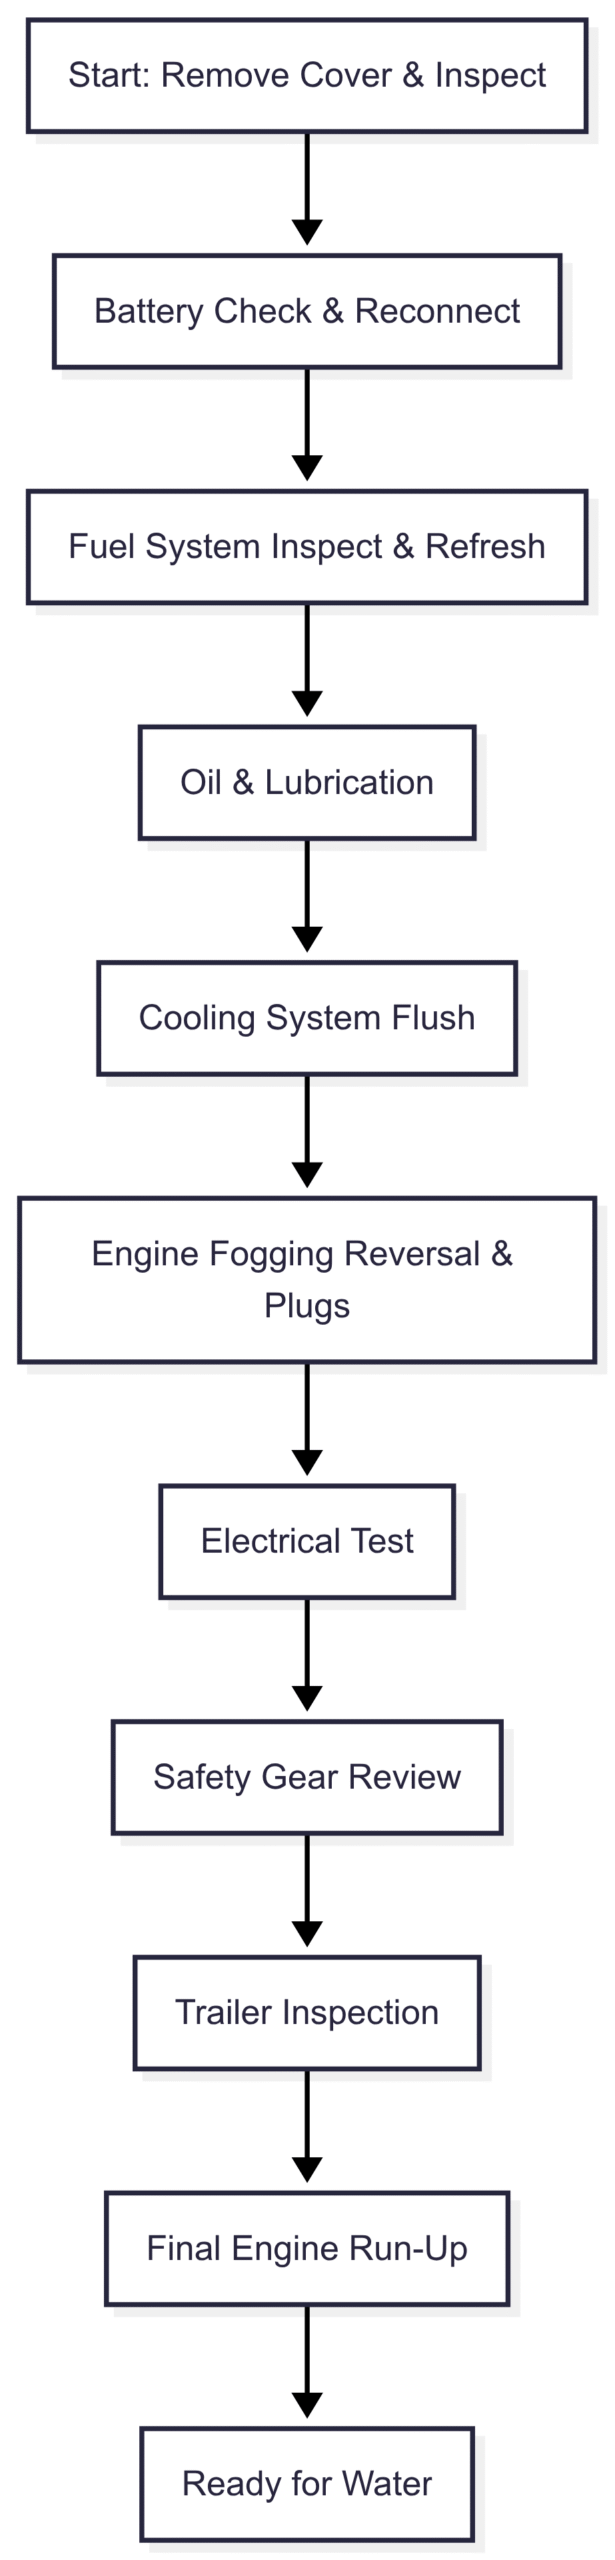
This sequential chart ensures no steps are missed, promoting efficiency.
Common Pitfalls and Expert Tips
Avoid starting without fresh fuel—stale gas clogs carbs. For 2-strokes, verify oil injection by running premix initially. 4-strokes need less fogging but check valves.
One forum user advised contacting your winterization service for specifics—they might include de-winterizing in fees (e.g., $900 total package mentioned).
In mild climates, focus on fogging and stabilizing regardless of “winter.” Always prioritize safety—test bilge pumps offshore-ready.
Conclusion: Launch with Confidence
De-winterizing your outboard motor sets the stage for a trouble-free season. By methodically addressing each system, you’ll catch issues early, saving time and money. Whether tackling it yourself or enlisting pros, this investment pays dividends in performance and peace of mind. With your motor prepped, hit the water knowing it’s as ready as you are.
Happy Boating!
Share What do you typically do to de-winterize an outboard? with your friends and leave a comment below with your thoughts.
Read How to De Winterize an Inboard Boat Motor in 1-3 Hours until we meet in the next article.