Checking Compression On An Outboard Engine
Learn how to perform a compression test on an outboard engine to diagnose cylinder health, with step-by-step instructions and expert tips.
Outboard engines are the heart of many boats, powering everything from small fishing vessels to high-performance recreational crafts. Ensuring their optimal performance requires regular maintenance and diagnostics, with the compression test being one of the most critical procedures. A compression test evaluates the health of an engine’s cylinders by measuring the pressure they can build, revealing issues like worn piston rings, leaky valves, or a blown head gasket. This guide provides a detailed, step-by-step process for performing a compression test on an outboard engine, along with expert insights, practical considerations, and troubleshooting tips to help boat owners maintain their engines effectively.
Why Compression Testing Matters
Compression is a fundamental aspect of an outboard engine’s operation. For an engine to run efficiently, it needs the right balance of air, fuel, spark, compression, and an unobstructed exhaust. The piston rings seal against the cylinder walls, allowing the air-fuel mixture to be compressed during the piston’s upstroke. This compression is essential for efficient combustion, which powers the engine. If the piston rings or cylinder walls are worn, or if valves or head gaskets are faulty, the engine’s performance suffers, leading to reduced power, poor fuel efficiency, or even complete failure.
A compression test measures the pressure (in pounds per square inch, or PSI) generated by the piston’s movement within the cylinder. Healthy compression indicates that the piston rings are sealing properly, the cylinder walls are in good condition, and the valves are functioning correctly. Low or inconsistent readings can signal problems that, if unaddressed, may lead to costly repairs. By performing a compression test, boat owners can diagnose issues early, saving time and money while ensuring their engine remains reliable on the water.
Benefits of Regular Compression Testing
- Early Problem Detection: Identifies issues like worn piston rings or leaky valves before they cause significant damage.
- Performance Optimization: Ensures the engine runs efficiently, delivering maximum power and fuel economy.
- Cost Savings: Prevents major repairs by addressing minor issues early.
- Baseline Data: Provides a reference for future tests, helping track engine health over time.
Tools and Equipment Needed
To perform a compression test on an outboard engine, you’ll need the following tools:
- Compression Tester: A quality gauge with adapters that fit your engine’s spark plug or injector threads. Brands like Snap-On or Mac are preferred by professionals, but affordable options from auto parts stores work for occasional use.
- Wrench or Socket Set: Typically, a 5/8-inch socket for spark plugs, though this varies by engine.
- Spark Plug Gap Tool: To check and adjust spark plug gaps during reassembly.
- Torque Wrench: For properly tightening spark plugs to avoid thread damage.
- Screwdriver or Pliers: To disconnect ignition components or fuel pump relays.
- Outboard Muffs or Barrel: To provide cooling water if running the engine out of water.
- Spark Tester: To ground ignition leads and prevent damage or sparks during testing.
- Engine Manual: For model-specific procedures and compression ranges.
- Notebook and Pen: To record compression readings for each cylinder.
Optional Tools
- Leak-Down Tester: For further diagnostics if compression readings are low.
- Teaspoon and Engine Oil: For performing a wet compression test to diagnose piston ring or valve issues.
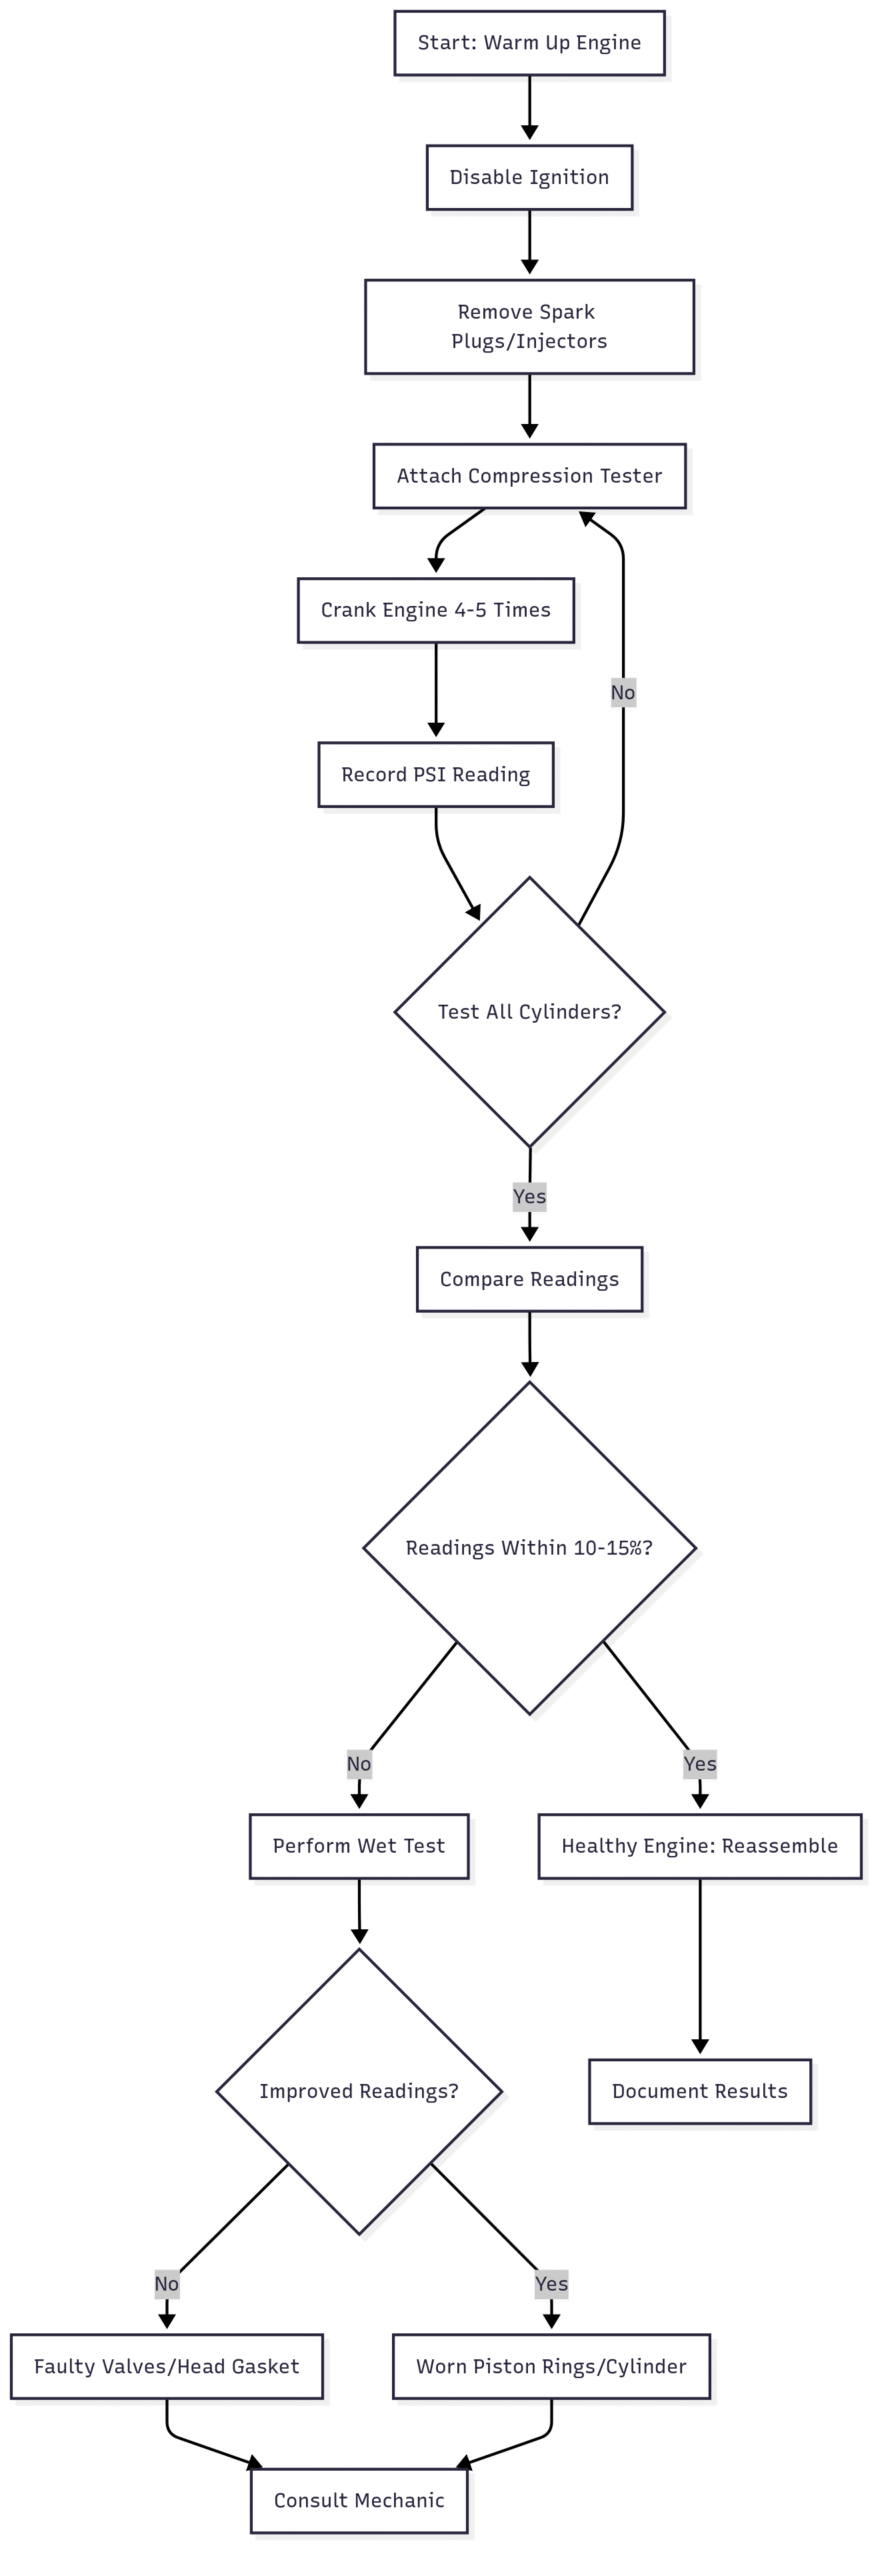
Step-by-Step Guide to Performing a Compression Test
The compression test is a straightforward process, but it requires careful preparation to ensure accurate results and avoid injury. Below is a detailed guide tailored to outboard engines, accounting for variations like two-stroke versus four-stroke engines, fuel-injected systems, and manual or electric starters.
Step 1: Warm Up the Engine
Run the engine until it reaches its normal operating temperature, typically 10-15 minutes. A warm engine provides consistent and accurate compression readings, as components like piston rings and cylinder walls expand to their operational state. If testing out of water, attach outboard muffs or place the lower unit in a barrel of water to ensure proper cooling, as specified in your engine’s manual.
Safety Tip: Ensure the boat is securely moored or on a trailer, and keep hands and clothing clear of moving parts like the propeller.
Step 2: Prepare the Engine
- Disable the Ignition: Prevent accidental starting by disconnecting the ignition coil wire, unplugging the fuel pump relay, or removing the engine kill switch. For electric-start engines, you may need to reconnect the battery later to crank the engine.
- Remove Spark Plugs or Injectors:
- For gasoline engines, locate the spark plugs and remove them using a socket wrench (typically 5/8 inch). Label each spark plug or lead to ensure correct reassembly.
- For diesel engines, refer to the manual to safely remove fuel injectors or glow plugs.
- Inspect Spark Plugs: Check for wear, fouling, or improper gapping. Spark plugs should be medium tan to brown after high-speed operation or dark brown to black after idling. Light tan or white plugs indicate a lean condition, which requires further investigation.
Safety Note: Ground all spark plug leads using a spark tester to prevent ignition damage or fuel vapor ignition, which can occur from open cylinders.
Step 3: Set Up the Compression Tester
Select the correct adapter for your engine’s spark plug or injector threads. Screw the adapter into the first cylinder’s spark plug hole, ensuring a tight seal to prevent pressure leaks. Attach the compression tester to the adapter, confirming it’s secure.
Step 4: Perform the Compression Test
- Crank the Engine: Use the starter motor or pull cord to turn the engine over for 4-5 revolutions, or until the compression gauge needle stops rising. For electric-start engines, ensure the throttle is open (if required by your manual) to allow sufficient air intake.
- Record the Reading: Note the highest pressure reading (in PSI) for the cylinder. Reset the gauge to zero before testing the next cylinder.
- Repeat for Each Cylinder: Move the tester to the next cylinder and repeat the process, recording each reading.
Step 5: Analyze the Results
Compare the compression readings across all cylinders. Healthy engines typically have readings within 10-15% of each other. For example, if the highest reading is 200 PSI, all cylinders should be within 170-230 PSI. Significant deviations or low readings indicate potential issues.
Typical Compression Ranges:
- Modern Two-Stroke Outboards: 90-105 PSI
- Older or High-Performance Two-Stroke Outboards: 115-140 PSI
- Four-Stroke Outboards: 180-220 PSI (e.g., a Suzuki DF115 may read ~210 PSI)
Table 1: Typical Compression Ranges for Outboard Engines
| Engine Type | Expected PSI Range | Notes |
|---|---|---|
| Modern Two-Stroke | 90-105 PSI | Varies by make and model |
| Older/High-Performance Two-Stroke | 115-140 PSI | Check manual for specifics |
| Four-Stroke | 180-220 PSI | Higher due to design differences |
If a cylinder shows a low reading, perform a wet compression test:
- Add a teaspoon of engine oil to the suspect cylinder through the spark plug hole.
- Retest the cylinder and compare the new reading to the dry test.
- Interpretation:
- If the reading increases significantly, the issue is likely worn piston rings or cylinder walls, as the oil temporarily improves the seal.
- If the reading remains low, suspect faulty valves or a blown head gasket.
Step 6: Reassemble and Document
- Reinstall Spark Plugs or Injectors: Use a torque wrench to tighten spark plugs to the manufacturer’s specifications (e.g., 18-22 ft-lbs for many outboards). Replace worn or improperly gapped plugs with new ones.
- Reconnect Ignition Components: Restore all disconnected wires or relays.
- Record Results: Log the compression readings for each cylinder in a maintenance notebook. This baseline data is invaluable for future diagnostics or when selling the engine.
Chart: Compression Test Workflow
Interpreting Compression Test Results
Compression test results provide critical insights into engine health. Here’s how to interpret common scenarios:
- Consistent Readings Within 10-15%: Indicates a healthy engine. For example, a Suzuki DF115 with readings of 208, 210, 212, and 209 PSI is in excellent condition.
- Low Readings Across All Cylinders: Suggests overall engine wear, such as out-of-round or tapered cylinders. This may require a rebuild or replacement.
- Low Reading in One Cylinder: Indicates a specific issue, such as a broken piston ring, scored cylinder, or faulty valve. A wet test can help pinpoint the cause.
- Zero or Near-Zero Reading: Suggests severe damage, like a broken piston or connecting rod. Immediate professional inspection is needed.
Common Issues and Causes
| Issue | Likely Cause | Action |
|---|---|---|
| Low compression in one cylinder | Worn piston rings, scored cylinder, bad valve | Wet test, inspect cylinder head |
| Low compression in all cylinders | Worn cylinders, general engine wear | Consider rebuild or replacement |
| Zero compression | Broken piston, connecting rod failure | Professional inspection required |
| Carbon buildup | Stuck piston rings | Use decarbonizing products, rebuild |
Troubleshooting Low Compression
If your compression test reveals issues, consider the following steps:
- Carbon Buildup: Carbon deposits in piston-ring grooves can prevent proper sealing. Products like Yamaha Ring Free or Mercury Engine Tuner can help dissolve deposits when added to fuel or sprayed into air intakes. Consult your engine manufacturer before using such products, as improper use can cause damage.
- Worn Components: Worn piston rings or cylinder walls may require an engine rebuild. This involves disassembling the engine, replacing worn parts, and honing or boring cylinders.
- Valve or Gasket Issues: Leaky valves or a blown head gasket often require cylinder head removal and repair by a professional mechanic.
- Further Diagnostics: A leak-down test can identify the source of compression loss (e.g., valves, rings, or head gasket) by measuring air leakage while the piston is at top-dead-center.
Safety Warning: Engine disassembly and advanced diagnostics carry risks of injury and further damage. If you’re unsure, consult a qualified marine mechanic.
Additional Considerations
Two-Stroke vs. Four-Stroke Engines
Two-stroke outboards typically produce lower compression (90-140 PSI) due to their simpler design, while four-stroke engines generate higher pressures (180-220 PSI). Always refer to your engine’s manual for specific ranges, as they vary by make, model, and year.
Cold vs. Warm Testing
While some advocate for cold compression testing, warm testing is preferred because it reflects the engine’s operating conditions. Cold testing may yield lower readings due to incomplete sealing of piston rings.
Manual vs. Electric Start
For manual-start engines, use the pull cord to crank the engine consistently. For electric-start engines, ensure the battery is charged, and use a bypass button if needed to open the throttle during cranking.
Professional Assistance
If you’re unfamiliar with your engine’s specifics or encounter low readings, consult a marine mechanic. They can perform advanced diagnostics, such as a leak-down test, and recommend repairs.
Maintaining Engine Health
Regular compression testing is part of a broader maintenance strategy to keep your outboard engine in top condition. Additional tips include:
- Routine Maintenance: Follow the manufacturer’s maintenance schedule, including oil changes, fuel filter replacements, and spark plug inspections.
- Proper Storage: Store the engine in a dry, upright position to prevent oil pooling in cylinders, which can affect compression.
- Fuel Quality: Use clean, ethanol-free fuel to minimize carbon buildup and corrosion.
- Annual Testing: Perform a compression test annually or after every 100 hours of operation to monitor engine health.
Cost of Tools and Services
| Item/Service | Approximate Cost (USD) | Notes |
|---|---|---|
| Compression Tester | $30-$150 | Basic models start at $30; professional-grade up to $150 |
| Spark Plug Socket | $5-$15 | Depends on size and quality |
| Torque Wrench | $20-$100 | Essential for proper plug installation |
| Spark Tester | $10-$25 | Prevents ignition damage |
| Professional Compression Test | $100-$200 | Varies by region and shop rates |
| Leak-Down Test (Professional) | $150-$300 | Additional diagnostic service |
Conclusion
Performing a compression test on an outboard engine is a vital diagnostic tool for assessing cylinder health and ensuring optimal performance. By following the steps outlined in this guide—warming the engine, preparing the components, conducting the test, and analyzing the results—boat owners can identify issues early and take corrective action. Whether you’re a seasoned boater or a novice, understanding this process empowers you to maintain your engine effectively and communicate confidently with marine mechanics. Regular testing, combined with proper maintenance, will keep your outboard engine running smoothly for years, ensuring safe and enjoyable time on the water.
Tip: Always consult your engine’s manual for model-specific instructions, and don’t hesitate to seek professional help for complex issues. Record your compression readings for future reference, and consider investing in quality tools for accurate diagnostics.
Share Checking Compression On An Outboard Engine with your friends and Leave a comment below with your thoughts.
Read How to Store Fishing Rods in Boat Securely? [Effective Way] until we meet in the next article.