Can you winterize a boat without starting the engines
Learn how to winterize a boat without starting the engine. Step-by-step guide to protect your boat’s engine from freezing and corrosion.
Winterizing a boat is a critical maintenance task for boat owners in regions where freezing temperatures threaten engine components. Traditionally, winterization involves running the engine to circulate antifreeze, fogging oil, and fuel stabilizer through the system. However, situations like dead batteries, mechanical issues, or fuel pump failures can prevent starting the engine. The good news is that it’s possible to winterize a boat without starting the engine, though it requires careful attention to detail to ensure protection against freezing, corrosion, and fuel degradation. This comprehensive guide explores the process, alternative methods, and best practices, drawing from expert advice and real-world boating experiences.
Why Winterize a Boat?
Winterizing protects a boat’s engine and systems from damage caused by freezing water, corrosion, and fuel breakdown during storage. Water left in the engine block, manifolds, or coolers can freeze and expand, cracking components. Corrosion can harm internal engine parts, while untreated fuel can degrade, clogging fuel lines or carburetors. For boat owners unable to start their engines due to mechanical issues, dead batteries, or other constraints, alternative winterization methods are essential to avoid costly repairs.
Challenges of Winterizing Without Starting the Engine
Running the engine during winterization ensures that antifreeze, fogging oil, and fuel stabilizer reach all critical components. Without starting the engine, these substances must be introduced manually, which can be less thorough. Key challenges include:
- Incomplete Circulation: Antifreeze and fogging oil may not reach all areas, leaving pockets of water or unprotected surfaces.
- Fuel Stabilization: Stabilizer may not circulate through fuel lines or carburetors, increasing the risk of fuel degradation.
- Mechanical Uncertainty: A non-running engine may have underlying issues that affect winterization effectiveness.
Despite these challenges, careful execution of alternative methods can provide adequate protection for most boats.
Step-by-Step Guide to Winterizing Without Starting the Engine
Below is a detailed process for winterizing a boat’s engine without starting it, tailored for both inboard and outboard engines. Always consult your engine’s owner’s manual for model-specific instructions.
1. Draining the Cooling System
The primary goal of winterization is to eliminate water from the engine and cooling system to prevent freezing damage. This step is critical for both inboard and outboard engines.
Outboard Engines
Most modern outboards feature a flushing port, allowing fresh water to be flushed through the system without running the engine. Follow these steps:
- Flush with Fresh Water: Connect a garden hose to the flushing port and run fresh water through the system to remove salt or debris.
- Drain Completely: Tilt the outboard to its lowest position to drain water from the cooling system. Remove drain plugs or petcocks, typically located on the engine block or lower unit, to ensure no water remains.
- Inspect Hoses and Impeller: Remove hoses to check for trapped water and ensure the raw water pump impeller is drained or removed to prevent freezing damage.
Inboard Engines
Inboard engines require thorough draining of the engine block, manifolds, and coolers:
- Locate Drain Plugs: Identify all drain plugs on the engine block, exhaust manifolds, oil coolers, power steering coolers, and heat exchangers. Most inboards have 3–4 drain plugs per side.
- Remove Plugs and Drain: Open all drain plugs and tilt the boat to facilitate drainage. Use a shop vacuum to suck out residual water from hard-to-reach areas.
- Disconnect Hoses: Remove hoses from the thermostat housing, raw water pump, and other components to ensure no water is trapped.
- Drain Water-Lift Muffler: If equipped, drain the muffler using its drain plug or siphon to prevent backflow into the engine.
Lower Unit (If Applicable)
For outboards or stern drives, drain and refill the lower unit gear lube:
- Remove Drain Screw: Locate the drain screw on the lower unit and remove it to drain old gear lube.
- Inspect for Water: Milky or cloudy lube indicates water intrusion, requiring further inspection.
- Refill with Fresh Lube: Use manufacturer-recommended gear lube and refill until it overflows from the fill hole.
Table 1: Common Drain Points for Boat Engines
| Component | Location | Action |
|---|---|---|
| Engine Block | Sides or bottom of block | Remove drain plugs, tilt to drain |
| Exhaust Manifolds | Lower section of manifolds | Remove drain plugs, ensure clear flow |
| Oil/Power Steering Coolers | Near engine accessories | Disconnect hoses, drain completely |
| Water-Lift Muffler | Base of muffler | Remove drain plug or siphon water |
| Lower Unit | Bottom of outboard or stern drive | Drain and refill with gear lube |
2. Fuel System Treatment
Fuel left untreated can degrade over winter, forming varnish or gum that clogs fuel lines and carburetors. Without running the engine, stabilizing the fuel requires alternative methods.
- Add Fuel Stabilizer: Pour a marine-grade fuel stabilizer (e.g., STA-BIL or Startron) into the fuel tank per the manufacturer’s instructions. Top off the tank to minimize air space and prevent condensation.
- Manual Circulation (Carbureted Engines): For carbureted engines, remove the fuel line and pour a small amount of stabilizer directly into the carburetor or fuel filter. Crank the engine manually (with ignition off) to distribute the stabilizer.
- EFI Engines: Electronic fuel injection (EFI) systems are harder to treat without running. Adding stabilizer to the tank and shaking the boat or towing the trailer can mix the stabilizer, but fuel in injectors may remain untreated.
- Drain Fuel Lines (Optional): For boats with ethanol-blended fuel (E10), consider draining fuel lines to prevent ethanol-related issues, though this is rarely necessary with proper stabilization.
Note: Some boaters report success without running stabilizer through the system, provided the tank is treated and the boat is stored for only 4–6 months. However, circulating stabilizer is ideal for long-term storage.
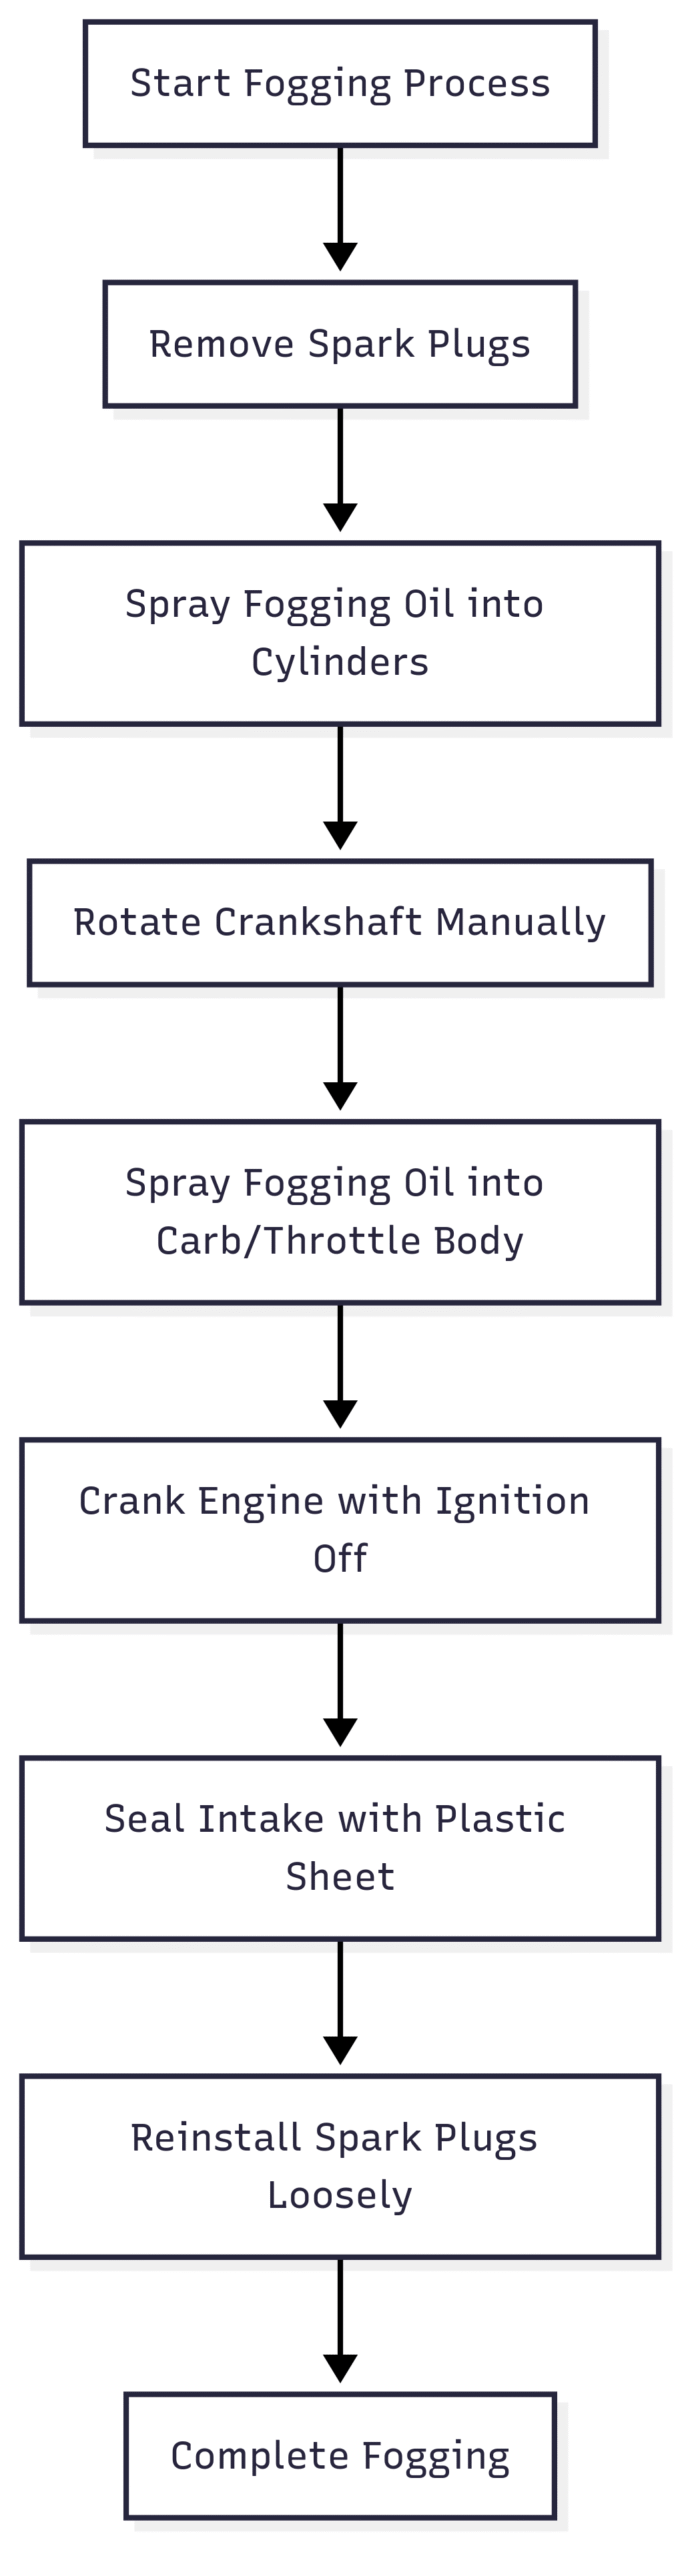
3. Fogging the Engine
Fogging oil coats internal engine components to prevent corrosion during storage. While running the engine is the most effective way to apply fogging oil, manual methods work for non-running engines.
Carbureted Engines
- Remove Spark Plugs: Disconnect and remove all spark plugs to access the cylinders.
- Spray Fogging Oil: Spray marine fogging oil (e.g., CRC or Mercury Precision) into each cylinder for 2–3 seconds. Rotate the crankshaft manually (using a wrench or remote starter with ignition off) to distribute the oil.
- Spray into Intake: Spray fogging oil into the carburetor or throttle body while cranking the engine (ignition off) to coat the intake manifold and valve seats.
- Seal the Intake: Cover the carburetor or throttle body with a plastic sheet and secure it with the flame arrestor to prevent moisture ingress. Remove this cover before starting in spring.
EFI Engines
- Fog Cylinders: Follow the same spark plug removal and fogging process as for carbureted engines.
- Treat Fuel System: EFI engines rely on oil-enriched fuel for stabilization, which is challenging without running. Adding a small amount of 2-cycle oil to the fuel filter (after draining half) can provide some protection, though this is less effective.
Debate on Fogging
Some mechanics argue fogging is unnecessary for 4-stroke engines stored for 4–6 months, comparing it to parking a car for the winter. However, others emphasize its importance for protecting valve seats, stems, and cylinder walls, especially in humid or coastal environments. Fogging is critical for 2-stroke outboards due to their needle-bearing design, which is prone to corrosion.
Chart: Fogging Process for Non-Running Engine
4. Antifreeze Application (Optional but Recommended)
Antifreeze provides an extra layer of protection against freezing and corrosion, especially for inboard engines. Outboards typically don’t require antifreeze if fully drained, but inboards benefit from it.
Inboard Engines
- Choose Antifreeze: Use non-toxic RV antifreeze (propylene glycol, often pink) rated for marine use. Avoid automotive antifreeze (ethylene glycol, green), which is toxic and less effective.
- Manual Application: Without running the engine, pour antifreeze into the cooling system via the thermostat housing, raw water pump inlet, or a disconnected hose. Ensure antifreeze flows through the block, manifolds, and coolers until it exits the exhaust or drain plugs.
- Use a Pump: For thorough distribution, use a small bilge pump to push antifreeze through the system from a bucket. Monitor for solid pink flow at the exhaust to confirm complete coverage.
- Avoid Overfilling: Ensure the water-lift muffler is drained to prevent backflow into the engine, which could cause hydrolock.
Risks of Antifreeze
Improper antifreeze application can leave water pockets, diluting the solution and reducing protection. Some boaters prefer draining completely over using antifreeze to avoid this risk, especially if all water is removed.
Table 2: Antifreeze vs. Draining Comparison
| Method | Pros | Cons |
|---|---|---|
| Draining Only | Simple, no cost, no risk of dilution | May miss water pockets, no corrosion protection |
| Antifreeze | Added corrosion protection, freeze-proof | Risk of incomplete mixing, cost of antifreeze |
5. Oil and Filter Maintenance
Used engine oil contains acidic contaminants that can corrode bearings during storage. Changing the oil is critical, even for a non-running engine.
- Drain Old Oil: Remove the oil drain plug and let the oil drain completely. Crank the engine briefly (ignition off) to push out residual oil.
- Replace Filter: Install a new oil filter, but consider reusing it in spring if another oil change is planned.
- Add Fresh Oil: Refill with manufacturer-recommended marine oil to protect bearings and journals.
- Why It Matters: Acidic oil can etch Babbitt-coated bearings, leading to premature wear. Fresh oil ensures a protective film remains during storage.
6. Battery Maintenance
Dead batteries are a common reason engines won’t start for winterization. Proper battery care prevents freezing and ensures spring startup.
- Remove Batteries: Disconnect and remove batteries to store in a cool, dry place.
- Charge and Maintain: Use a trickle charger to keep batteries at full charge. Check water levels in non-sealed batteries and top off with distilled water.
- Inspect Cables: Clean and grease battery terminals to prevent corrosion. Label cables for easy reinstallation.
- Diagnose Dead Batteries: If batteries were dead, investigate potential causes like parasitic drains or faulty charging systems before spring.
7. Outdrive and Drive Maintenance
For boats with outdrives or stern drives, winterizing the drive system is essential.
- Lower the Drive: Position the outdrive in the down position to relax bellows and shift cables.
- Drain Gear Oil: Remove the drain plug to drain old gear oil and inspect for water intrusion. Refill with fresh marine gear oil.
- Inspect Zincs: Check sacrificial anodes (zincs) on the drive and replace if worn.
- Remove Propeller: Remove the propeller to prevent theft and cover the shaft opening to keep out rodents.
- Grease Fittings: Lubricate all grease points, including tilt/trim, steering, and drive couplings.
8. Additional Winterization Tasks
To fully protect the boat, address these ancillary systems:
- Fresh Water Tanks: Drain and add biodegradable antifreeze to freshwater systems, showers, and heads. Avoid automotive antifreeze.
- Bilge and Storage Areas: Remove standing water from bilge, coolers, and lockers to prevent freezing or mildew.
- Interior Protection: Place moisture absorbers or dryer sheets in the cabin to combat mildew. Use rodent repellent if stored outdoors.
- Electronics: Remove portable electronics and store in a dry place.
- Trailer Maintenance: Inspect trailer bearings, brakes, and tires. Block the trailer to prevent flat spots and loosen tie-downs to reduce hull stress.
- Boat Cover: Use a sturdy cover to protect against snow and debris. Add a tarp for extra protection in harsh climates.
Table 3: Winterization Checklist
| Task | Inboard | Outboard | Priority |
|---|---|---|---|
| Drain Cooling System | Yes | Yes | High |
| Add Fuel Stabilizer | Yes | Yes | High |
| Fog Engine | Yes | Yes | Medium |
| Apply Antifreeze | Yes | Optional | Medium |
| Change Oil and Filter | Yes | Yes | High |
| Remove and Charge Battery | Yes | Yes | High |
| Drain Outdrive Gear Oil | Yes | Yes | High |
| Protect Interior | Yes | Yes | Medium |
Real-World Experiences and Lessons
Boating forums reveal varied experiences with winterizing non-running engines. One boater with a dead battery had their mechanic pour antifreeze through the manifolds, but forum members criticized the lack of fogging and fuel stabilization, highlighting the risks of incomplete winterization. Another boater with a Volvo Penta 3.0 successfully drained the system and fogged cylinders manually, avoiding damage despite starter issues. A Perkins 236 owner used a bilge pump to circulate antifreeze without cranking, demonstrating a creative solution for a missing injector pump.
These cases underscore the importance of thorough draining, manual fogging, and fuel treatment. They also highlight the value of consulting experts or doing it yourself if a mechanic’s work seems inadequate.
Professional vs. DIY Winterization
Hiring a marine mechanic ensures expertise but can be costly, ranging from $200–$500 depending on the boat and region. However, as seen in forum discussions, some mechanics cut corners, especially with non-running engines. DIY winterization saves money but requires time, tools, and knowledge. For non-running engines, DIY is often preferable, as owners can take extra care to address specific issues.
Table 4: DIY vs. Professional Winterization Costs
| Item | DIY Cost (USD) | Professional Cost (USD) |
|---|---|---|
| Fuel Stabilizer | 10–20 | Included |
| Fogging Oil | 8–15 | Included |
| RV Antifreeze (5 gal) | 15–30 | Included |
| Engine Oil and Filter | 30–60 | Included |
| Gear Lube | 10–20 | Included |
| Labor | 0 | 200–500 |
| Total | 73–145 | 200–500 |
Common Mistakes to Avoid
- Incomplete Draining: Missing a drain plug or water pocket can lead to cracked components.
- Skipping Fogging: Neglecting fogging increases corrosion risk, especially in humid environments.
- Improper Antifreeze Use: Diluted or poorly circulated antifreeze may fail to protect against freezing.
- Neglecting Oil Change: Acidic oil left in the engine can damage bearings.
- Trusting Inadequate Mechanics: Always verify a mechanic’s work, especially for non-running engines.
Spring Preparation Tips
When spring arrives, reverse the winterization process:
- Remove Intake Cover: Ensure the carburetor or throttle body cover is removed before starting.
- Flush Antifreeze: Run fresh water through the cooling system to remove antifreeze.
- Replace Spark Plugs: Install new plugs if old ones were fogged.
- Check Fuel System: Inspect fuel lines and filters for clogs or degradation.
- Test Battery: Reinstall and test batteries for charge and functionality.
- Inspect Drive: Reinstall the propeller and check drive oil and zincs.
Conclusion
Winterizing a boat without starting the engine is entirely feasible with the right approach. By thoroughly draining the cooling system, treating the fuel, fogging the engine manually, and applying antifreeze where needed, boat owners can protect their investment from winter’s harsh effects. While running the engine is ideal, alternative methods—backed by expert advice and real-world experiences—offer reliable protection. Whether you choose DIY or professional help, attention to detail is key to ensuring your boat is ready for the next season.
For those unsure about the process, consulting a trusted marine mechanic or referring to your owner’s manual can provide peace of mind. With proper winterization, your boat will emerge from storage ready to hit the water, free from freeze damage or corrosion.
Happy Boating!
Share Can you winterize a boat without starting the engines with your friends and leave a comment below with your thoughts.
Read Can You Use RV Antifreeze to Winterize a Boat? until we meet in the next article.