The Importance of Boat Bow Eye Installation
Learn the critical role of boat bow eye installation for safety, towing, and anchoring. Step-by-step guide, maintenance tips, and choosing the right bow eye.
Boat bow eye installation is a fundamental yet often overlooked aspect of marine safety and vessel functionality. This critical component ensures secure towing, anchoring, and lifting, safeguarding both the boat and its occupants. Whether you’re a seasoned boater or a novice, understanding the purpose, installation process, maintenance, and selection of a boat bow eye is essential for safe and enjoyable boating. This comprehensive guide explores the bow eye’s role, provides a detailed installation process, discusses maintenance, troubleshoots common issues, and offers insights into choosing the right bow eye for your vessel.
What is a Boat Bow Eye?
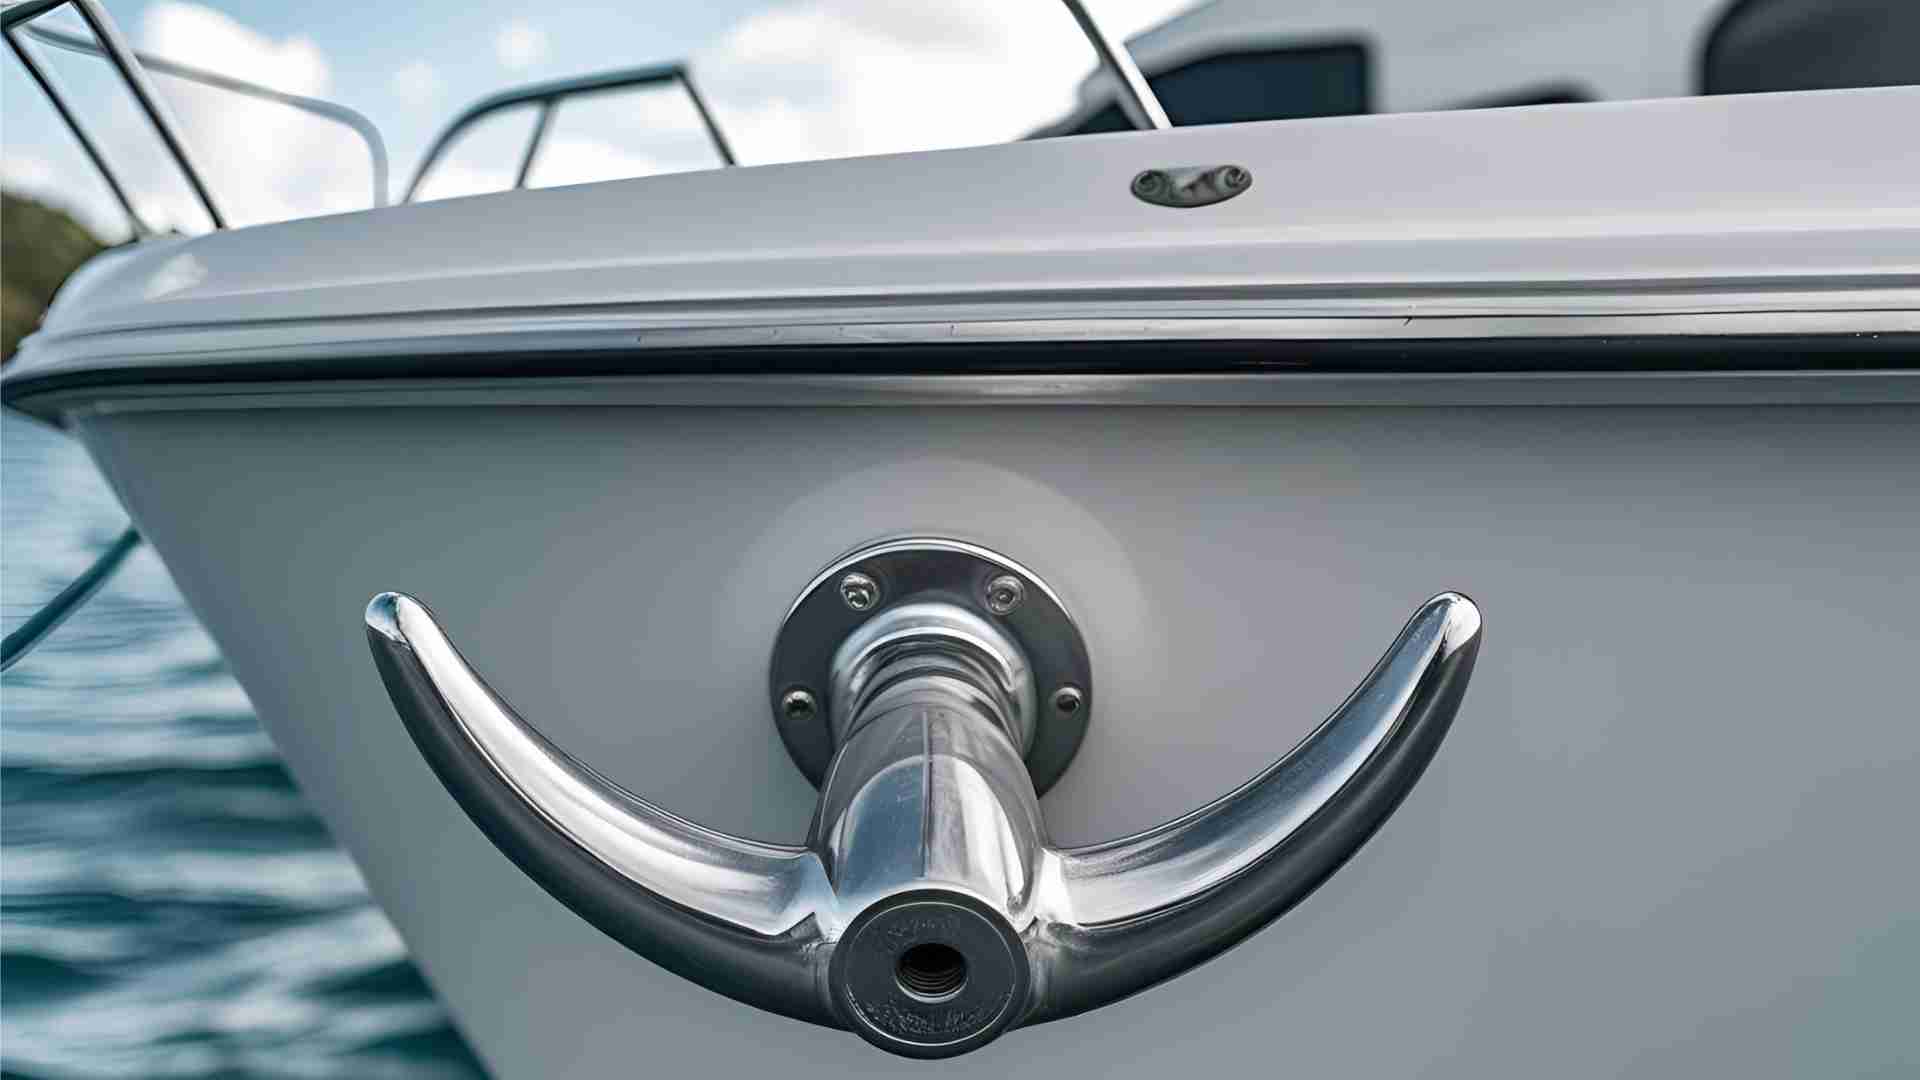
A boat bow eye is a robust fitting, typically made of stainless steel, galvanized steel, or nylon, attached to the bow (front) of a boat. It serves as a secure connection point for towing, anchoring, or lifting the vessel. The bow eye usually features a loop or ring through which ropes, chains, or cables are threaded, providing a strong and reliable attachment. Available in various sizes and materials, bow eyes are designed to suit different vessel types, from small recreational boats to large yachts.
Key Functions of a Boat Bow Eye
- Towing: Facilitates safe trailering by securing the boat to a trailer.
- Anchoring: Acts as a low attachment point for anchor snubbers, reducing rode length and swing radius.
- Lifting: Enables hoisting the boat for maintenance or storage, especially in tidal areas.
- Rescue Operations: Provides a strong point for tow lines during emergencies.
The bow eye’s material and design must withstand significant forces, making proper selection and installation critical.
The Role of a Boat Bow Eye in Marine Safety
The bow eye is a cornerstone of marine safety, contributing to the vessel’s stability and security in various scenarios.
Towing Safety
When trailering, the bow eye secures the boat to the trailer, preventing movement during transport. A properly installed bow eye ensures the boat remains stable, reducing the risk of damage or accidents on the road. For example, a loose or improperly installed bow eye can cause the boat to shift, potentially leading to collisions or trailer damage.
Anchoring Stability
In anchoring, the bow eye serves as a low attachment point for a snubber line, which absorbs shock loads and reduces strain on the anchor system. By attaching the snubber closer to the waterline, boaters can achieve the desired scope (ratio of rode length to water depth) with less chain or rope. This is particularly beneficial in crowded anchorages, where minimizing swing radius is crucial.
For instance, in a 10-foot-deep anchorage with a 5:1 scope, a boat with a bow roller 5 feet above the water requires 75 feet of rode [(10 + 5) × 5]. A bow eye at the waterline reduces this to 50 feet [(10 + 0) × 5], a 33% reduction in rode length, significantly decreasing the swing radius.
Emergency Situations
In rescue operations, the bow eye provides a reliable attachment point for tow lines, enabling swift and secure assistance. Its strength ensures it can handle the forces exerted during towing, protecting both the vessel and rescue personnel.
Preventing Hull Damage
A well-installed bow eye, backed by a substantial plate, distributes forces evenly, preventing stress cracks or hull damage. Conversely, a poorly installed bow eye can lead to gelcoat cracking or hull breaches, compromising the vessel’s integrity.
The Boat Bow Eye Installation Process
Proper installation is paramount to ensure the bow eye’s effectiveness and longevity. Below is a detailed guide to installing a bow eye, including tools, steps, and best practices.
Necessary Tools for Installation
To install a bow eye, gather the following tools and materials:
- Drill and Drill Bits: For creating pilot and final holes.
- Stainless Steel U-Bolt Bow Eye: E.g., Accon Marine 3/8-inch U-bolt ($17.54, shop.acconmarine.com).
- Backing Plate: Stainless steel or marine-grade plywood for load distribution.
- Marine-Grade Sealant: To prevent water intrusion (e.g., 3M 4200).
- Screws or Bolts: Marine-grade stainless steel, typically 1½-inch No. 10 oval-head screws.
- Wrench and Screwdriver: For tightening bolts and screws.
- Measuring Tape and Marker: For precise placement.
- Level: To ensure alignment.
- Blue Masking Tape: To protect gelcoat during drilling.
- Cleaning Rags: For removing excess sealant.
Step-by-Step Installation Guide
- Select the Location:
- Choose a structural point on the bow, ideally reinforced by a backing block or strong hull section.
- For trailering, position the bow eye 20–30 inches from the vertical break, depending on the boat’s design.
- For anchoring, place it near the waterline to minimize rode length.
- Mark the Center Point:
- Use a measuring tape to locate the centerline of the bow.
- Run a string from the vertical break to the boot stripe to ensure alignment.
- Mark the spot with a pencil or marker.
- Drill Pilot Holes:
- Apply blue masking tape over the marked area to protect the gelcoat.
- Drill a small pilot hole (e.g., 1/8-inch) to confirm alignment with the internal backing block.
- Verify the hole’s position inside the boat to ensure it aligns with the reinforcement.
- Drill Final Holes:
- Use a brad point drill bit in reverse to minimize gelcoat chipping.
- Drill through the hull, keeping the bit perpendicular to the surface.
- For U-bolt bow eyes, drill two holes spaced according to the bow eye’s specifications.
- Install the Bow Eye:
- Apply marine-grade sealant around the holes to prevent water ingress.
- Insert the U-bolt through the holes, ensuring it aligns with the backing plate inside.
- Secure the backing plate and nuts, tightening with a wrench to the manufacturer’s torque specifications.
- Check Alignment and Stability:
- Use a level to confirm the bow eye is straight.
- Test the installation by applying moderate force to ensure it’s secure.
- Wipe away excess sealant with a clean rag.
- Final Inspection:
- Verify the bow eye is firmly attached with no movement.
- Check for sealant leaks and ensure the backing plate is properly seated.
Installation Tips
- Consult Manufacturer Guidelines: Check your boat’s manual for recommended bow eye placement (e.g., Ericson 25 specifies 30 inches from the vertical break).
- Use a Backing Plate: A large stainless steel or marine-grade plywood backing plate distributes loads, reducing stress on the hull.
- Avoid Overtightening: Excessive torque can crack the gelcoat or hull.
- Professional Assistance: If unsure, consult a marine professional to ensure a robust installation.
Maintenance and Care for Your Boat Bow Eye
Regular maintenance extends the bow eye’s lifespan and ensures its reliability.
Regular Inspection
- Frequency: Inspect before each boating season and after heavy use (e.g., towing or anchoring in rough conditions).
- What to Check:
- Signs of rust, corrosion, or pitting, especially in saltwater environments.
- Loose bolts or nuts, which can compromise stability.
- Cracks or stress marks in the surrounding gelcoat or hull.
- Wear on the snubber line or attachment points.
- Action: Replace corroded components, tighten loose fittings, and repair hull damage promptly.
Cleaning and Protection
- Cleaning: Rinse the bow eye with freshwater after each use to remove salt and debris.
- Lubrication: Apply a marine-grade rust inhibitor or lubricant to metal bow eyes.
- Polishing: Use marine-grade polish or wax to protect against UV rays and corrosion.
- Snubber Line: Inspect for chafe, especially at the chain attachment point, and replace if worn.
Maintenance Schedule
| Task | Frequency | Tools/Materials Needed |
|---|---|---|
| Inspect for corrosion | Monthly/Pre-season | Visual inspection, flashlight |
| Tighten bolts/nuts | Every 3 months | Wrench, screwdriver |
| Clean with freshwater | After each use | Hose, freshwater |
| Apply rust inhibitor | Every 6 months | Marine-grade lubricant |
| Check snubber line | Before each anchoring | Visual inspection, replacement line |
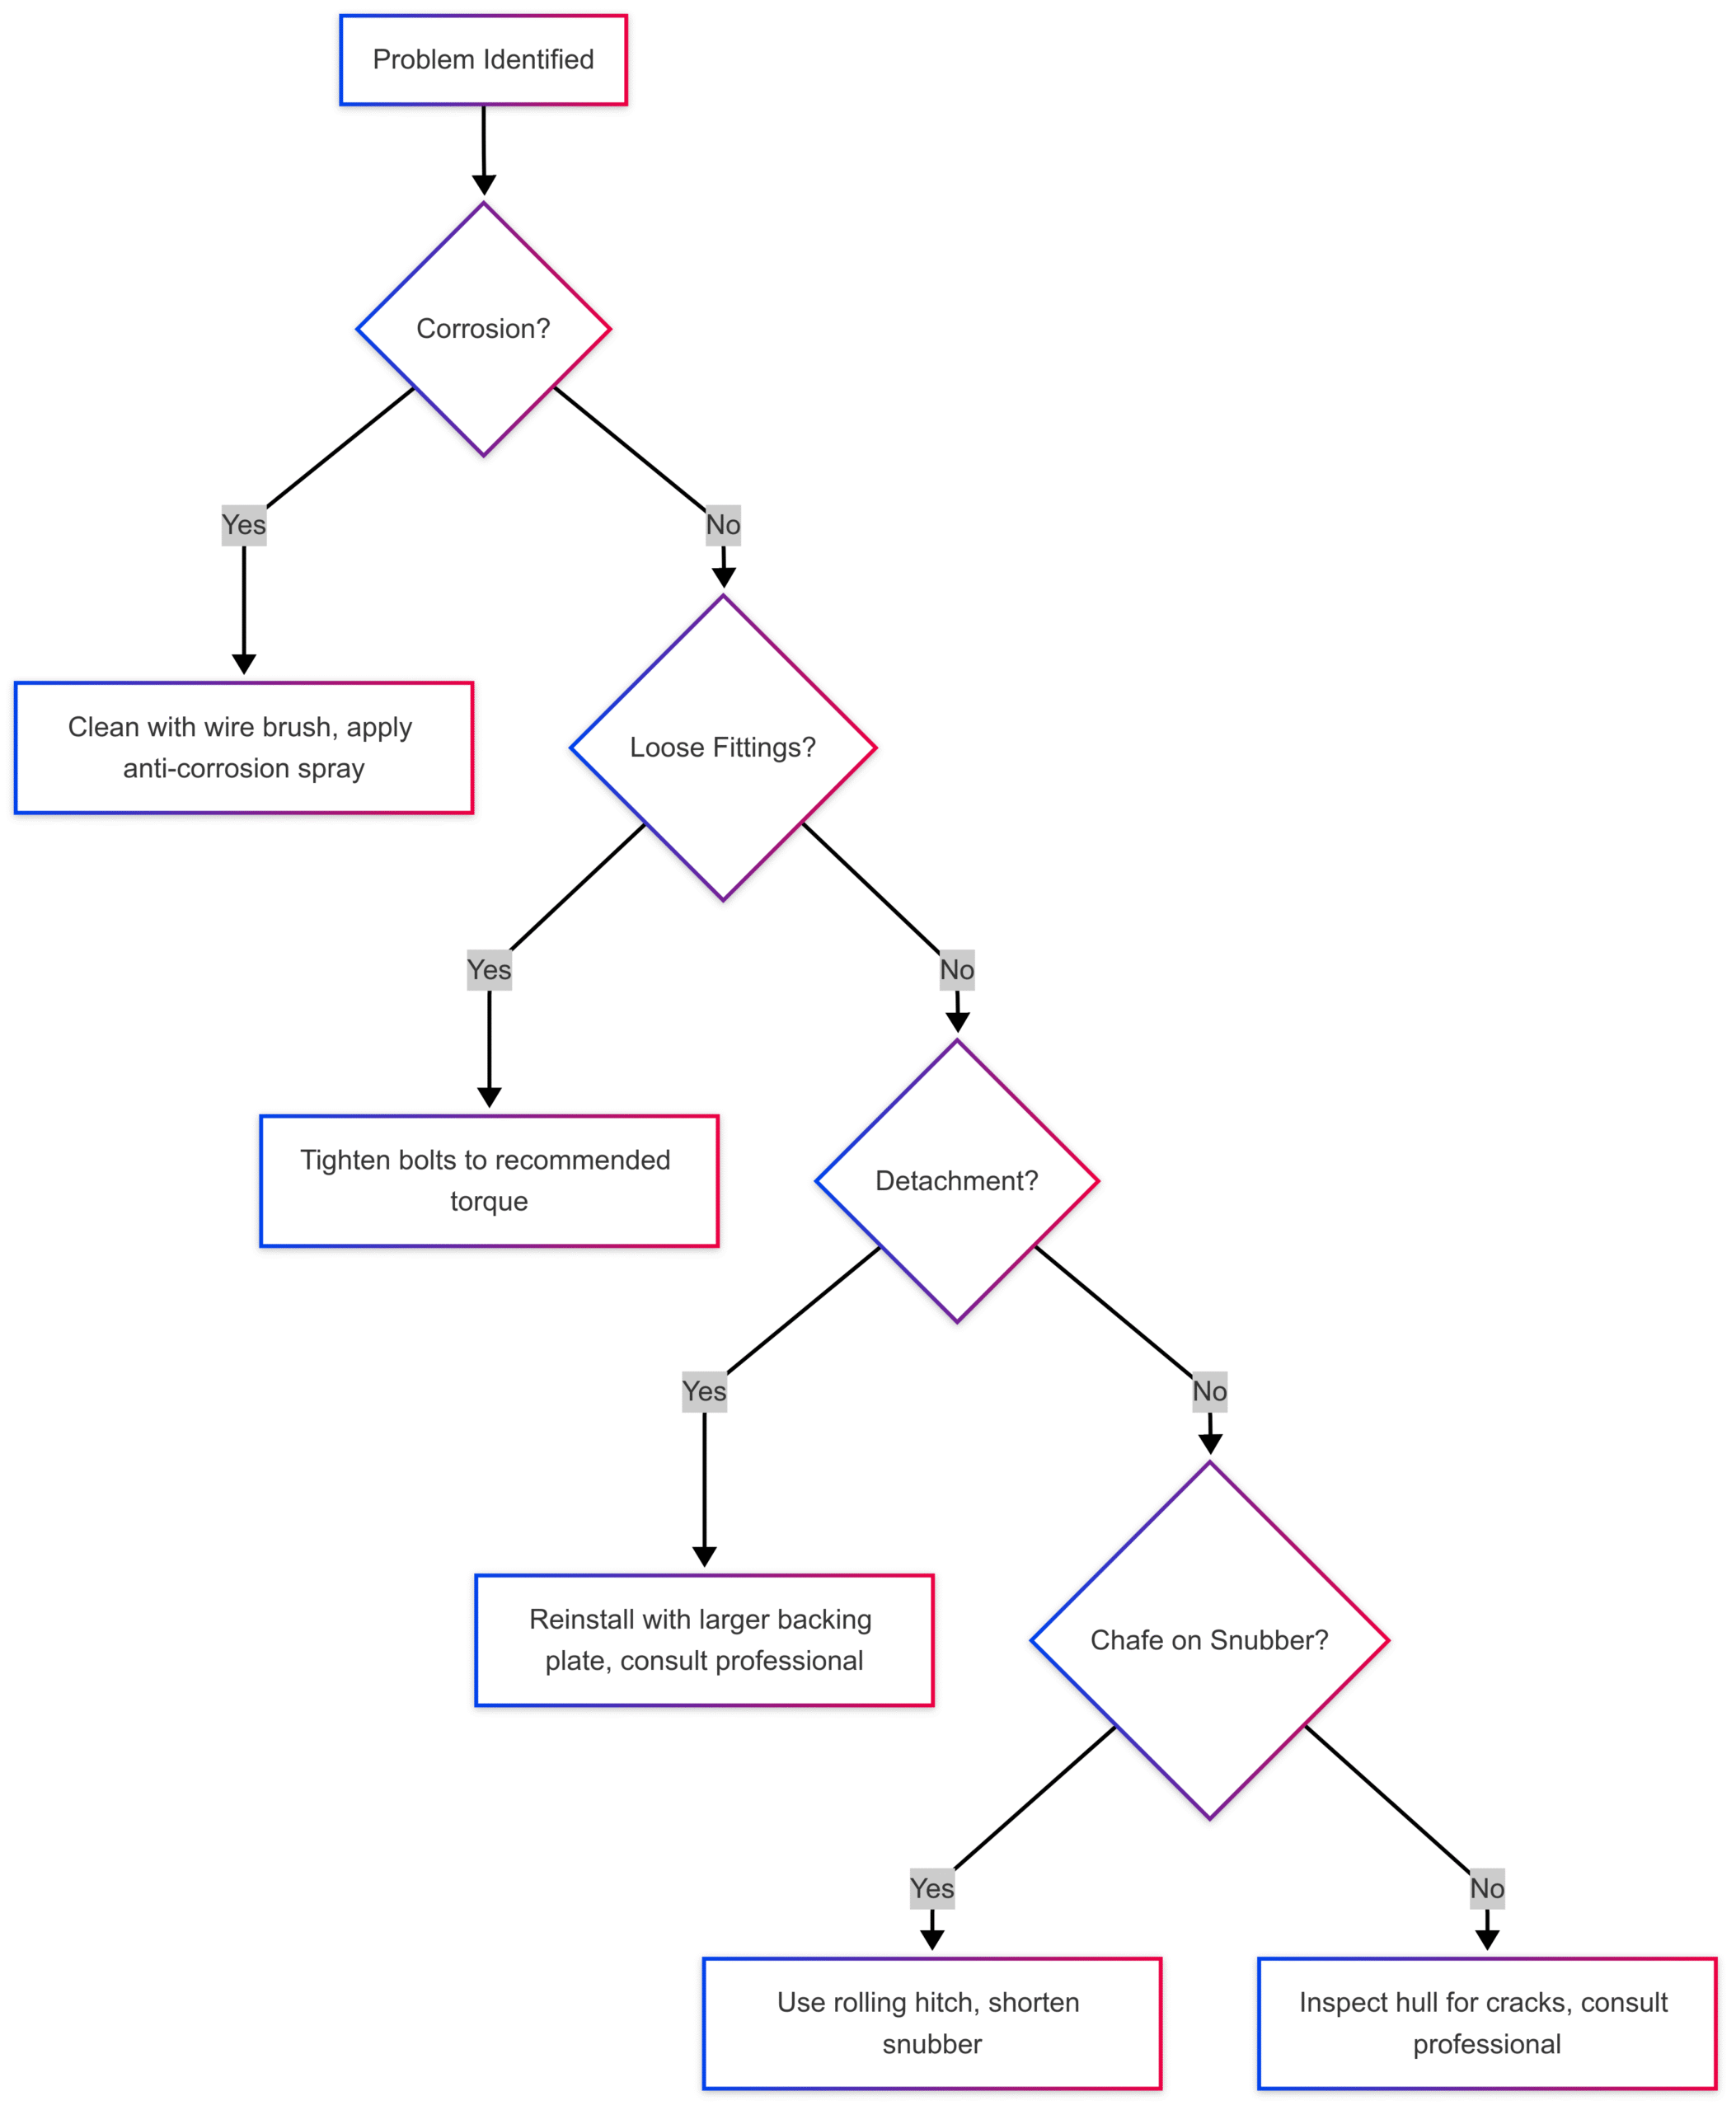
Common Issues and Troubleshooting
Despite proper installation and maintenance, bow eyes can encounter issues. Below are common problems and solutions.
Common Problems
- Corrosion:
- Cause: Prolonged exposure to saltwater or humidity.
- Signs: Rust, pitting, or discoloration on metal components.
- Solution: Clean with a wire brush, apply anti-corrosion spray, or replace with stainless steel or nylon bow eyes.
- Loose Fittings:
- Cause: Vibrations from towing or anchoring.
- Signs: Wobbling bow eye or loose nuts.
- Solution: Tighten bolts to the recommended torque. If threads are stripped, replace the hardware.
- Bow Eye Detachment:
- Cause: Inadequate backing plate or excessive force.
- Signs: Cracks in the gelcoat or hull near the bow eye.
- Solution: Reinstall with a larger backing plate and marine-grade sealant. Consult a professional for hull repairs.
- Chafe on Snubber Line:
- Cause: Friction at the chain attachment or bow eye.
- Signs: Frayed or worn line.
- Solution: Use a rolling hitch to attach the snubber to the chain, reducing chafe. Shorten the snubber to prevent bottom contact.
Troubleshooting Flowchart
Choosing the Right Boat Bow Eye
Selecting the appropriate bow eye depends on your vessel’s specifications and intended use.
Factors to Consider
- Vessel Size and Weight: Larger boats require bow eyes with higher load capacities (e.g., 4,000–4,800 lbs for yachts).
- Intended Use: Trailering, anchoring, or lifting dictates the bow eye’s placement and strength.
- Hull Material: Fiberglass, aluminum, or wood hulls require compatible hardware and backing plates.
- Environment: Saltwater environments demand corrosion-resistant materials like stainless steel or nylon.
- Load Capacity: Ensure the bow eye can handle the boat’s weight and dynamic forces (e.g., towing or storm conditions).
Types of Boat Bow Eyes
| Material | Benefits | Drawbacks | Best For | Price (USD) |
|---|---|---|---|---|
| Stainless Steel | Corrosion-resistant, high strength | Higher cost | Saltwater, heavy-duty use | $15–$50 |
| Galvanized Steel | Durable, cost-effective | Prone to rust over time | Freshwater, budget-conscious | $10–$30 |
| Nylon | Lightweight, non-corrosive, impact-resistant | Lower load capacity | Small boats, recreational use | $5–$20 |
Example Products
- Accon Marine 3/8-inch U-Bolt Bow Eye: $17.54, 4,000-lb load capacity, stainless steel.
- Accon Marine Retractable Lifting Cleat Kit: $269.80, includes sling and connecting rod, ideal for lifting.
- Sea-Dog Nylon Bow Eye: $6.99, suitable for small personal watercraft.
Selection Tips
- Match Load Capacity: Choose a bow eye rated for at least 1.5 times the boat’s weight.
- Check Compatibility: Ensure the bow eye fits the hull’s thickness and reinforcement.
- Consider Accessibility: For anchoring, place the bow eye near the waterline but accessible from the deck.
- Consult Experts: For custom installations, seek advice from marine professionals or manufacturers like Accon Marine.
Advanced Applications: Bow Eye for Anchoring
Using a bow eye for anchoring, particularly with a snubber, offers significant advantages in tight anchorages.
Benefits of a Low Bow Eye for Anchoring
- Reduced Rode Length: A waterline bow eye minimizes the vertical distance, reducing the required rode by up to 50% in shallow water.
- Smaller Swing Radius: Less rode means a tighter swing circle, ideal for crowded anchorages like those in the Bahamas or Cuttyhunk Island.
- Chafe Reduction: A spliced eye through the bow eye eliminates shackles, reducing chafe and noise.
- Shock Absorption: A nylon snubber attached to the bow eye absorbs shock loads, protecting the windlass and hull.
Example Calculation
For a boat with a 10-foot bow height anchoring in 6 feet of water:
- Without Bow Eye: Scope = (6 + 10) × 5 = 80 feet of rode.
- With Bow Eye (1 foot above water): Scope = (6 + 1) × 5 = 35 feet of rode.
- Savings: 45 feet (56% reduction), significantly reducing swing radius.
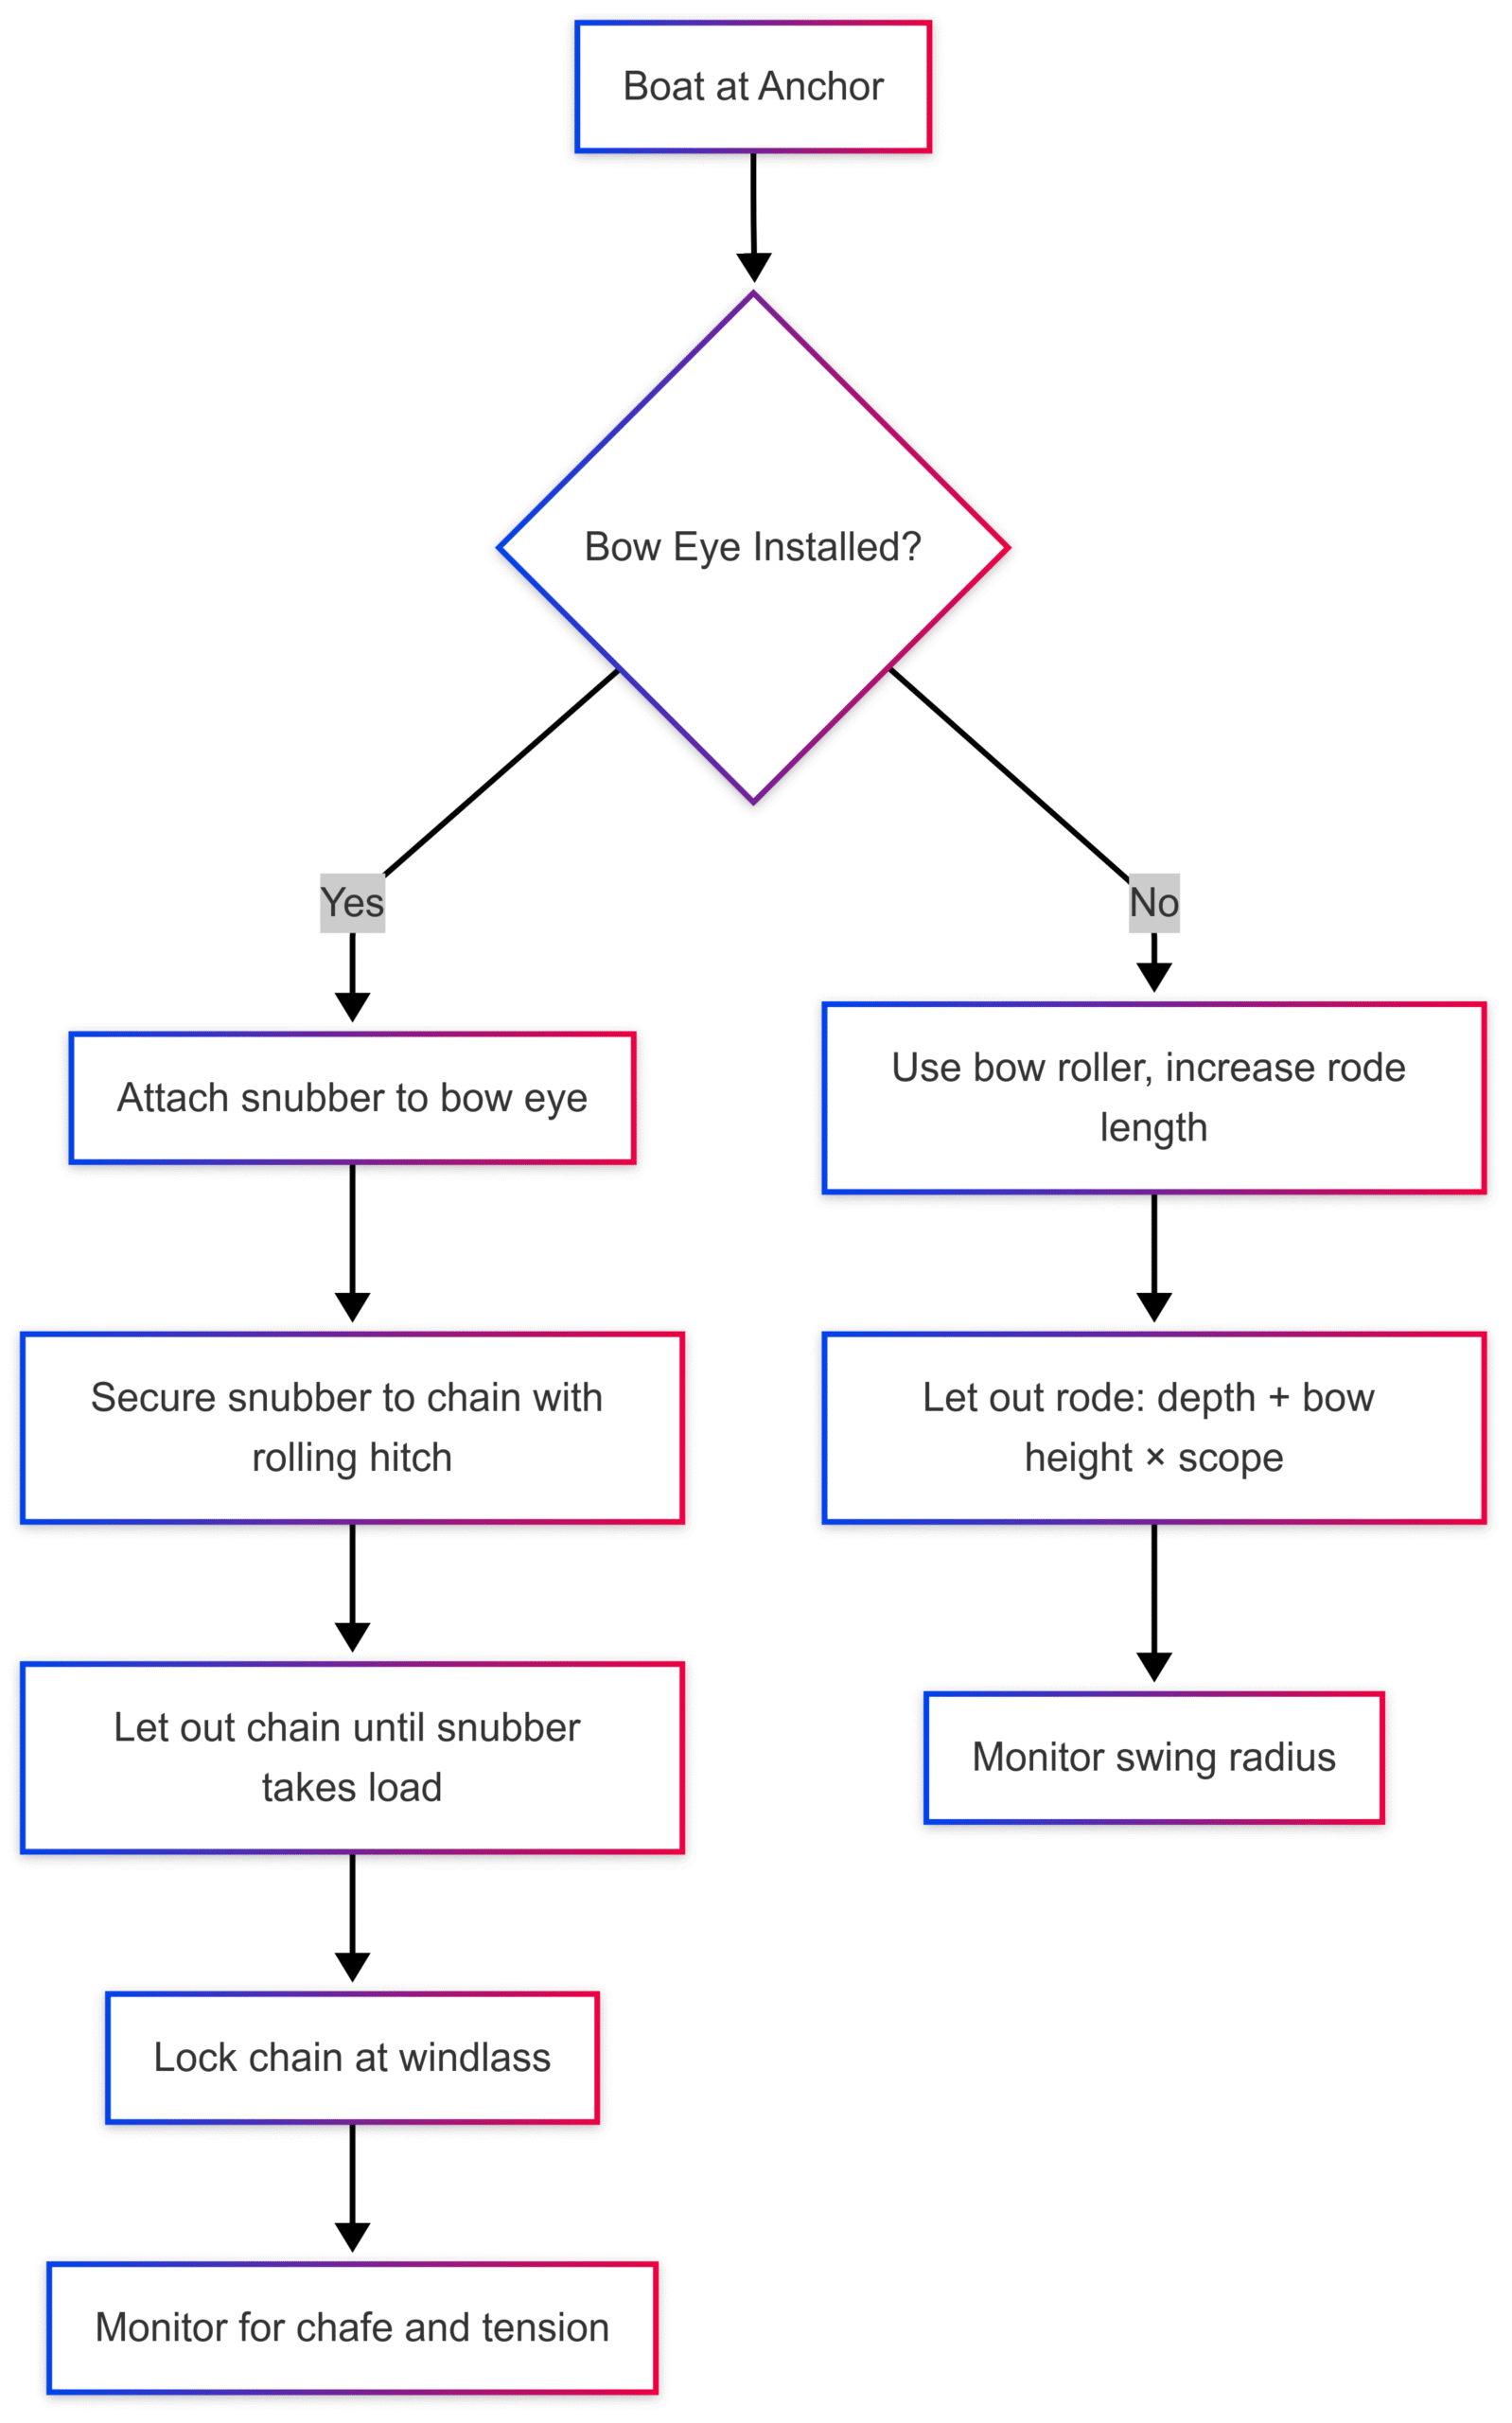
Snubber Setup
- Material: Use 3-strand or 8-plait nylon for elasticity.
- Attachment: Secure the snubber to the chain with a rolling hitch to minimize chafe.
- Length: 6–20 feet, depending on conditions (shorter for calm, longer for storms).
- Backup: Lock the chain at the windlass to prevent load transfer if the snubber breaks.
Diagram: Anchoring with Bow Eye
Real-World Insights from Boaters
Boaters on forums like Trawler Forum have mixed opinions on using bow eyes for anchoring:
- Proponents: Highlight reduced rode length and swing radius, especially for high-bow vessels (e.g., Kadey-Krogen 54). Users like Coastal Cruiser and HenryD praise the increased scope and chafe-free setup.
- Skeptics: Cite accessibility issues and the risk of snubber failure transferring load to the chain with less scope. Britannia notes that a snubber break could cause the anchor to drag.
- Practical Concerns: Xsbank and WesK argue that bow eyes are hard to reach and complicate anchoring, preferring traditional snubbers.
Despite differing views, the consensus is that a properly installed bow eye, with a robust backing plate, enhances safety and efficiency when engineered correctly.
Conclusion
Boat bow eye installation is a critical process that enhances marine safety, towing efficiency, and anchoring performance. By understanding its role, following a meticulous installation process, maintaining it regularly, and selecting the right bow eye, boaters can ensure their vessel’s safety and longevity. Whether trailering, anchoring in tight harbors, or preparing for emergencies, the bow eye is an indispensable component. Invest in quality materials, adhere to best practices, and consult professionals when needed to maximize the benefits of this essential marine fitting.
Happy Boating!
Share The Importance of Boat Bow Eye Installation with your friends and leave a comment below with your thoughts.
Read Plastic pollution in the ocean: data, facts, consequences until we meet in the next article.