Why Is 2 Stroke Outboard Not Reaching Full RPM
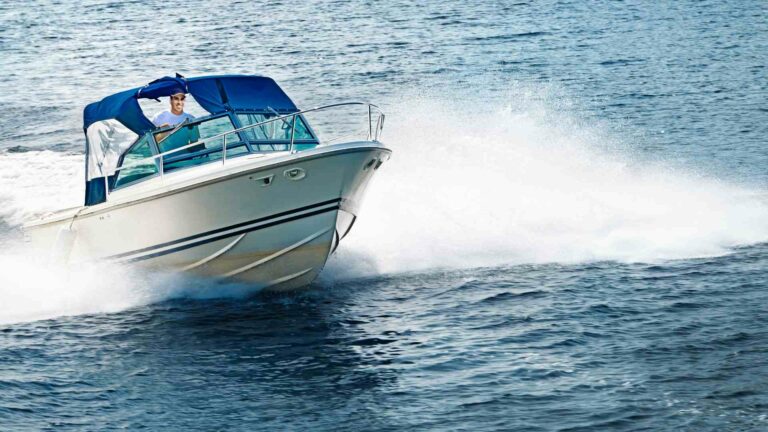
Picture this: you’re out on the water, the wind in your hair, and the sun on your face, ready for an exhilarating ride with your boat’s 2-stroke outboard engine. Yet, instead of the power and speed you anticipate, there’s a frustrating problem – the engine isn’t reaching its full RPM potential.
In the world of boating, RPM is the heartbeat of performance. It directly impacts speed, efficiency, and the overall experience. When your 2-stroke outboard engine falls short of its RPM capabilities, it’s not just an inconvenience; it can be a significant letdown.
This comprehensive guide aims to be your compass in troubleshooting and resolving the issue of a 2-stroke outboard engine that won’t reach full RPM. We’ll delve into the core reasons behind this problem, provide step-by-step diagnostic procedures, and offer solutions to help you unlock your boat’s full potential. Get ready to rediscover the thrill of the open water as we unravel the mystery of suboptimal RPM performance.
Role of RPM (Revolutions Per Minute) in the Functioning of a Boat’s Outboard Engine
Before we dive into solving the issue of a 2-stroke outboard engine not reaching full RPM, it’s paramount to grasp the significance of RPM itself.
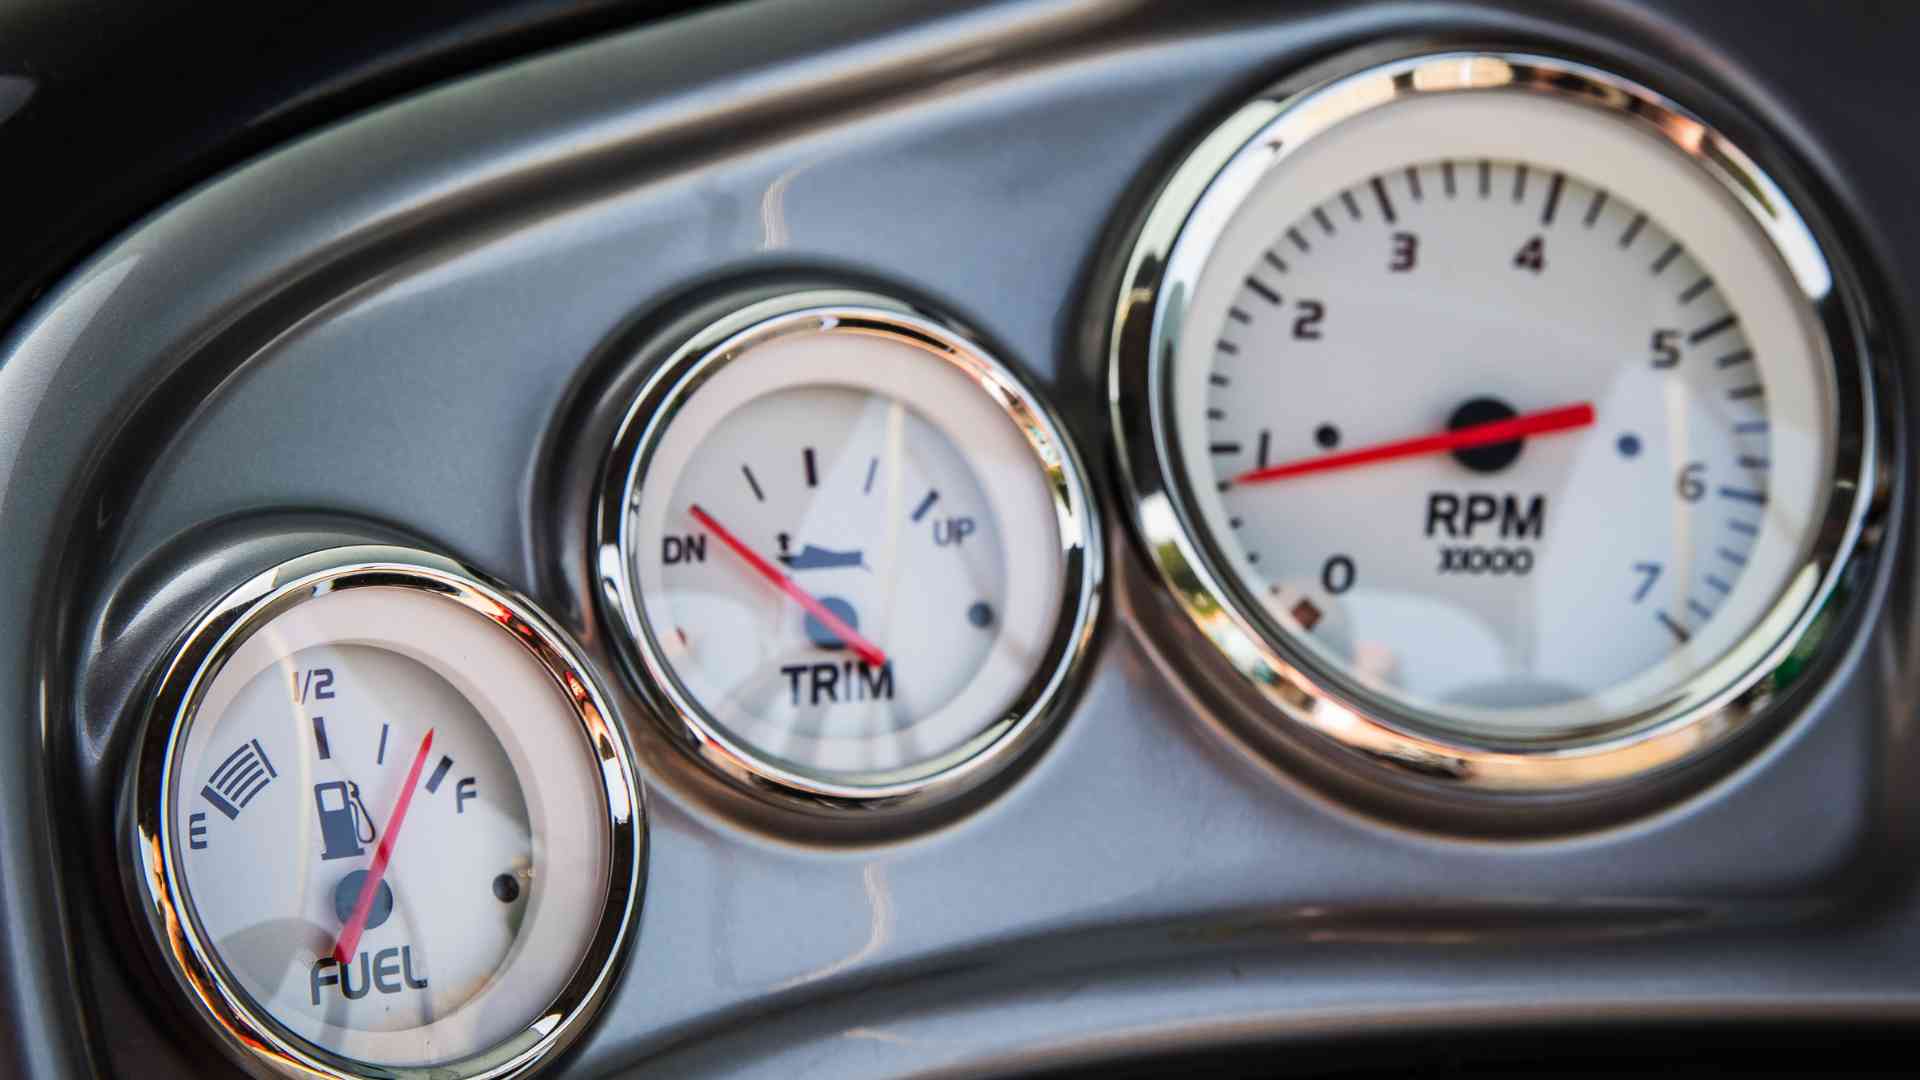
RPM, or Revolutions Per Minute, serves as the heartbeat of your boat’s outboard engine. Imagine it as the engine’s musical tempo – the faster it beats, the more power and performance it delivers. Here’s why RPM matters:
- Maximum Power: RPM directly correlates with the engine’s power output. When you achieve full RPM, you’re tapping into the engine’s maximum potential, which translates to enhanced boat acceleration and overall power.
- Speed: For speed enthusiasts, RPM is the key. Higher RPM means your boat can reach higher speeds, offering an exhilarating experience on the water.
- Fuel Efficiency: Surprisingly, achieving full RPM can also contribute to better fuel efficiency. When your engine operates efficiently at its designed RPM range, it burns fuel optimally, allowing you to cover more distance with less fuel consumption.
In essence, RPM is your gateway to a boat’s peak performance. When you encounter RPM issues, it’s not merely about speed; it’s about harnessing the full capabilities of your 2-stroke outboard engine for a smoother, more efficient, and more enjoyable boating experience.
Common Symptoms of Not Reaching Full RPM in 2-Stroke Outboard
Not reaching full RPM in your 2-stroke outboard engine manifests through various noticeable symptoms, each subtly suggesting a less-than-optimal boating experience:
- Sluggish Acceleration: Your boat may struggle to leap into action, delaying your response to throttle input. This sluggishness makes it challenging to achieve the desired speed swiftly.
- Limited Top Speed: When your outboard engine falls short of its RPM potential, you’re essentially placing a speed limit on your boat. Reaching that thrilling top speed becomes a distant dream.
- Poor Fuel Economy: An incomplete RPM climb often translates into inefficient fuel consumption. You’ll find yourself burning more fuel than necessary to achieve mediocre speeds, leading to frequent refueling stops and greater expenses.
- Unusual Engine Sounds or Vibrations: Listen carefully. Your engine might produce irregular sounds or vibrations, indicating that it’s not operating within its comfort zone. These disturbances can be disconcerting and are often linked to RPM-related issues.
These symptoms collectively contribute to an unsatisfactory boating experience. Sluggishness, speed limitations, and fuel inefficiency diminish the joys of being out on the water. To fully appreciate the potential of your 2-stroke outboard engine, addressing and resolving the issue of incomplete RPM is paramount.
Step-By-Step Guide on How to Diagnose the Issue of a 2-Stroke Outboard Not Reaching Full RPM
Diagnosing why your 2-stroke outboard isn’t hitting full RPM can be a step-by-step process. Follow these diagnostic steps systematically:
- Visual Inspection: Start with a visual inspection of your engine and its components. Look for loose connections, disconnected hoses, or obvious damage. Check the condition of the spark plugs, fuel lines, and air filter.
- Fuel System Check: Focus on the fuel system. Ensure there are no fuel leaks, and the fuel filter is clean and free of debris. Check the fuel tank for water contamination, which can hinder performance.
- Spark Plugs: Examine the spark plugs closely. Fouled or worn-out spark plugs can affect engine efficiency. Replace them if necessary and ensure the gap is set correctly.
- Air Intake: Check the air intake system for blockages or restrictions. A clogged air filter can limit airflow, leading to incomplete RPM.
- Propeller Inspection: Examine your boat’s propeller. Damage or improper sizing can impact RPM. Ensure the propeller is in good condition and the right size for your boat and engine.
- Ignition System: Inspect the ignition system, including the coils, wires, and distributor (if applicable). Faulty ignition components can hinder RPM performance.
- Compression Test: Perform a compression test on the engine cylinders. Low compression can lead to RPM issues, indicating problems with the engine’s internal components.
- Exhaust System: Check the exhaust system for blockages or restrictions. A clogged exhaust can limit engine performance.
- Fuel Mixture: Ensure the fuel mixture is correct. A lean or rich mixture can affect RPM. Refer to your engine’s manual for the appropriate fuel-to-oil ratio.
- Professional Diagnostic Tools: If the issue remains unresolved, consider using professional diagnostic tools, such as an engine analyzer, to pinpoint the problem accurately.
Remember to prioritize safety throughout the diagnostic process. Disconnect the battery and follow manufacturer guidelines and safety precautions. By methodically assessing each component, you can identify the root cause of your 2-stroke outboard’s incomplete RPM climb and take appropriate corrective actions.
Checking Fuel System in 2 Stroke Outboard
The fuel system plays a crucial role in your 2-stroke outboard engine’s performance. Follow these steps to inspect it for clogs, contamination, or air leaks:
- Visual Inspection: Start by visually inspecting the entire fuel system. Check for any obvious signs of damage, loose connections, or disconnected hoses. Ensure that all components are securely fastened.
- Fuel Tank: Examine the fuel tank for any signs of contamination or water. Water in the fuel can lead to poor engine performance. Drain any water or impurities from the tank, and consider using a fuel-water separator to prevent future issues.
- Fuel Lines: Inspect the fuel lines for cracks, leaks, or kinks. These can introduce air into the system, disrupting the fuel flow. Replace damaged fuel lines as needed, and ensure they are properly routed without sharp bends.
- Fuel Primer Bulb: Check the condition of the fuel primer bulb. It should be firm when squeezed and free from cracks or damage. A faulty primer bulb can lead to inconsistent fuel delivery.
- Fuel Filter: Locate the fuel filter and examine it for clogs or contamination. A dirty or clogged fuel filter can restrict fuel flow, affecting RPM. Replace the fuel filter regularly according to your engine manufacturer’s recommendations.
- Fuel Connections: Ensure that all fuel connections, including those at the fuel tank, filter, and carburetor (if applicable), are tight and free from air leaks. Air leaks can disrupt the fuel-air mixture, leading to performance issues.
- Fuel Quality: Use high-quality fuel with the correct octane rating and the manufacturer-recommended fuel-to-oil ratio. Poor-quality or improperly mixed fuel can impact engine performance.
- Fuel Pump: If your engine has a fuel pump, inspect it for proper operation. Test the pump’s diaphragm for leaks or damage, as a malfunctioning fuel pump can lead to inadequate fuel delivery.
- Carburetor: If your engine is equipped with a carburetor, consider having it professionally cleaned and tuned if fuel system issues persist. A poorly adjusted carburetor can affect fuel-air mixture and RPM.
- Professional Inspection: If you’re uncertain about any aspect of your fuel system inspection or suspect a complex issue, consult a qualified marine technician for a thorough assessment.
Addressing fuel system issues promptly is vital for restoring your 2-stroke outboard engine’s full RPM potential. A clean, well-maintained fuel system ensures efficient fuel delivery and, ultimately, optimal engine performance.
How to Inspect and Replace Spark Plugs
To ensure your 2-stroke outboard engine reaches its full RPM potential, regularly inspect and replace spark plugs as needed. Here’s a step-by-step guide:
- Safety First: Always turn off the engine and let it cool before attempting any work on the spark plugs to avoid burns or accidents.
- Locate the Spark Plugs: Refer to your engine’s manual to identify the location of the spark plugs. Most outboard engines have one spark plug per cylinder.
- Removal: Using a spark plug socket and ratchet, carefully remove the spark plugs one at a time. Pay attention to the plug wires and their order if they are attached.
- Inspect the Spark Plugs: Examine the spark plugs’ condition:
- Fouling: Fouled spark plugs may have a black, oily residue on the electrode. This can result from running a too-rich fuel mixture or burning oil. Clean or replace fouled spark plugs.
- Damage: Look for cracked or damaged porcelain insulators, bent or corroded electrodes, or worn-out electrode gaps. Damaged spark plugs should be replaced.
- Normal Wear: If the spark plug appears relatively clean with a light tan or grayish color on the insulator and a consistent electrode gap, it may still be in good condition.
- Cleaning: If the spark plugs show minor fouling or carbon buildup, you can attempt to clean them with a spark plug cleaner tool or a wire brush. Ensure the electrode gap remains within specifications.
- Replacement: For damaged or excessively fouled spark plugs, replace them with the manufacturer-recommended plugs. Make sure to use the correct plug type and gap.
- Gap Adjustment: If necessary, adjust the spark plug gap to the specifications outlined in your engine’s manual. Use a gapping tool for this purpose.
- Installation: Carefully thread the spark plugs by hand into the spark plug holes to avoid cross-threading. Once snug, use the spark plug socket and ratchet to tighten them securely but not overly tight.
- Reconnect Wires: If your engine has spark plug wires, reconnect them to the appropriate spark plugs. Ensure they are properly seated.
- Testing: Start the engine and check for improved RPM and smoother performance. If the issue persists, other engine components or settings may require inspection.
Regularly inspecting and replacing spark plugs as needed is a fundamental aspect of maintaining optimal engine performance and achieving full RPM potential. Well-maintained spark plugs ensure efficient combustion and reliable ignition, contributing to a smoother and more powerful boating experience.
Importance of a Properly Functioning Ignition System and How It Can Impact RPM
A well-functioning ignition system is crucial for achieving full RPM potential in your 2-stroke outboard engine. Here’s how to check and troubleshoot ignition components:
- Safety First: Before working on the ignition system, turn off the engine and allow it to cool to prevent burns or accidents.
- Inspect Spark Plug Wires: Start by examining the spark plug wires. Look for visible damage such as cracks, cuts, or worn insulation. Damaged wires can lead to misfires and reduced RPM. Replace any compromised wires with new ones of the correct length and resistance.
- Check the Coil: The ignition coil is responsible for generating the high-voltage spark that ignites the fuel-air mixture. To test it: 1. Measure the resistance of the primary and secondary windings using a multimeter. Refer to your engine’s manual for the specific resistance values, as they can vary between models. If the resistance is significantly out of spec, the coil may need replacement. 2. Inspect the coil for physical damage, such as cracks or loose connections. Replace the coil if any damage is found.
- Examine the CDI Unit (Capacitor Discharge Ignition): The CDI unit controls the timing of the spark. To test it: 1. Check for visible damage or loose connections on the CDI unit. Replace it if any issues are found. 2. Since CDI units are complex electronic components, diagnosing them may require specialized equipment. If you suspect a CDI issue and other components check out, consult a professional technician for further diagnostics.
- Inspect the Ignition Switch: A faulty ignition switch can disrupt power to the ignition system. Test the switch for continuity using a multimeter to ensure it’s functioning correctly.
- Check Grounding: Ensure that all ignition components are properly grounded. Loose or corroded ground connections can lead to electrical issues. Clean and secure grounding points as necessary.
- Testing the Ignition System: After inspecting and potentially replacing components, start the engine and monitor its performance. Check for improved RPM and smoother operation. If issues persist, further diagnostics may be required by a qualified technician.
- Routine Maintenance: Keep the ignition system well-maintained by cleaning and protecting electrical connections, using dielectric grease on plug wire connections, and replacing components as recommended by the manufacturer.
A properly functioning ignition system is vital for achieving and maintaining full RPM potential in your 2-stroke outboard engine. Regular inspection and maintenance of ignition components will help ensure a reliable and powerful boating experience on the water.
How to Inspect and Clean the Carburetor in 2 Stroke Outboard
The carburetor plays a critical role in regulating the fuel-air mixture and engine performance. Here’s how to inspect and clean it to ensure your 2-stroke outboard engine reaches its full RPM potential:
- Safety First: Before working on the carburetor, turn off the engine and allow it to cool to prevent burns or accidents. Disconnect the fuel line and ensure there are no open flames or sparks nearby.
- Access the Carburetor: Depending on your engine’s design, you may need to remove covers or components to access the carburetor. Refer to your engine’s manual for specific instructions.
- Visual Inspection: Examine the carburetor’s exterior for any signs of damage, loose connections, or corrosion. If you spot any issues, address them before proceeding.
- Remove the Carburetor: Carefully detach the carburetor from the engine, taking note of the location and orientation of all connections and linkages. You may need to disconnect the throttle cable, fuel lines, and choke linkage.
- Clean the Exterior: Use a carburetor cleaner or degreaser and a brush to clean the outside of the carburetor. Remove any dirt, grime, or residue that may impede its function.
- Inspect the Jets and Passages: The main jets and passages inside the carburetor can become clogged with debris or varnish buildup, leading to poor RPM. Use carburetor cleaner and compressed air to clean these components thoroughly. Pay special attention to the pilot jet, main jet, and idle passages.
- Check Gaskets and Seals: Inspect the gaskets and seals on the carburetor. Replace any damaged or worn gaskets to prevent air leaks, which can affect the fuel-air mixture.
- Reassemble and Reinstall: Reassemble the carburetor, ensuring all components are properly aligned and tightened. Reconnect the carburetor to the engine, reattaching the throttle cable, fuel lines, and choke linkage as needed.
- Adjustment and Tuning: Once the carburetor is back in place, start the engine and let it warm up. Fine-tune the carburetor adjustments for optimal RPM and performance. This may involve adjusting the idle speed, air-fuel mixture, and throttle linkage.
- Routine Maintenance: To maintain consistent RPM and engine performance, consider adding a fuel stabilizer to your gasoline if the boat will be sitting idle for extended periods. Regularly inspect and clean the carburetor as part of your maintenance routine.
A well-maintained carburetor ensures the proper fuel-air mixture, which is essential for achieving full RPM and optimal engine performance. Regular inspection and cleaning will help keep your 2-stroke outboard engine running smoothly on the water.
How the Choice of Propeller and Gear Ratio Can Affect RPM and Overall Performance.

The choice of propeller and gear ratio can significantly impact the RPM and overall performance of your 2-stroke outboard engine. Here’s how to make informed decisions for achieving optimal RPM:
Propeller Selection:
- Pitch and Diameter: Propellers come in various pitches and diameters. The pitch determines how far the propeller will move forward in one revolution. Higher pitch propellers offer more top-end speed but may lower RPM. Lower pitch propellers provide better acceleration but may increase RPM. Choose a pitch that aligns with your desired RPM and boat usage.
- Material: Propellers are made from materials like aluminum and stainless steel. Stainless steel props are durable and provide better performance, but they may be heavier. Consider your RPM requirements alongside weight considerations.
- Number of Blades: Propellers can have three or four blades. Three-blade props often provide higher RPM and speed, while four-blade props offer better low-end acceleration. The number of blades should match your boating style and desired RPM range.
Gear Ratio Selection:
- Lower Gear Ratios: Lower gear ratios (e.g., 1.75:1) provide higher RPM but may reduce top-end speed. These ratios are suitable for smaller boats or those looking for quick acceleration.
- Higher Gear Ratios: Higher gear ratios (e.g., 2.0:1) can increase top-end speed but may lower RPM. These ratios are ideal for larger boats or when top speed is a priority.
Considerations for Optimal RPM:
- Boat Load: The weight and load of your boat can affect RPM. Heavier loads may require lower gear ratios or different propeller pitches to maintain optimal RPM.
- Boat Usage: Determine your primary boating activities. Watersports, cruising, and fishing may have different RPM requirements. Choose components that align with your intended usage.
- Testing and Adjusting: After selecting a propeller and gear ratio, monitor your engine’s RPM while boating. You may need to fine-tune your choices to achieve the desired RPM range.
Remember that achieving the right RPM is a balance between factors like pitch, diameter, gear ratio, boat load, and intended usage. It’s essential to test and adjust these components as needed to achieve optimal engine performance and RPM for your specific boating needs.
Seek Professional Help If They Are Unable to Diagnose or Resolve the Issue Themselves
If you’ve gone through the troubleshooting steps and are still unable to diagnose or resolve the issue of your 2-stroke outboard engine not reaching full RPM, it’s advisable to seek professional assistance. Qualified marine technicians or boat mechanics have the expertise and tools needed to pinpoint and rectify complex engine problems. Here’s how to find a reliable professional:
- Ask for Recommendations: Seek recommendations from fellow boaters, friends, or local boat clubs. Personal referrals can lead you to experienced and trustworthy technicians.
- Check Certifications: Look for technicians who are certified by recognized organizations or have received training from reputable institutions. Certifications demonstrate their knowledge and commitment to quality service.
- Online Research: Utilize online resources and directories to find marine technicians or repair shops in your area. Websites and reviews can provide insights into their reputation and customer satisfaction.
- Contact Local Dealerships: Reach out to local boat dealerships or marinas. They often have service centers or can recommend qualified technicians who specialize in your engine brand.
- Interview Potential Technicians: When you identify a potential technician or service center, don’t hesitate to ask questions about their experience, certifications, and the types of engines they typically work on. Discuss your specific RPM issue to ensure they can address it effectively.
- Request Estimates: Before committing to service, obtain written estimates for the diagnosis and repair. This helps you understand the costs involved and prevents unexpected expenses.
- Visit the Facility: If possible, visit the technician’s workshop or service center. A well-organized and clean facility often reflects professionalism and attention to detail.
- Check for Warranties: If your boat or engine is under warranty, inquire whether the issue is covered. Some repairs may be eligible for warranty service at authorized repair centers.
Remember that seeking professional assistance is a proactive step to ensure the safety and longevity of your boat’s engine. Experienced technicians can quickly identify and resolve issues, allowing you to enjoy your boating experiences to the fullest.
Watch My boat lost wide open throttle | Video
Top 5 FAQs and answers related to 2 stroke outboard not reaching full rpm
Why is my 2-stroke outboard not reaching its full RPM?
Can a clogged fuel filter affect RPM performance?
How often should I change spark plugs in my 2-stroke outboard?
Can propeller choice really impact RPM?
What should I do if I’ve checked all components, but my outboard still won’t reach full RPM?
Conclusion

In conclusion, the ability to reach full RPM is paramount for the optimal performance and efficiency of a 2-stroke outboard engine. This article has shed light on the importance of this aspect and provided a comprehensive guide to diagnose and resolve issues when your outboard isn’t reaching its full potential.
We’ve explored common symptoms that signify a problem, such as sluggish acceleration, limited top speed, and poor fuel economy. Additionally, we delved into diagnostic steps covering the fuel system, spark plugs, ignition components, and carburetor. We also discussed the impact of propellers and gear ratios on RPM performance.
Regular maintenance and inspections are key to preventing such issues. Ensuring your fuel system is clean, spark plugs are in good condition, and ignition components are working correctly will contribute to consistent RPM performance.
Remember, if you can’t resolve the problem on your own, seeking professional assistance from a qualified marine technician is a wise choice. Maintaining your outboard engine at its full RPM potential guarantees a safer, more enjoyable, and efficient boating experience on the water.
Share Why Is 2 Stroke Outboard Not Reaching Full RPM with your friends and Leave a comment below with your thoughts.
Read 7 Symptoms to Detect a Bad Primer Solenoid until we meet in the next article.